You want holy water that hurts only the undead. Test enemies one by one — skeleton, zombie, ghoul — and every new enemy means editing the holy water's conditions too.
Gameplay Tags let you attach a label saying "this enemy is one of the undead". The holy water just checks the Enemy.Undead classification. Add another enemy of the same classification later and the holy water needs no new checks.
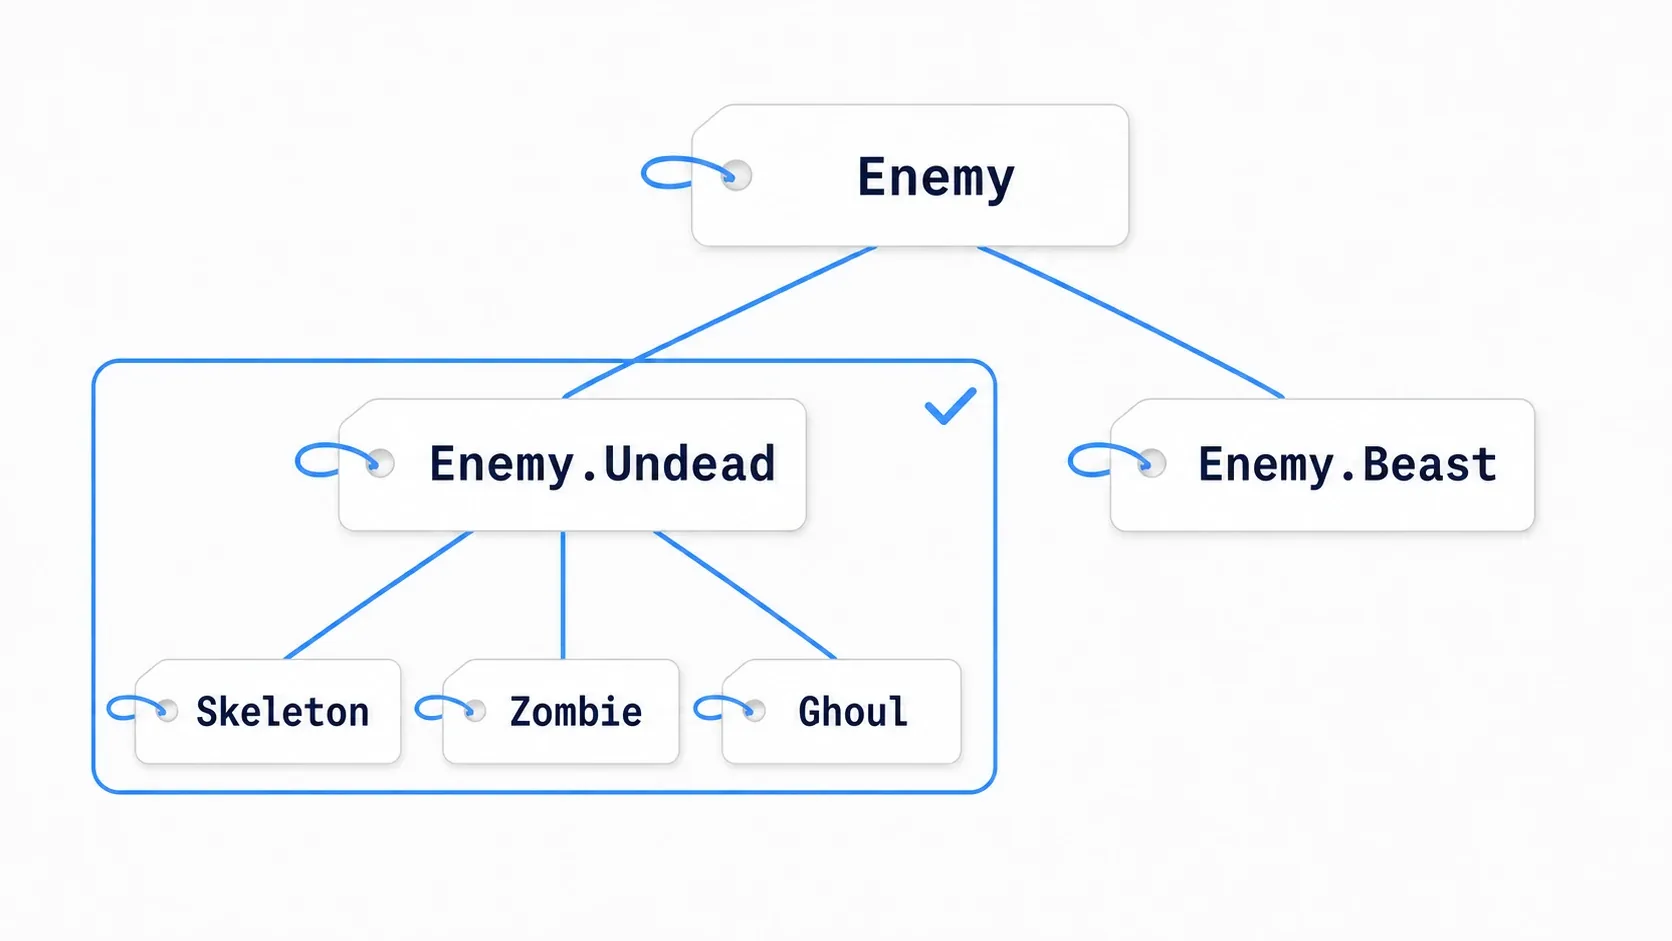
What You'll Learn
- Using a tag hierarchy to test a whole group at once
- The difference between the tag dictionary and the tags an enemy actually has
- Has Tag's "Exact Match", and choosing between Any and All
- An experiment where undead end at HP 0 and a wolf ends at HP 80
You can do this article entirely in Blueprint. If you can create variables and connect nodes, you can follow along. No C++ or Gameplay Ability System (GAS) required.
- Test the classification instead of listing types
- A Gameplay Tag is a label with a hierarchy
- Register tags in the dictionary and use them in variables
- Has Tag, Any, All, and Matches Tag
- Hands-On prep: line up three kinds of enemy
- Build the logic that drains and displays enemy HP
- Have the holy water inspect enemy tags
- Use it with the H key and check the result
- Try a new enemy and a different affinity
- Bonus: Good to Know Up Front
- Summary
Test the classification instead of listing types
Writing "if Skeleton then bonus, if Zombie then bonus" per enemy type scatters the same classification decision across holy water, spells, and everything else. The problem is not only that there are many enemy types, but that you re-list the same group every time .
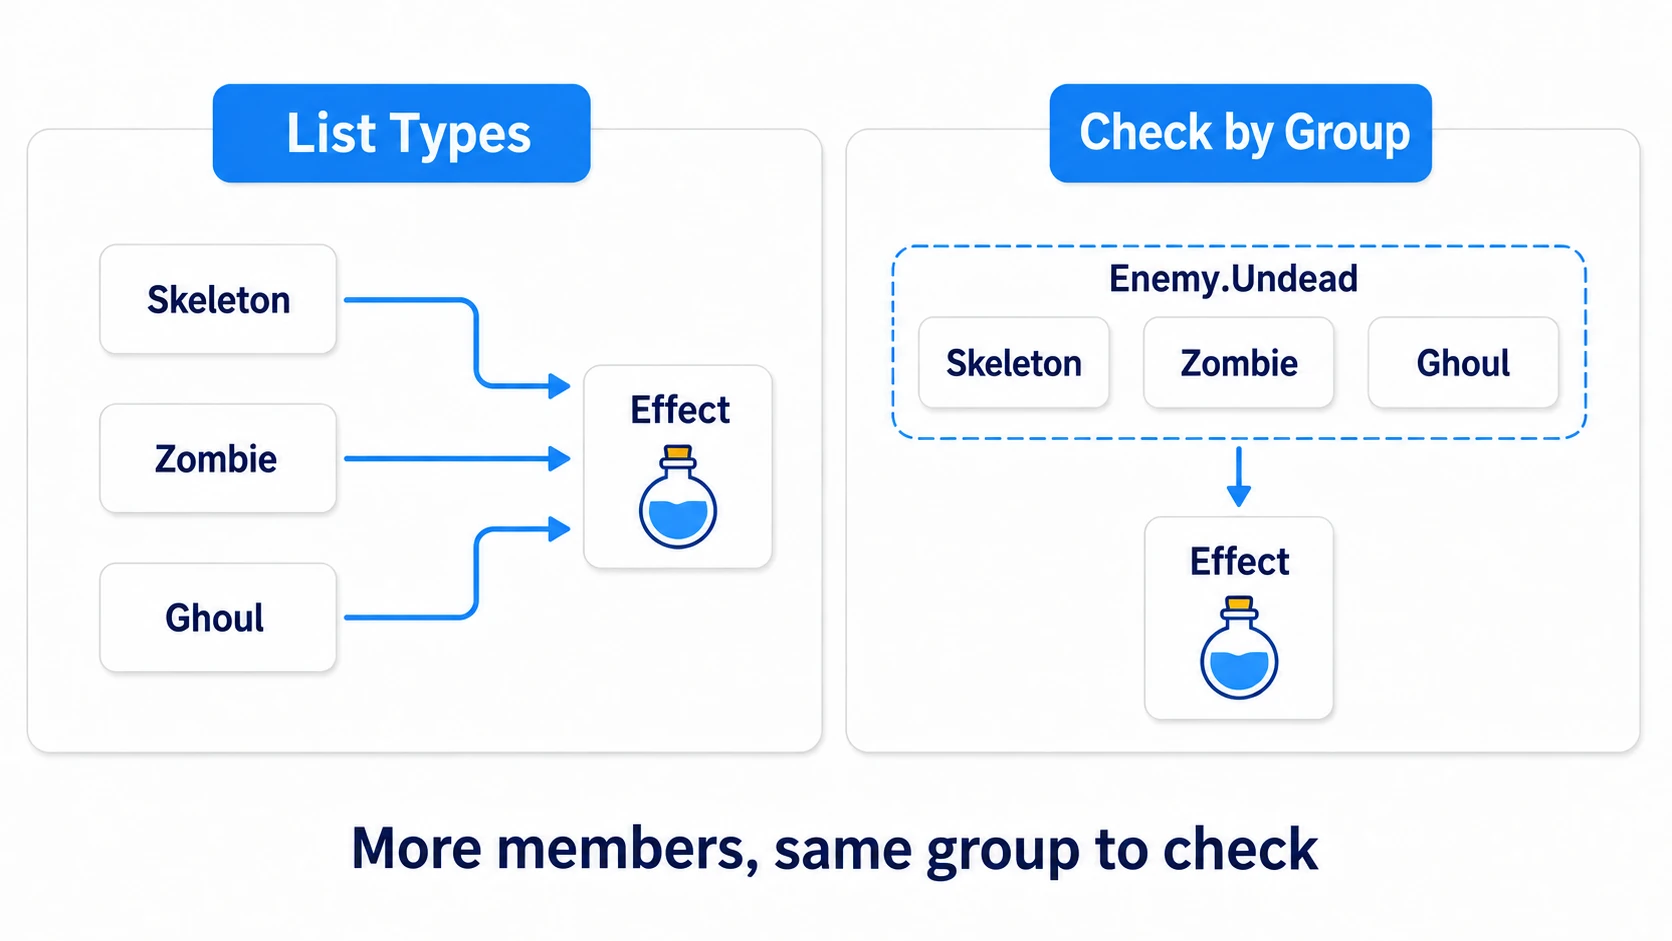
With Gameplay Tags the enemy carries its classification and the user side asks for the classification it needs. Adding "an enemy that counts as undead" becomes mostly a matter of enemy setup.
An Enum is a type for choosing one option from a prepared list. You can also add a separate "species" field with an Enum, or gather the classification into one function. It is not that Enums cannot classify.
| What you want to express | Example choice |
|---|---|
| Currently one of idle, chase, or attack | Choose the current state with an Enum |
| This enemy is undead and also poisoned | Hold multiple traits with a Gameplay Tag Container |
| You only need to remember on or off | A bool is sometimes enough |
Designs that narrow to one state are covered in Enum and Switch state machines. Before switching to tags, ask "are these traits something held at the same time?" and the roles separate cleanly.
A Gameplay Tag is a label with a hierarchy
Tags use . (a dot) to go from broad classification to fine.
Enemy.Undead.Skeleton means "Skeleton" inside "Undead" inside "Enemy". The left is the broad classification, and it gets more specific toward the right.
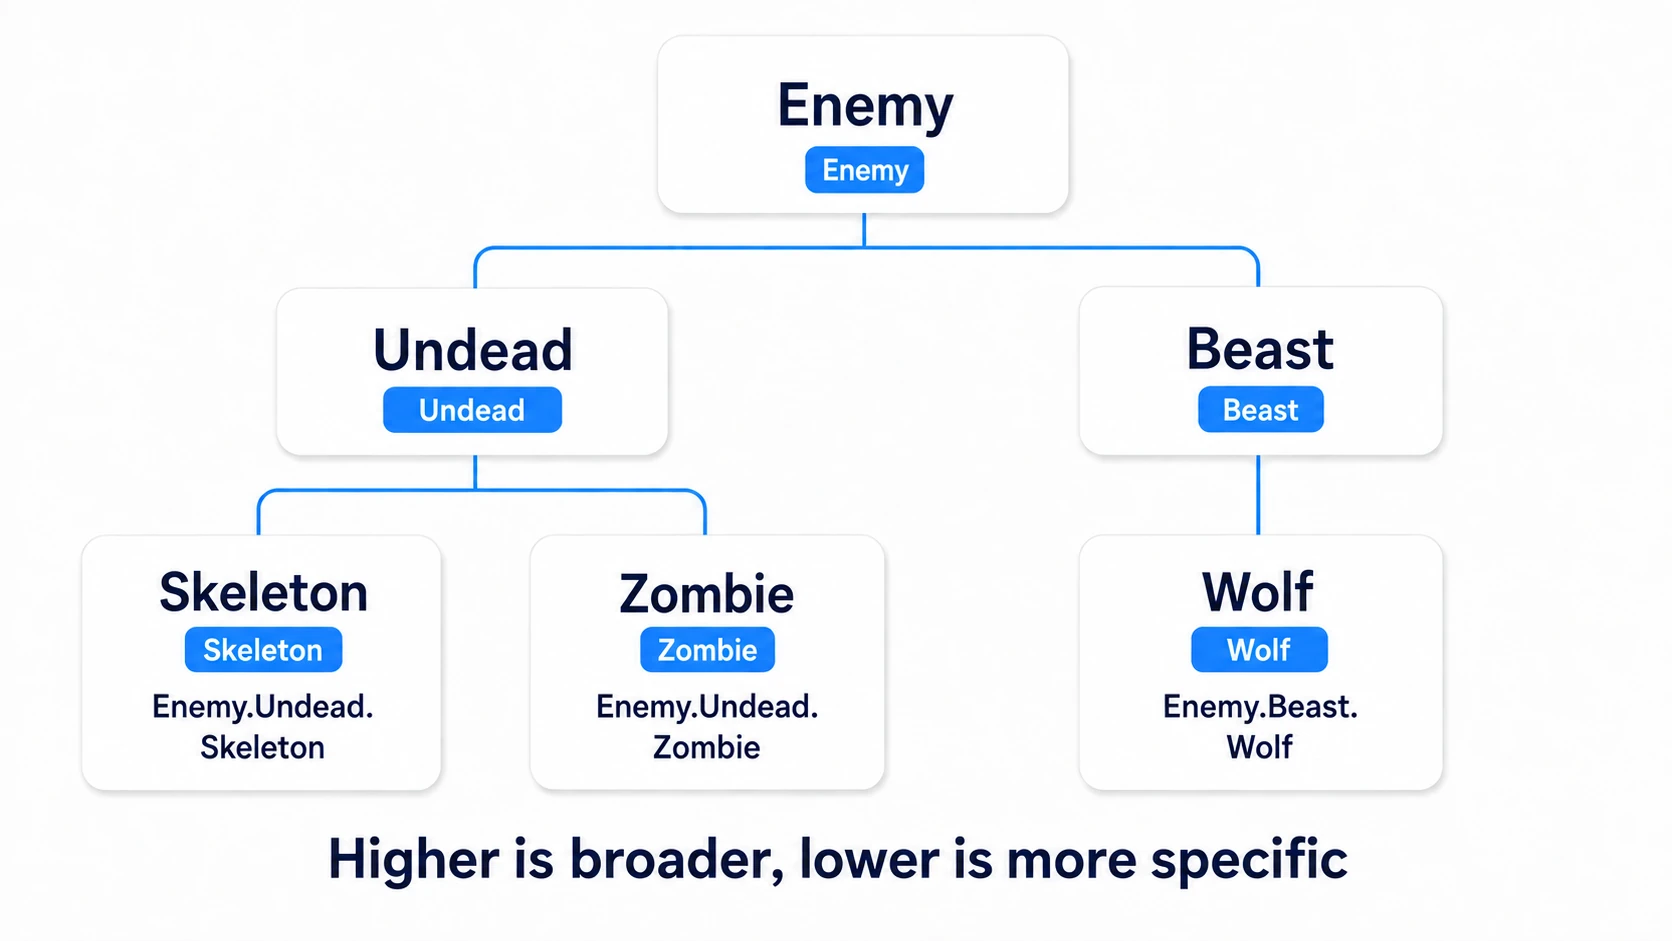
Testing with a parent classification also matches its child tags. Give a skeleton Enemy.Undead.Skeleton and it is found by Enemy.Undead and by the broader Enemy too.
The reverse does not hold. Knowing only Enemy.Undead cannot decide whether the target is a skeleton or a zombie.
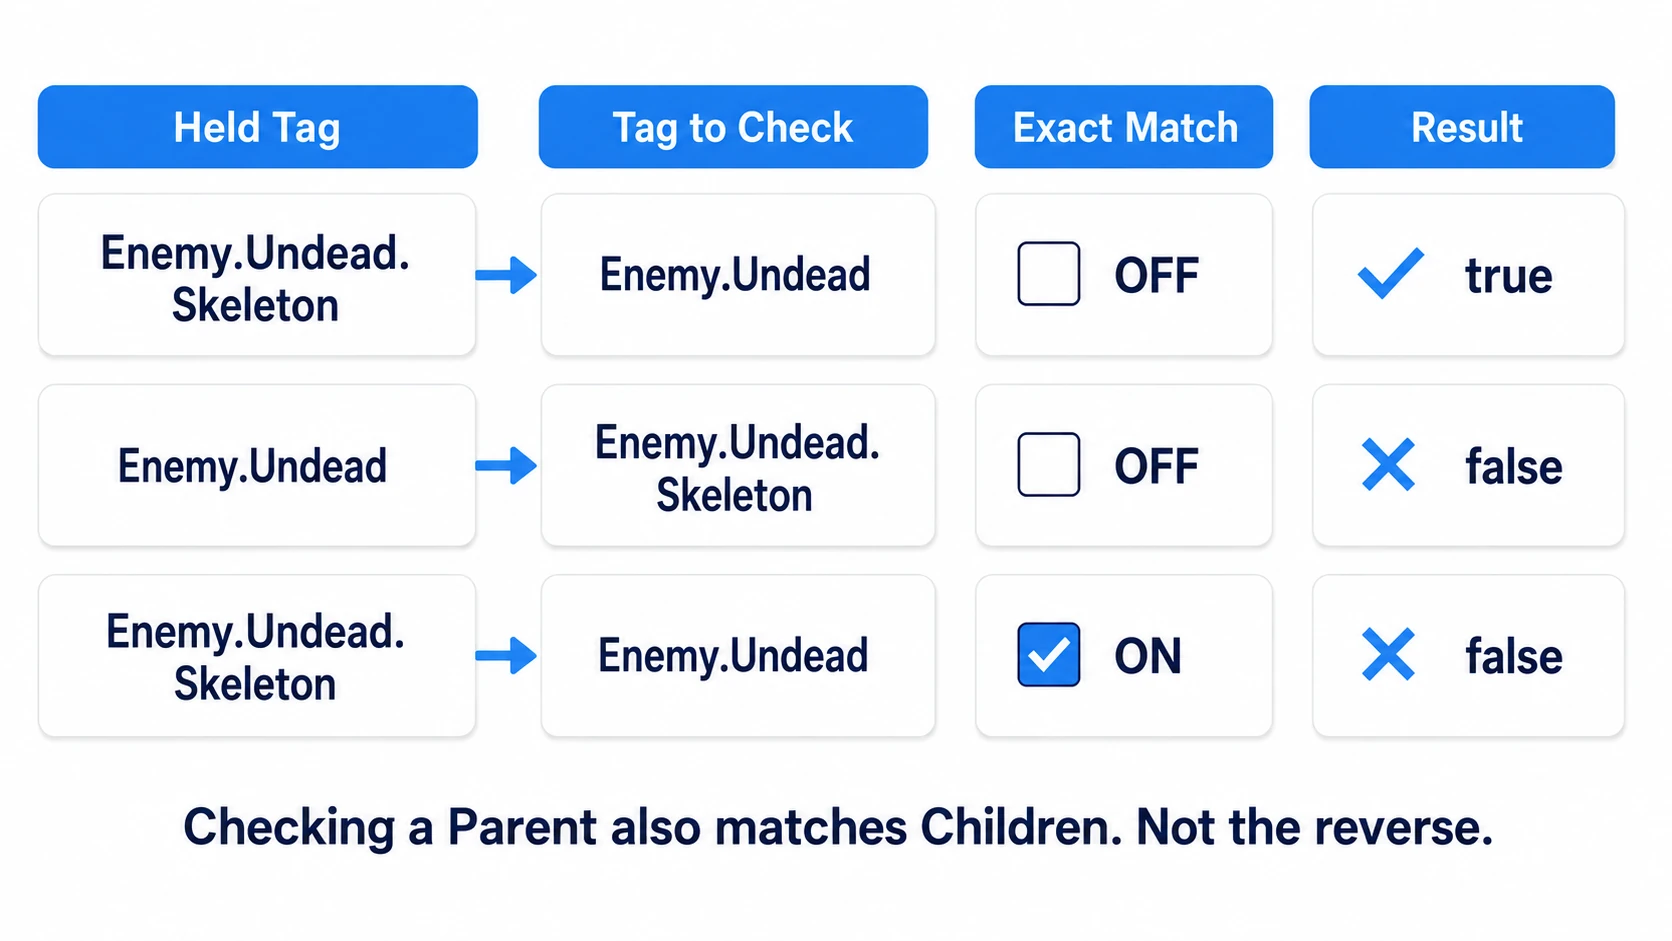
In Blueprint's Has Tag , turning Exact Match off tests including parent tags, and turning it on tests only whether it has that exact tag. A match returns true and a mismatch false. Our holy water affects undead in general, so we leave it off.
Note that putting dots in a Name type used for identification does not add this parent-child matching. Gameplay Tags provide the dictionary and hierarchy-based testing.
Register tags in the dictionary and use them in variables
Preparing tags splits into registering the tags you can use and actually attaching them to enemies . Registering a skeleton tag in the dictionary does not put that tag on a placed enemy.
Register in Project Settings
- Open "Edit → Project Settings" and go to "Project" → "GameplayTags".
- Enable "Import Tags From Config".
- Open "Manage Gameplay Tags" in "Gameplay Tag List" and press the "+" to add.
- Enter
Enemy.Undead.Skeletonfor Name and a purpose in Comment. ChooseDefaultGameplayTags.inifor Source and confirm with "Add New Tag". - Register
Enemy.Undead.ZombieandEnemy.Beast.Wolfthe same way.
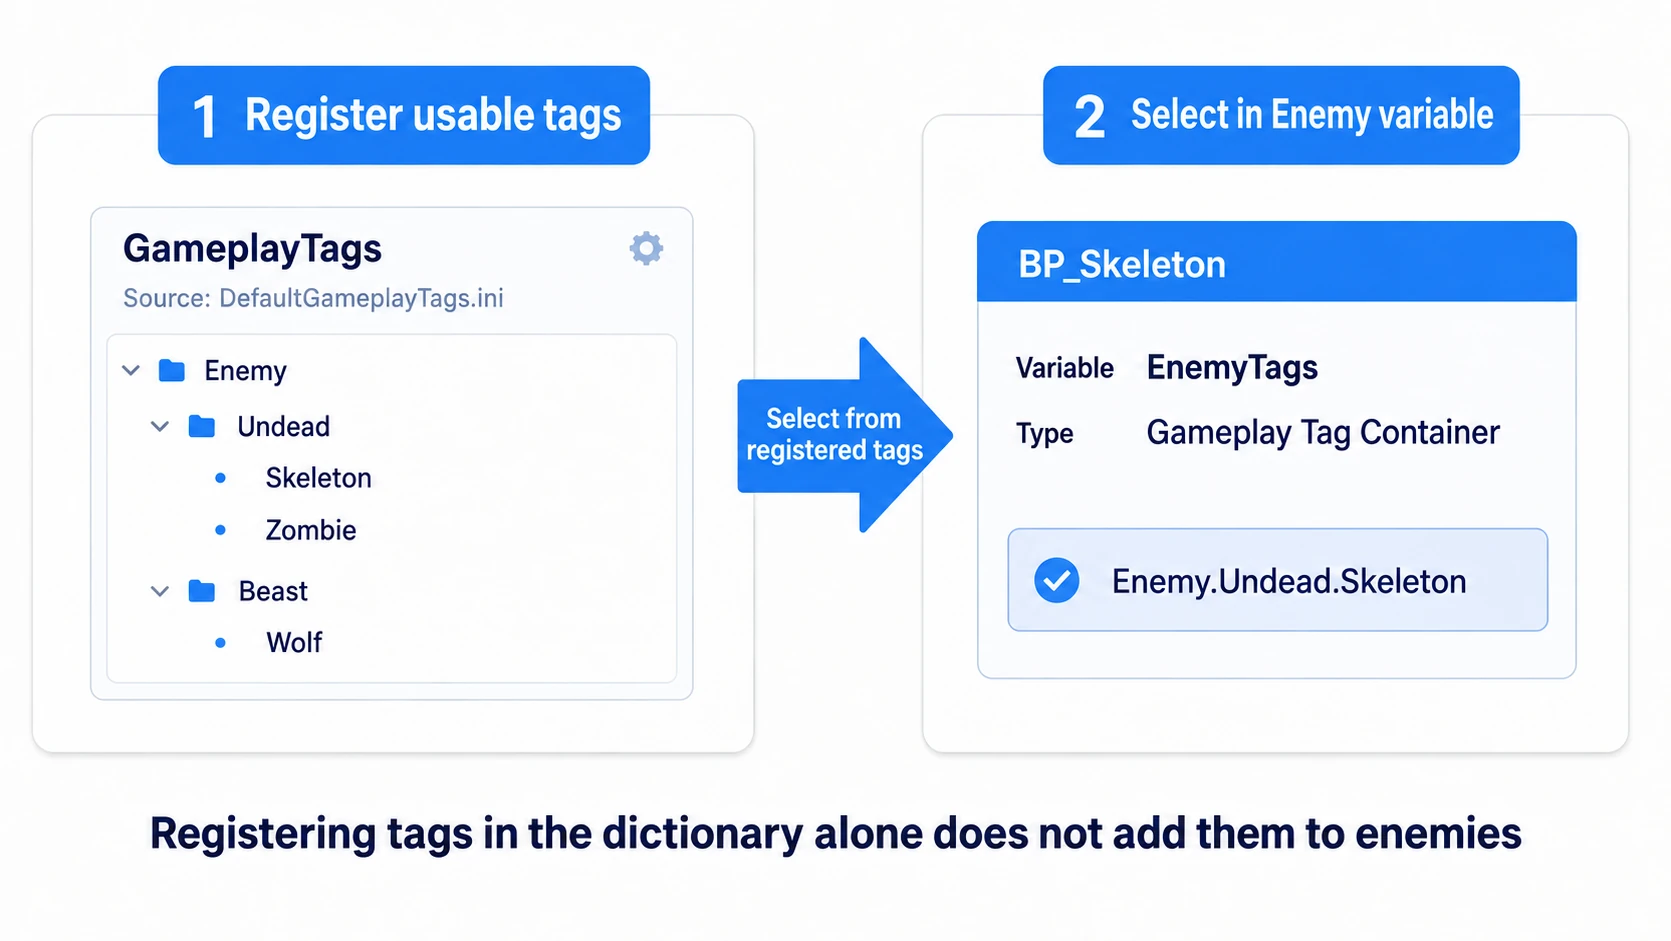
Typing the full long name up front also creates the intermediate levels Enemy and Enemy.Undead. Expand the tree and confirm the three leaf tags sit in their places.
One tag versus a set of tags
Blueprint variables use these types.
| Type | What it holds | Our use |
|---|---|---|
| Gameplay Tag | One tag | The Enemy.Undead the holy water tests |
| Gameplay Tag Container | A set of multiple tags | Enemy classification and status |
A Container is a container for holding tags together. One enemy can carry Enemy.Undead.Skeleton and Status.Debuff.Poison at the same time. This is different from making a Gameplay Tag variable an array; choose the "Gameplay Tag Container" type.
It is also different from the "Tags" already present in an Actor's Details. Those are Name-type Actor Tags, tested with "Actor Has Tag". This article passes our own EnemyTags variable to Has Tag .
Source decides where it is saved
We register into Config/DefaultGameplayTags.ini . A list like this is saved.
[/Script/GameplayTags.GameplayTagsSettings]
+GameplayTagList=(Tag="Enemy.Undead.Skeleton",DevComment="Skeleton")
+GameplayTagList=(Tag="Enemy.Undead.Zombie",DevComment="Zombie")
+GameplayTagList=(Tag="Enemy.Beast.Wolf",DevComment="Wolf")
To split by feature, add a Source in the GameplayTags settings and register into a separate file under Config/Tags . If you edit the ini directly, restart the editor so it reloads. Registering from the settings screen is enough to start.
Has Tag, Any, All, and Matches Tag
Consider an enemy holding Enemy.Undead.Skeleton and Status.Debuff.Poison . All of the following assume Exact Match is off .
| Node | The question | Result |
|---|---|---|
| Has Tag | Does it have Enemy.Undead? | true |
| Has Tag | Does it have Enemy.Beast? | false |
| Has Any Tags | Does it have either Enemy.Undead or Enemy.Beast? | true |
| Has All Tags | Does it have both Enemy.Undead and Status.Debuff? | true |
| Has All Tags | Does it have both Enemy.Undead and Immune.Fire? | false |
Any means "one of", All means "every one of". With Has Any Tags and Has All Tags, the thing being tested goes to Tag Container and the condition set goes to Other Container.
To compare one tag against another, use Matches Tag . Pass the target's tag to Tag One and the classification you are testing to Tag Two. Tag One=Enemy.Undead.Skeleton with Tag Two=Enemy.Undead is true, but reversing them is false.
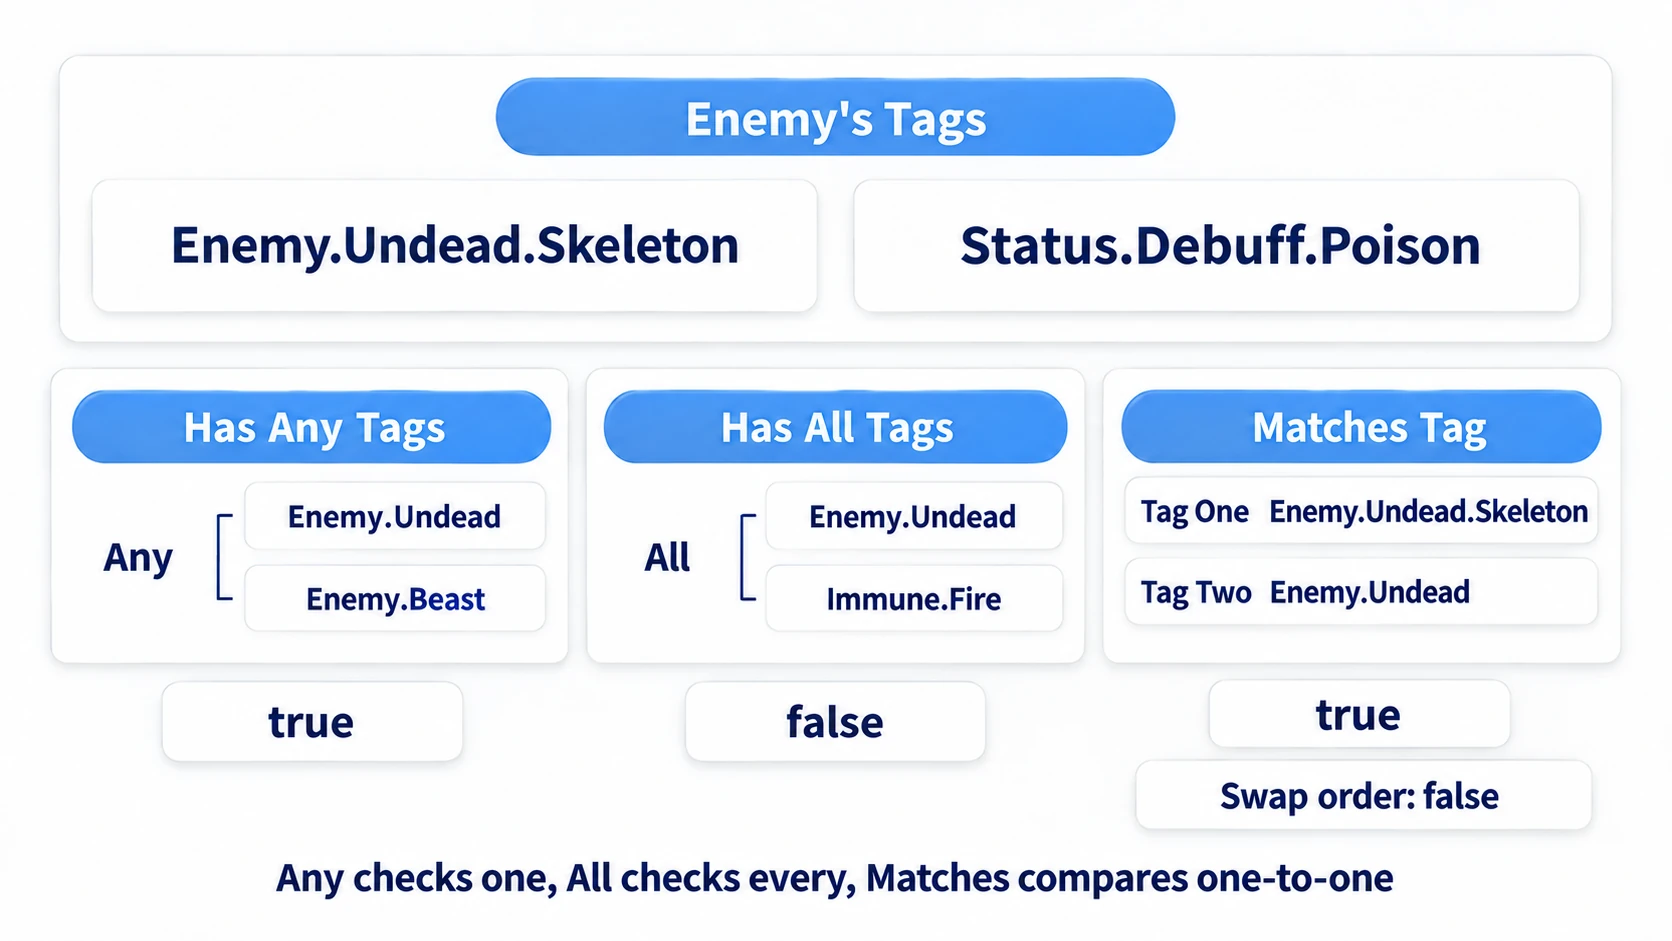
If you want to add conditions like "only poisoned undead", Has All Tags becomes the candidate. If you also try poison and fire-resist tags, register those names in the dictionary first. In the hands-on below, one Has Tag against registered enemy tags tells us whether something is undead.
Hands-On prep: line up three kinds of enemy
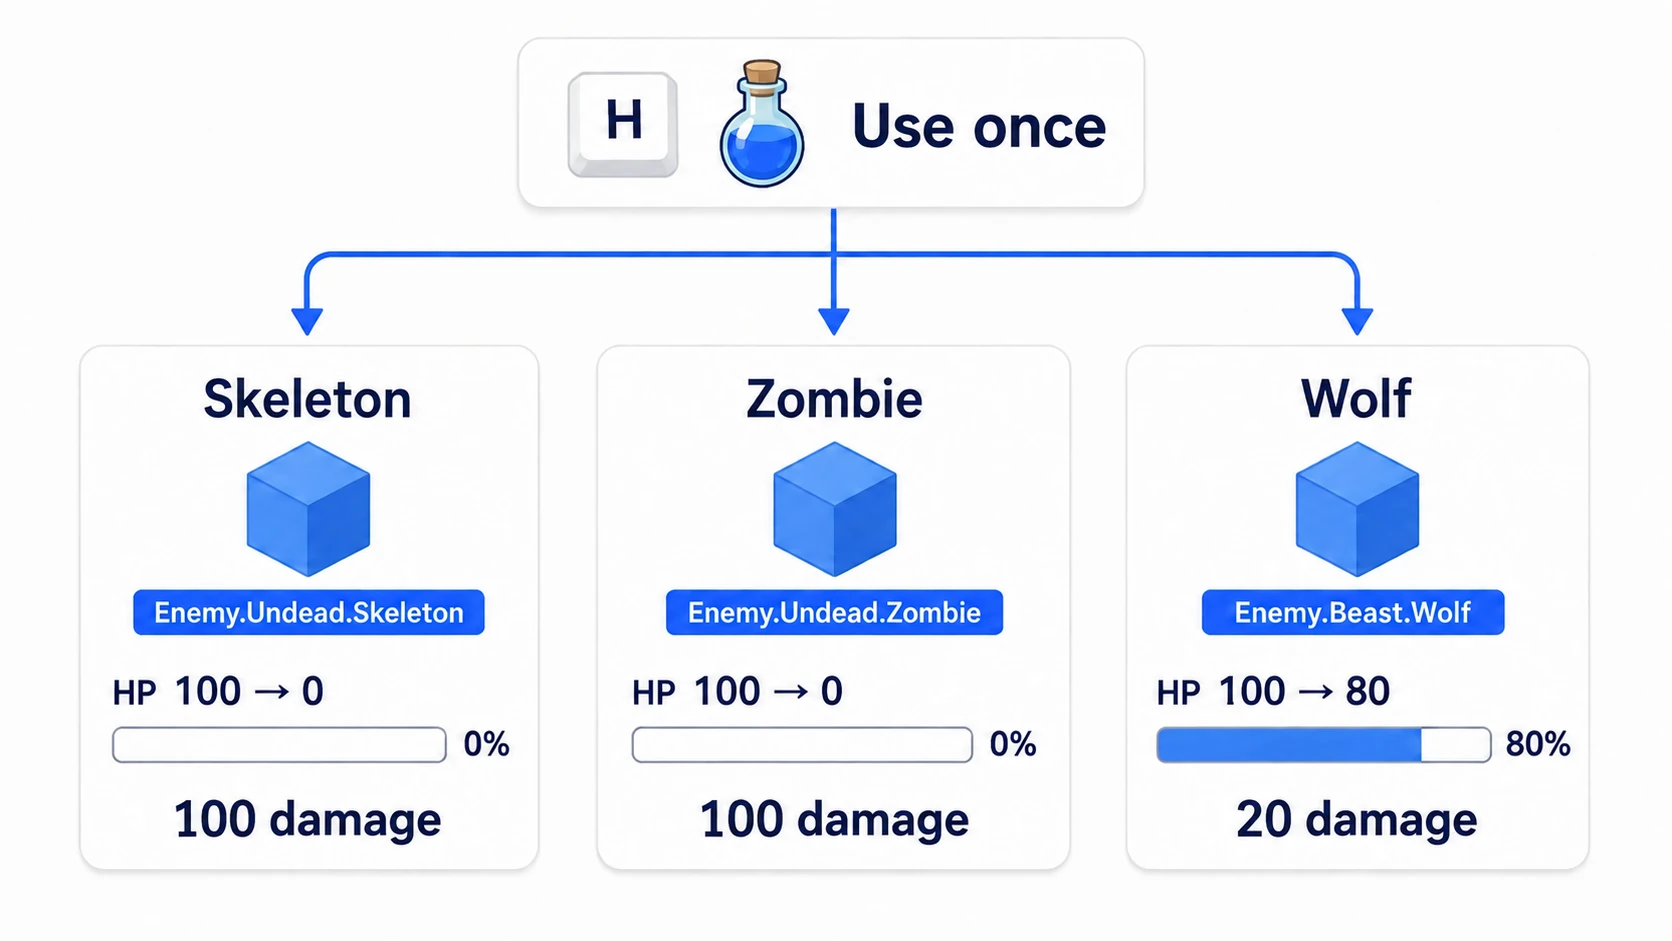
In a Third Person Blueprint project, place cubes standing in for a skeleton, a zombie, and a wolf. Using the holy water deals 100 damage to undead and 20 to everything else — a five-times bonus.
To keep the tag testing easy to watch, the H key applies the effect once to each practice enemy in the level . Throwing motions and range checks are things to add after the basics work.
Create the enemy parent class
Create "Blueprint Class → Actor" from the Content Browser and name it BP_EnemyBase . Add a Static Mesh from Components' "Add" and name it Body .
Set Body's Static Mesh to the engine's basic Cube shape. Enable "Show Engine Content" in the content display settings to find it. Set Collision Presets to NoCollision . We deal damage by calling an enemy event rather than by contact, so no collision is needed.
Create the following variables, compile, and set the defaults.
| Variable | Type | Default |
|---|---|---|
| EnemyTags | Gameplay Tag Container | Empty |
| EnemyName | Text | Enemy |
| Health | Float | 100.0 |
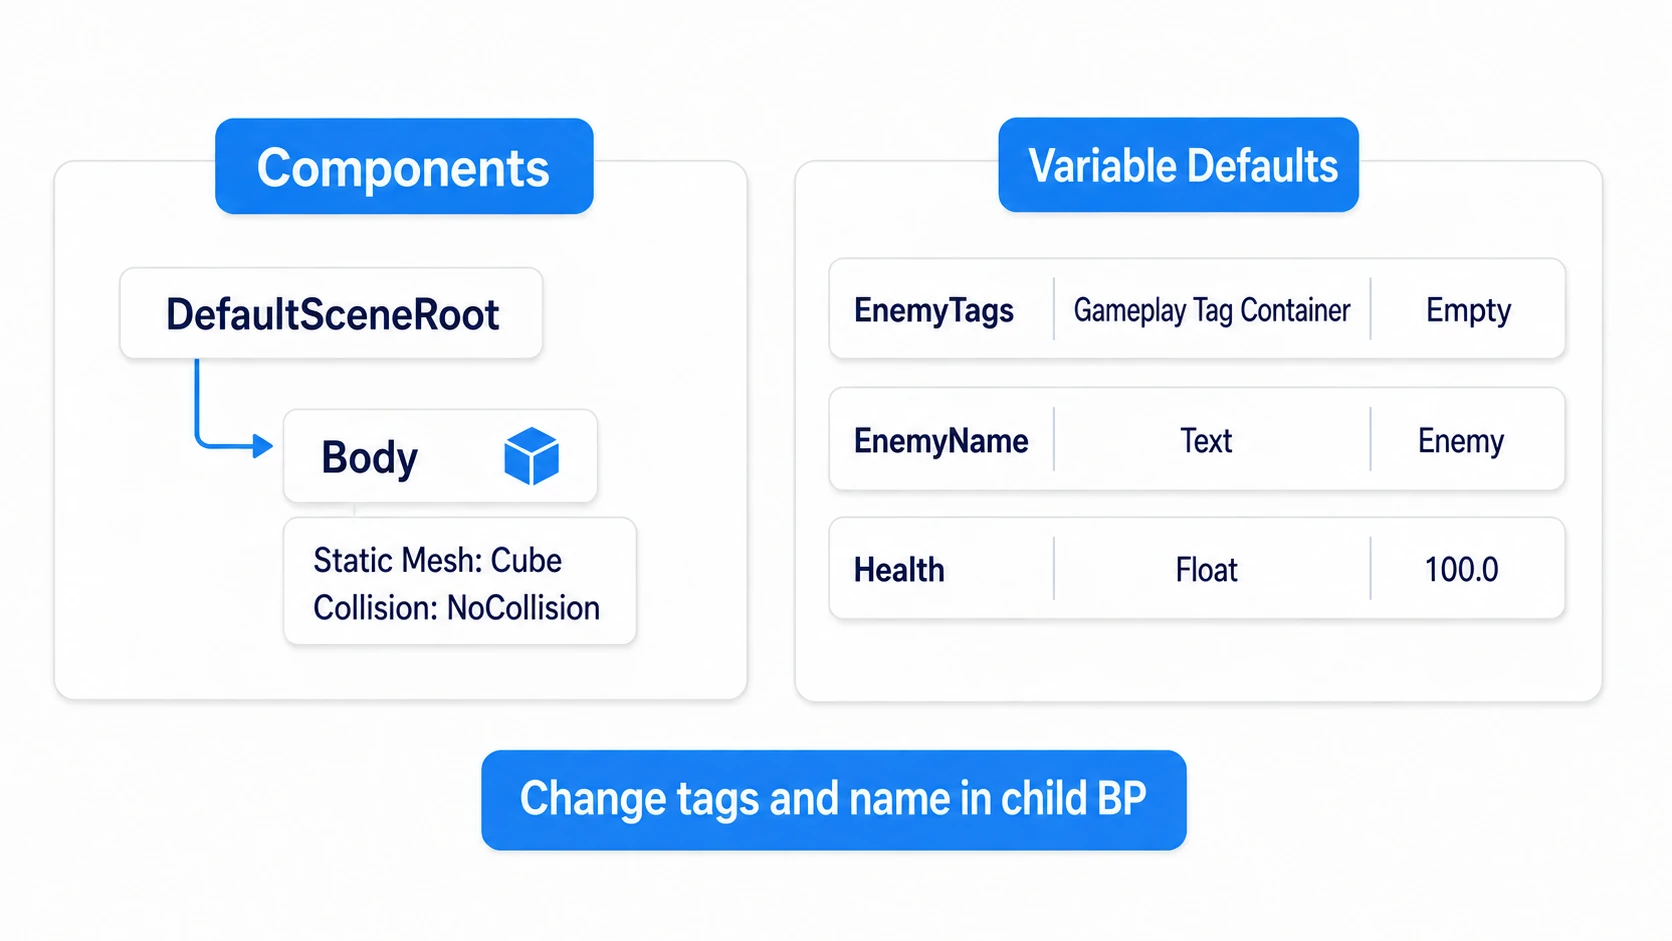
EnemyTags and EnemyName get changed in each child BP's Class Defaults. Leave Instance Editable off for now, since we are not doing per-instance overrides.
Give each child class its tag
Right-click BP_EnemyBase and create three child BPs with "Create Child Blueprint Class". Open each and set the following in "Class Defaults".
| Child BP | Tag to choose in EnemyTags | EnemyName |
|---|---|---|
| BP_Skeleton | Enemy.Undead.Skeleton | Skeleton |
| BP_Zombie | Enemy.Undead.Zombie | Zombie |
| BP_Wolf | Enemy.Beast.Wolf | Wolf |
Open EnemyTags' edit field and choose the matching leaf tag from the dictionary tree. You do not need to add the parent tags separately. BP_Skeleton, for instance, gets only the Skeleton tag.
Place the three in the level in front of Player Start, spaced out left to right as Skeleton, Zombie, Wolf. Place the child BPs, not BP_EnemyBase itself, which has no tags.
Build the logic that drains and displays enemy HP
Add a Custom Event to BP_EnemyBase's Event Graph and name it ApplyHolyDamage . A Custom Event is an entry point you name and call yourself. The holy water calls it and the enemy drains HP by the damage it receives.
Select the event and add one input in Details → Inputs. Name it Damage , type Float, and compile. The child BPs inherit this event.
Compute the new HP
Feed a Get of Health and Damage into a subtract node. The top input is Health and the bottom is Damage. Pass the result to Clamp (Float) with Min = 0.0 and Max = 100.0.
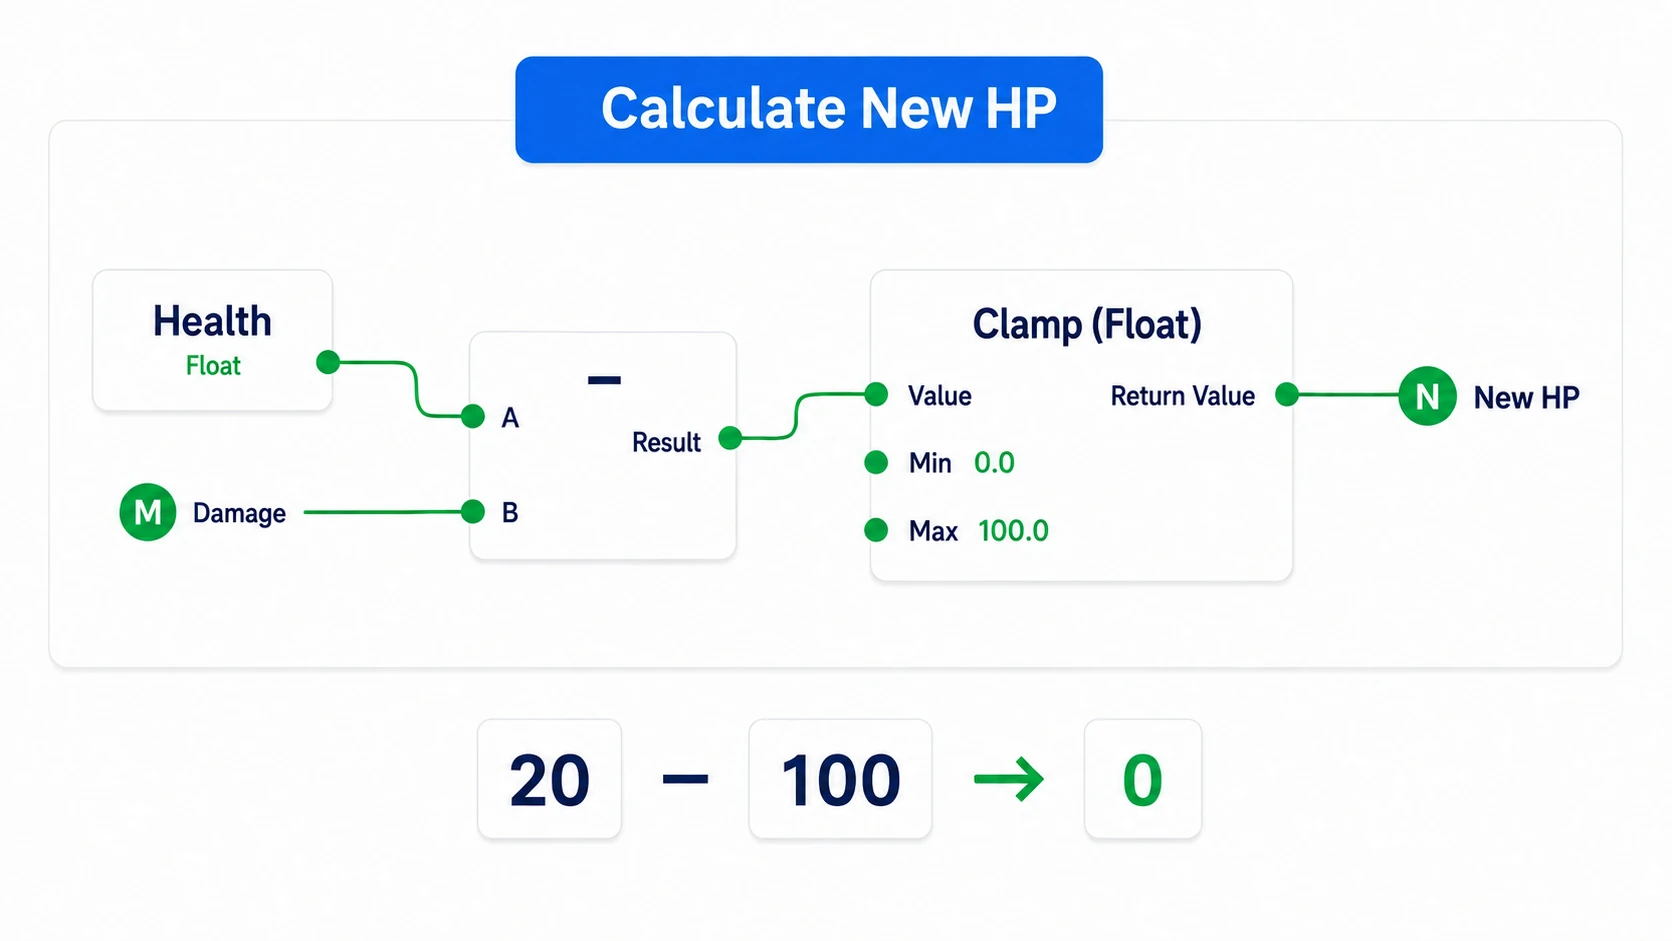
Clamp brings a value up to the minimum or down to the maximum. Taking 100 damage at 20 HP gives 0, not -80.
Connect ApplyHolyDamage's white exec wire to Set Health and feed the computed value in. Run Print String after that.
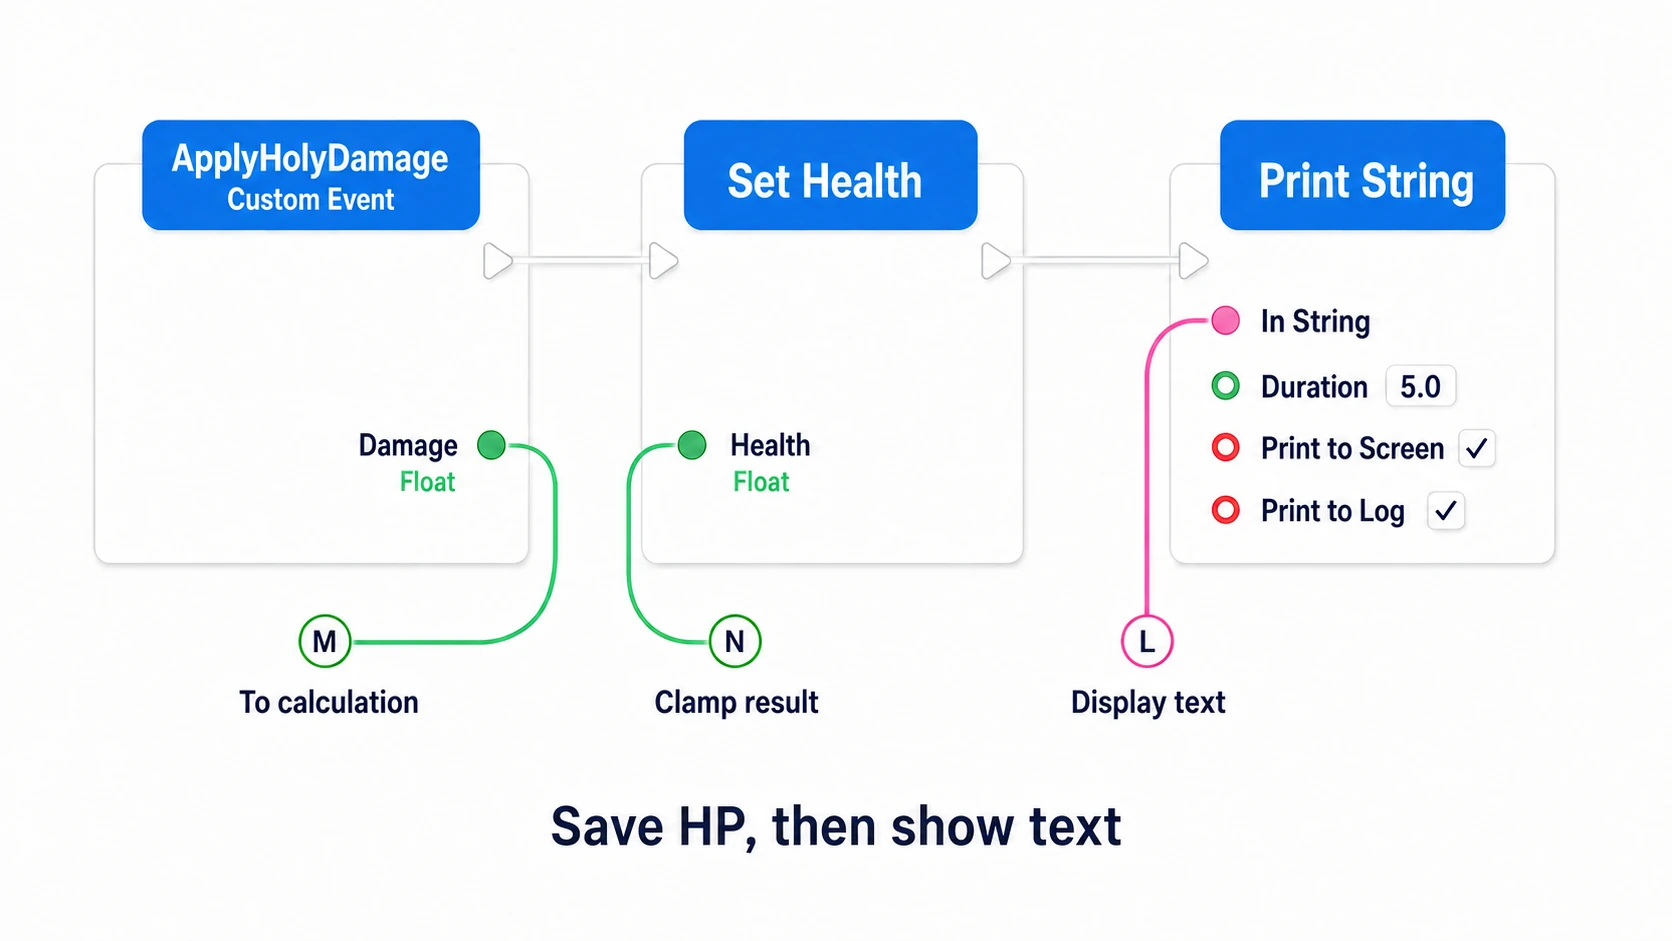
In the diagram, M is the Damage value, N is Clamp's result, and L marks the display string we build next. In practice you wire them in the same graph. Do not create nodes for the symbols themselves.
Display which enemy's HP it is
Create a Format Text node and enter {Enemy}: HP {HP} for Format. Connect a Get of EnemyName to the added Enemy pin and a Get of Health to the HP pin.
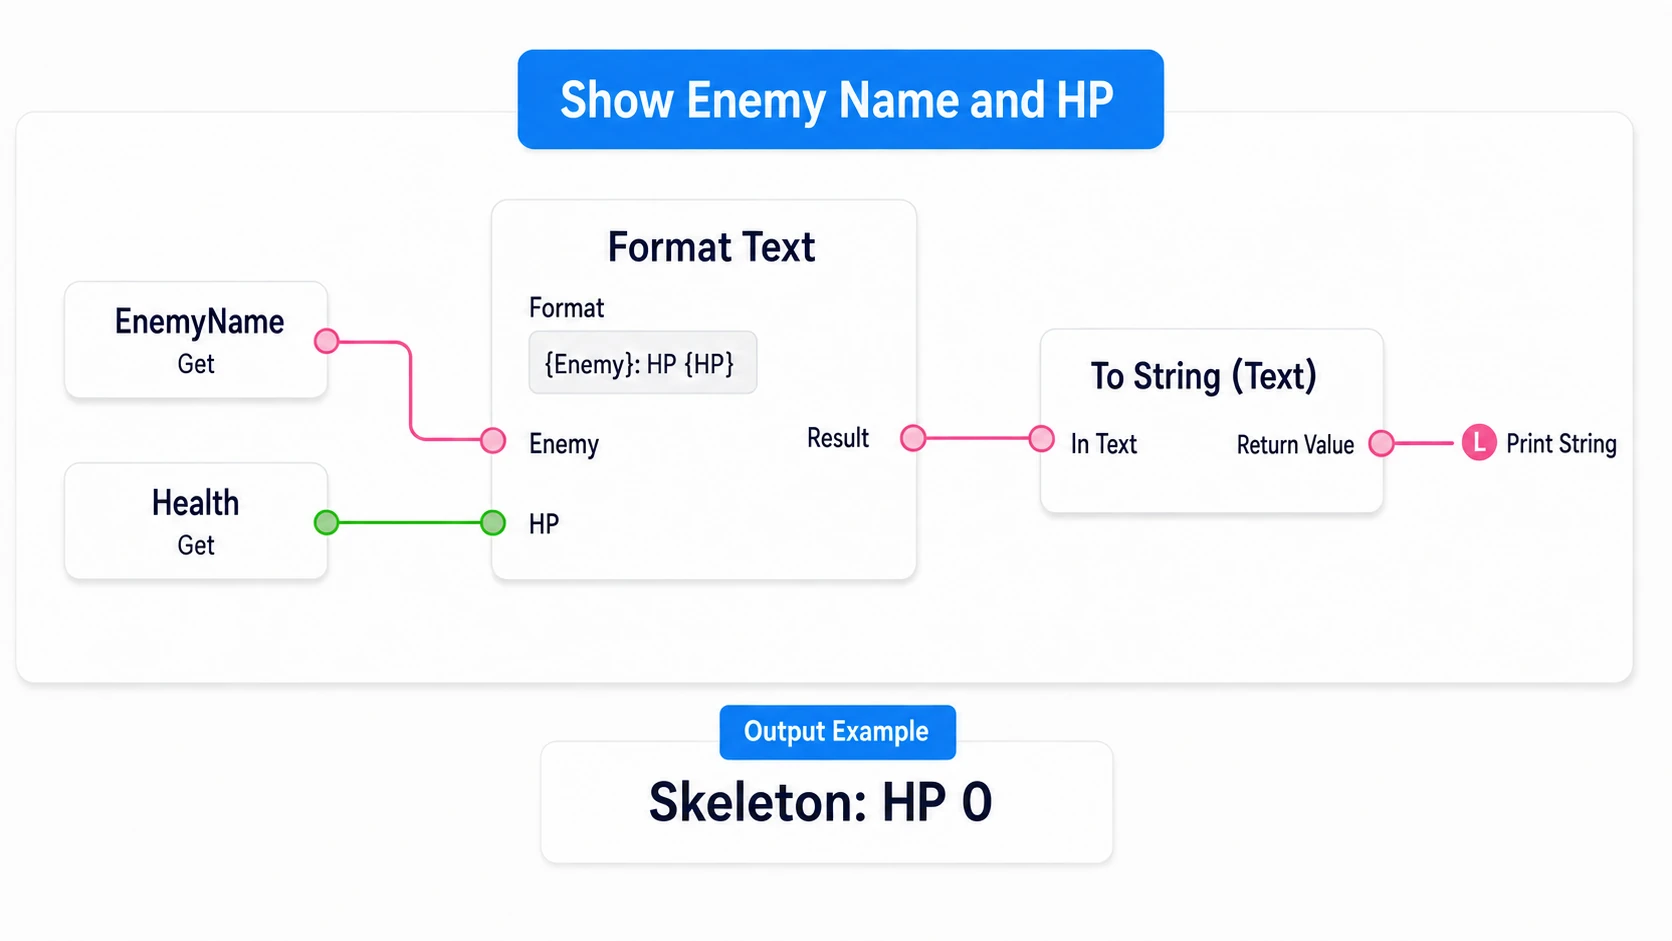
Format Text fills values into the braces. Convert its output with To String (Text) and connect it to Print String's In String. Set Duration to 5.0 and enable Print to Screen and Print to Log.
Since Print String runs after Set Health, it reads the updated value, like Skeleton: HP 0 . In this exercise we leave the HP 0 cubes in place so the numbers can be compared.
Have the holy water inspect enemy tags
Create another Actor BP and name it BP_HolyWater . Create a TargetTag variable of type Gameplay Tag and, after compiling, choose Enemy.Undead as its default. Turn Instance Editable on so a placed holy water can change its target.
In the Event Graph, create a Custom Event UseHolyWater with no arguments.
Take enemies one at a time
Wire UseHolyWater → Get All Actors of Class → For Each Loop with white wires. Actor Class is BP_EnemyBase. Pass the Out Actors array to For Each Loop's Array.
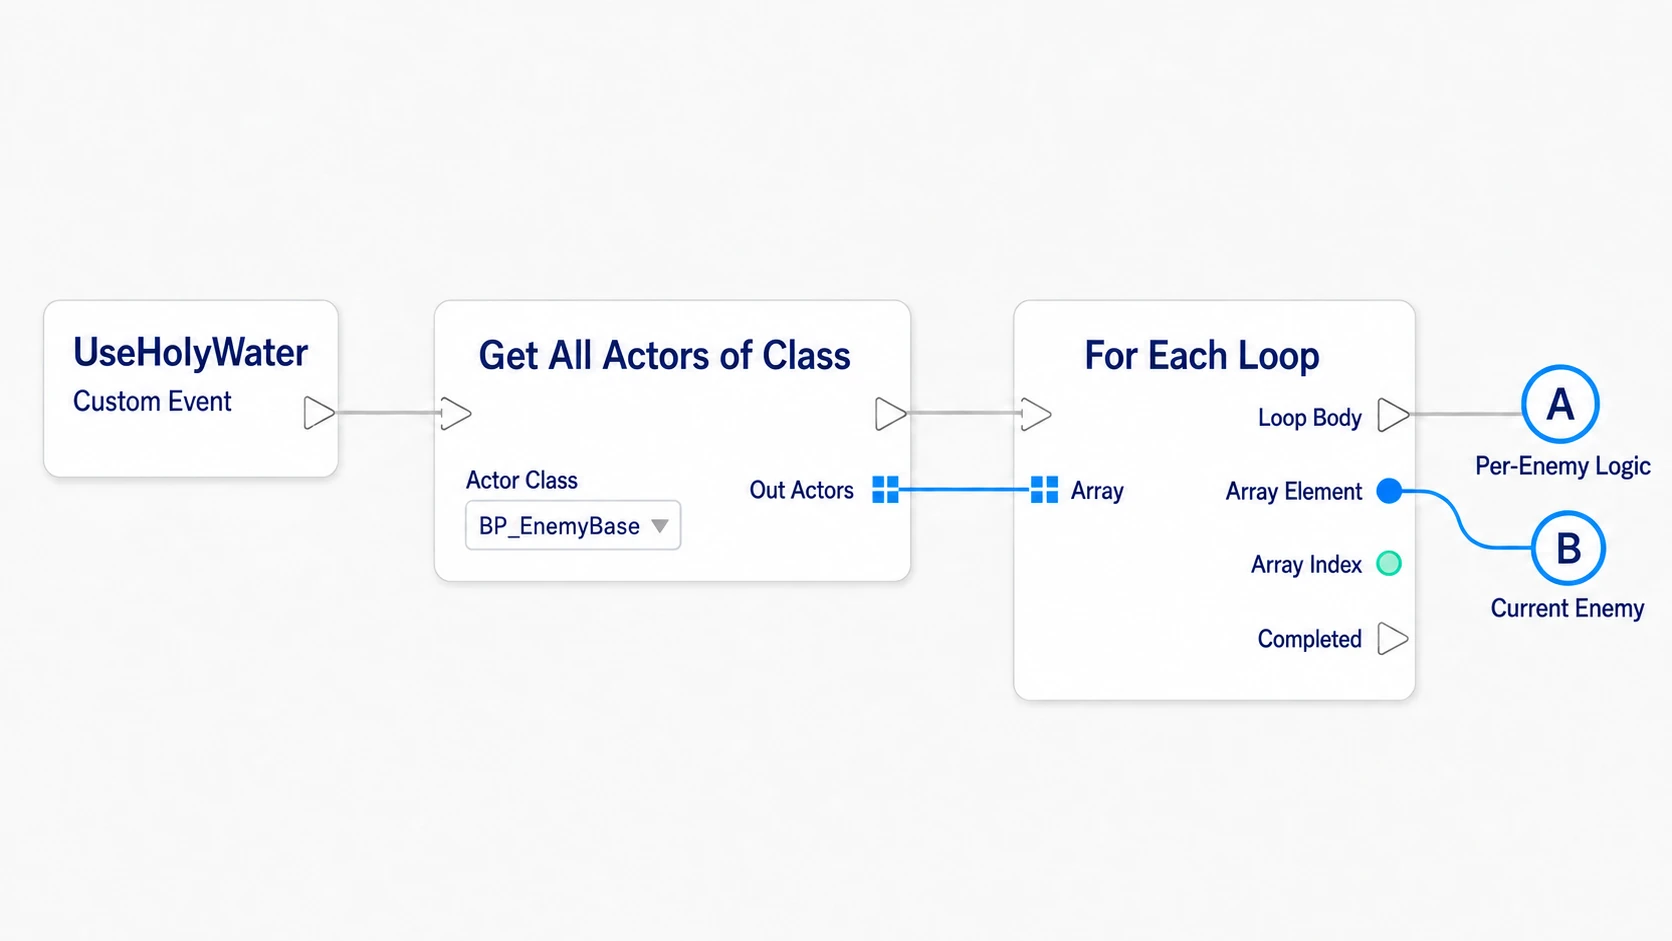
An array is the list of enemies found. For Each Loop takes one at a time from that list and processes it. The Skeleton, Zombie, and Wolf children of BP_EnemyBase are all gathered.
In the diagram, A is Loop Body's exec wire and B is the Array Element reference. A reference specifies which individual in the level you are handling. B represents "the one we test and send damage to this iteration". Completed and Array Index go unused here.
Test whether that enemy is undead
Drag from Array Element and create a Get of EnemyTags. Target receives that enemy's reference. Create Has Tag from EnemyTags' output and pass the TargetTag variable to Tag. Uncheck Exact Match.
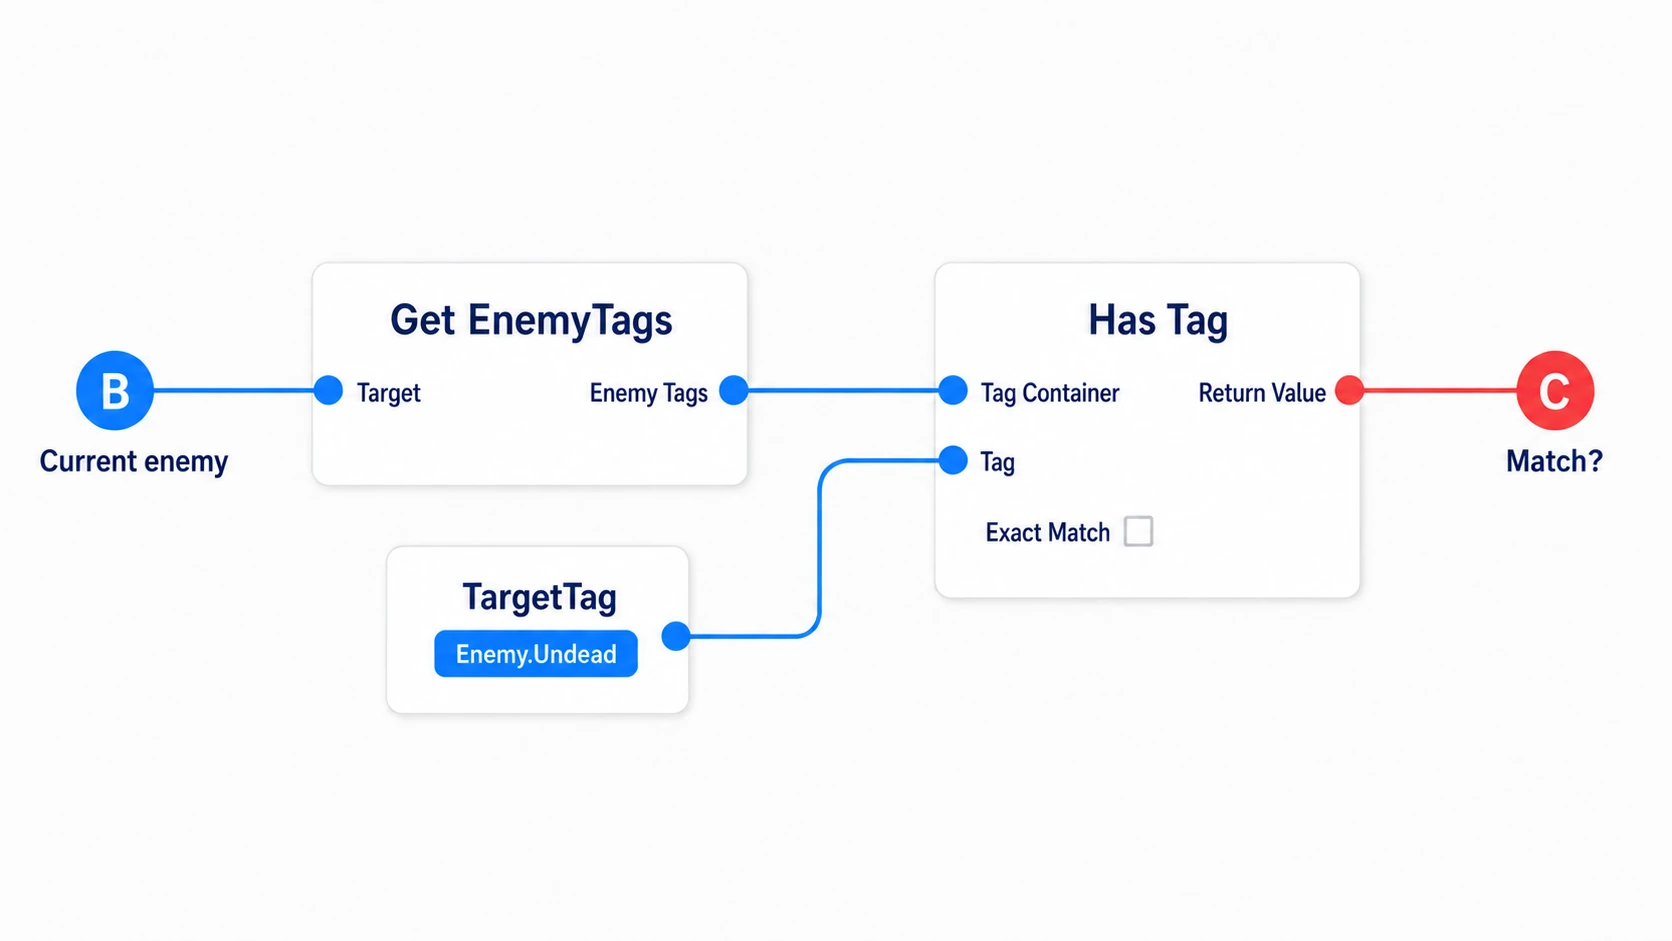
Has Tag's result is a bool : true means the condition matched, false means it did not. Connect that red result to a Branch's Condition and Loop Body's white wire to the Branch's exec input.
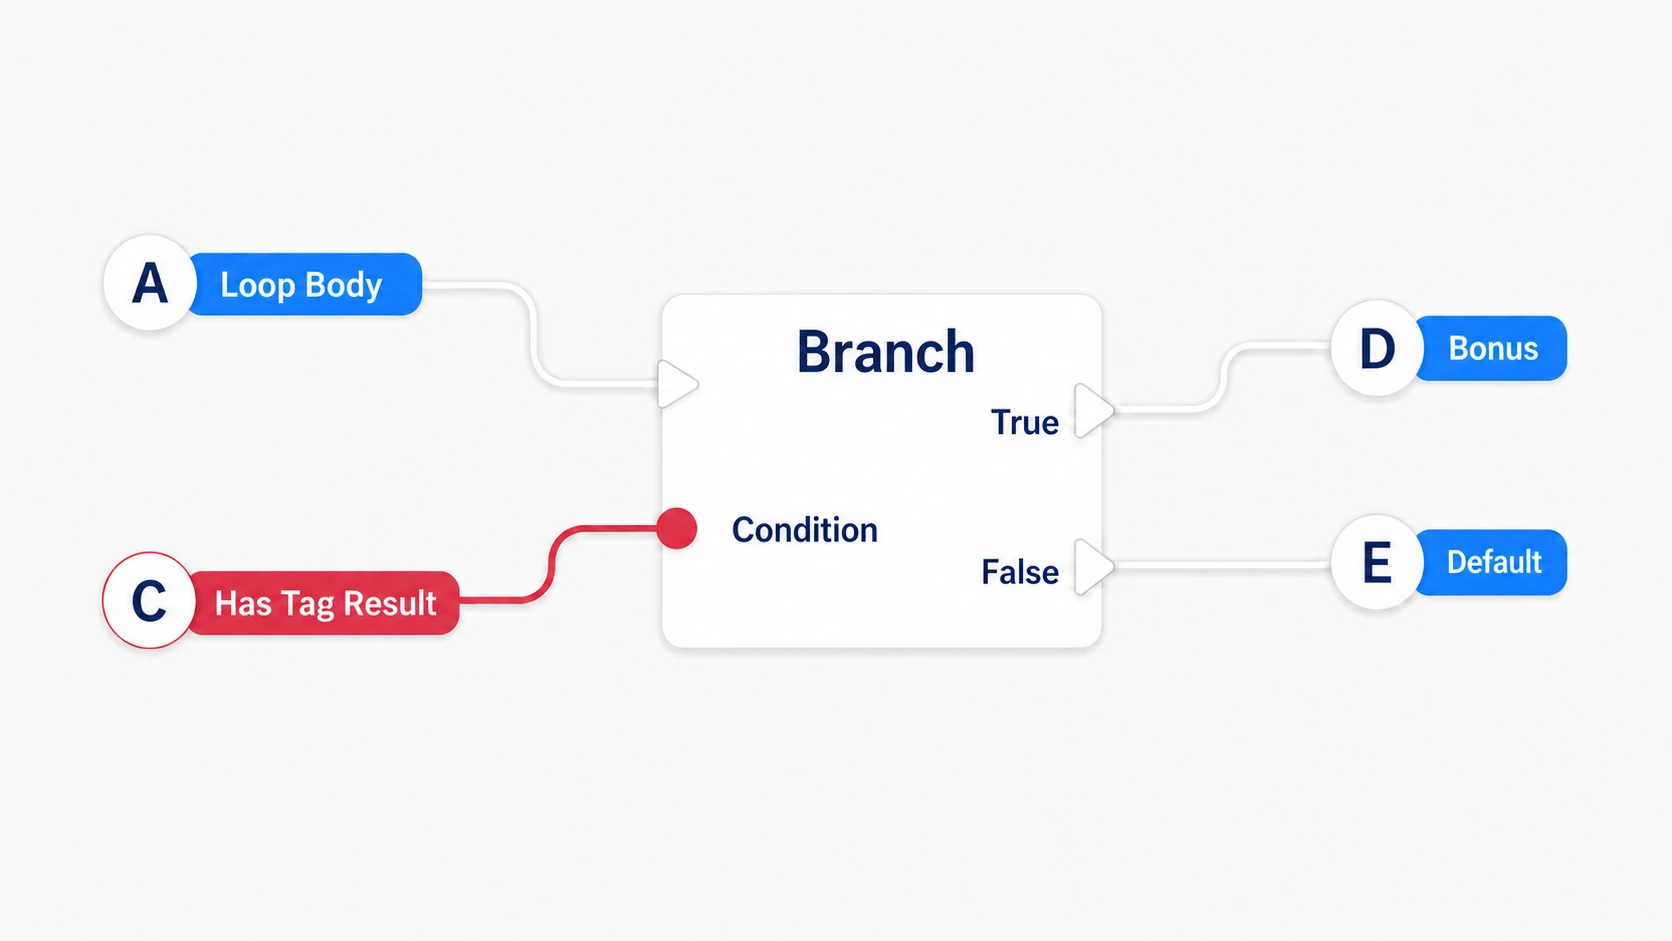
In the diagram, C is Has Tag's result, D is the Branch's True side, and E is the False side. Has Tag returns a value, so it takes no white exec wire.
Send 100 to matches and 20 to everything else
Place one Apply Holy Damage call on the True side and one on the False side. Connect the same Array Element reference to both Targets. True's Damage is 100.0 and False's is 20.0.
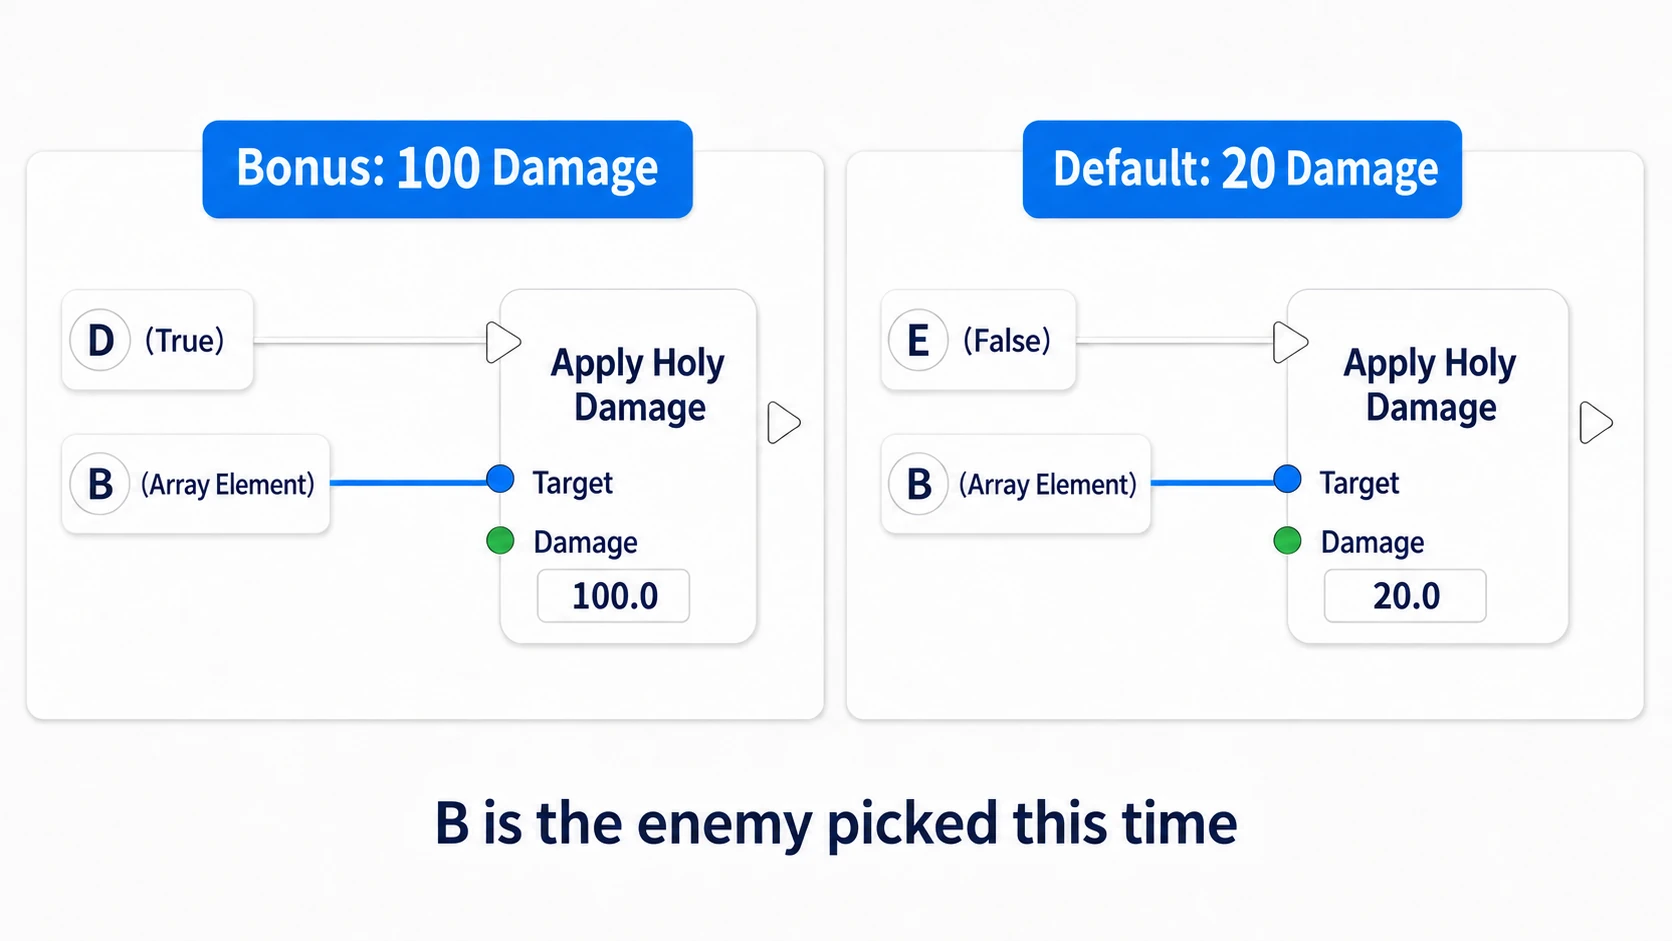
Create the call nodes by dragging from Array Element and searching for Apply Holy Damage . That calls the Custom Event defined on the enemy. You do not create a same-named Custom Event on BP_HolyWater.
Now the holy water picks its power by whether an enemy falls under Enemy.Undead, without listing a single enemy name. The enemy side just drains HP by the Damage it receives.
Use it with the H key and check the result
Place one BP_HolyWater in the level. It needs no visuals. All practice enemies in the level are targets here, so where you place it does not change the power.
Select that BP_HolyWater in the Outliner and open the level editor's "Blueprints → Open Level Blueprint". Create a reference to the placed individual with right-click "Create a Reference to BP_HolyWater" or by dragging from the Outliner.
Add an H key event and call Use Holy Water from Pressed. Connect the BP_HolyWater reference to Target. Leave Released unconnected.
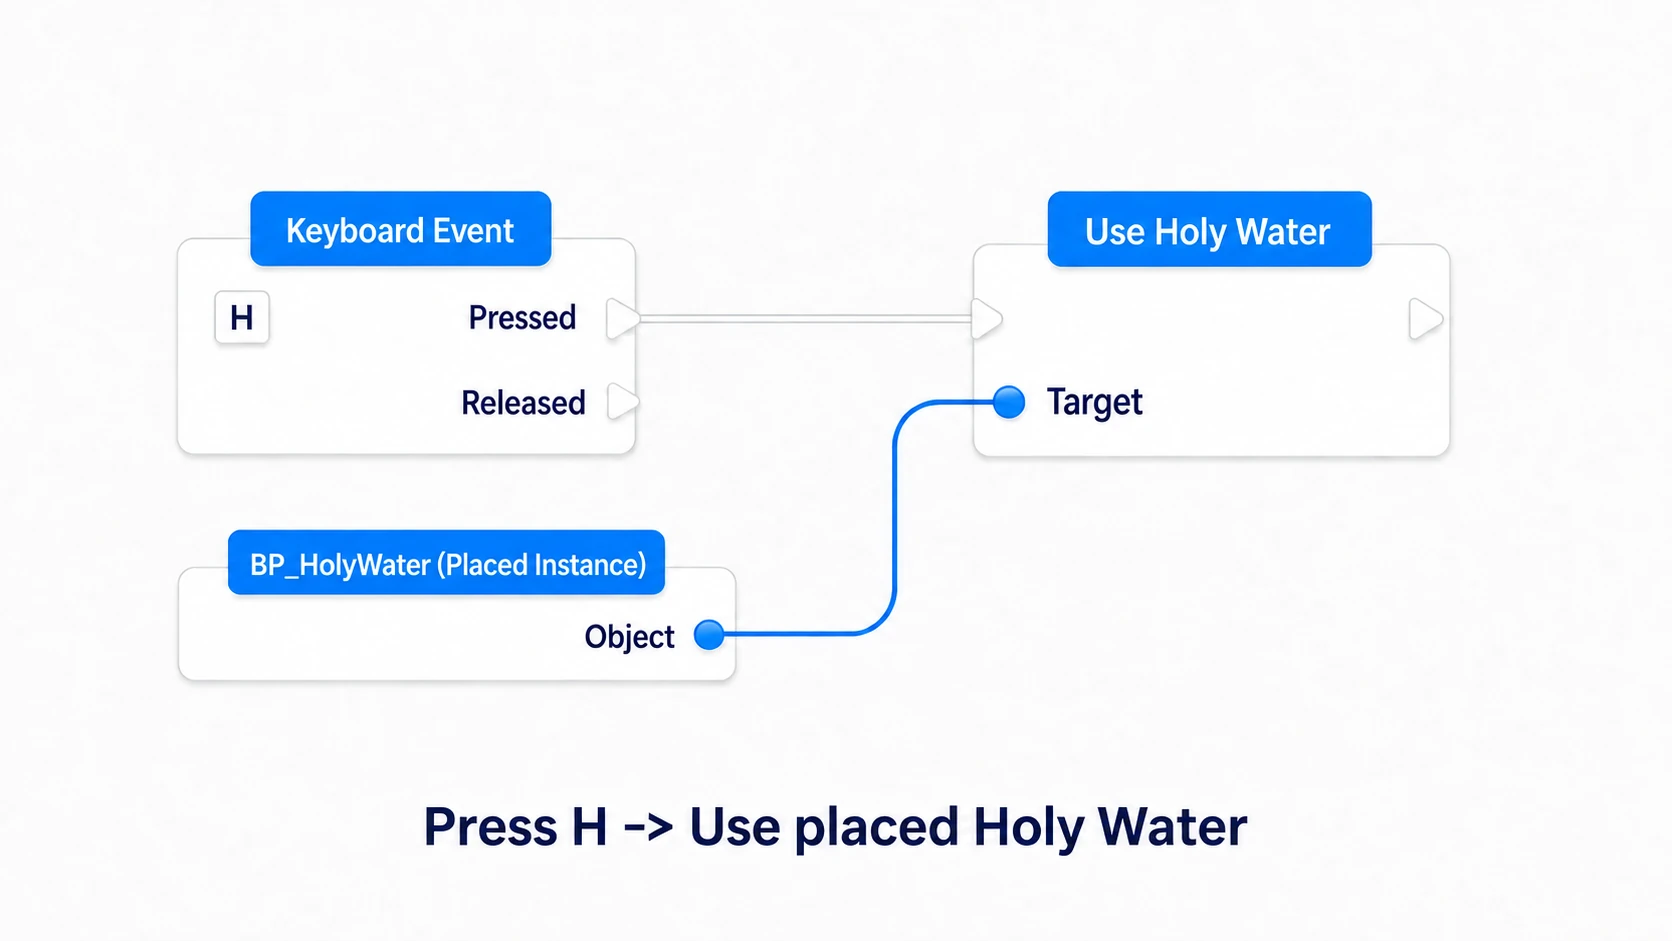
Compile and save each BP, then Play. Click the game window and press H once .
| Enemy | Matches the bonus | Damage | Remaining HP |
|---|---|---|---|
| Skeleton | true | 100 | 0 |
| Zombie | true | 100 | 0 |
| Wolf | false | 20 | 80 |
The order enemies are fetched in is not fixed, so read the names and values rather than the log order. Once the on-screen text fades, you can re-read it in the Output Log.
Press H again and Wolf becomes 60. Stop and Play again between comparison experiments and everyone starts from 100.
| If the result looks wrong | Where to check |
|---|---|
| No log lines at all | H's Pressed, the placed holy water reference, UseHolyWater's wire, Actor Class |
| Everyone lands at HP 80 | The child BPs' EnemyTags, TargetTag = Enemy.Undead, whether Exact Match is off |
| Everyone lands at HP 0 | Whether TargetTag is the too-broad Enemy, and whether False's Damage is 20 |
| Only one enemy keeps dropping | Whether both EnemyTags' Target and Apply Holy Damage's Target are Array Element |
| The display shows pre-damage HP | Whether Set Health runs before Print String |
Try a new enemy and a different affinity
Add a wraith without changing the holy water
Add Enemy.Undead.Wraith to the dictionary. Create BP_Wraith as a child of BP_EnemyBase and set that tag in EnemyTags and Wraith in EnemyName. Add one more cube to the level, Play again, and press H.
If Wraith also reaches HP 0, it worked. BP_HolyWater has always been "gather BP_EnemyBase relatives and test Enemy.Undead", so you never write the new type into the holy water .
Change only the target tag
Now Stop and try changing the placed BP_HolyWater's TargetTag. Play again each time and press H once.
| TargetTag | Skeleton | Zombie | Wolf |
|---|---|---|---|
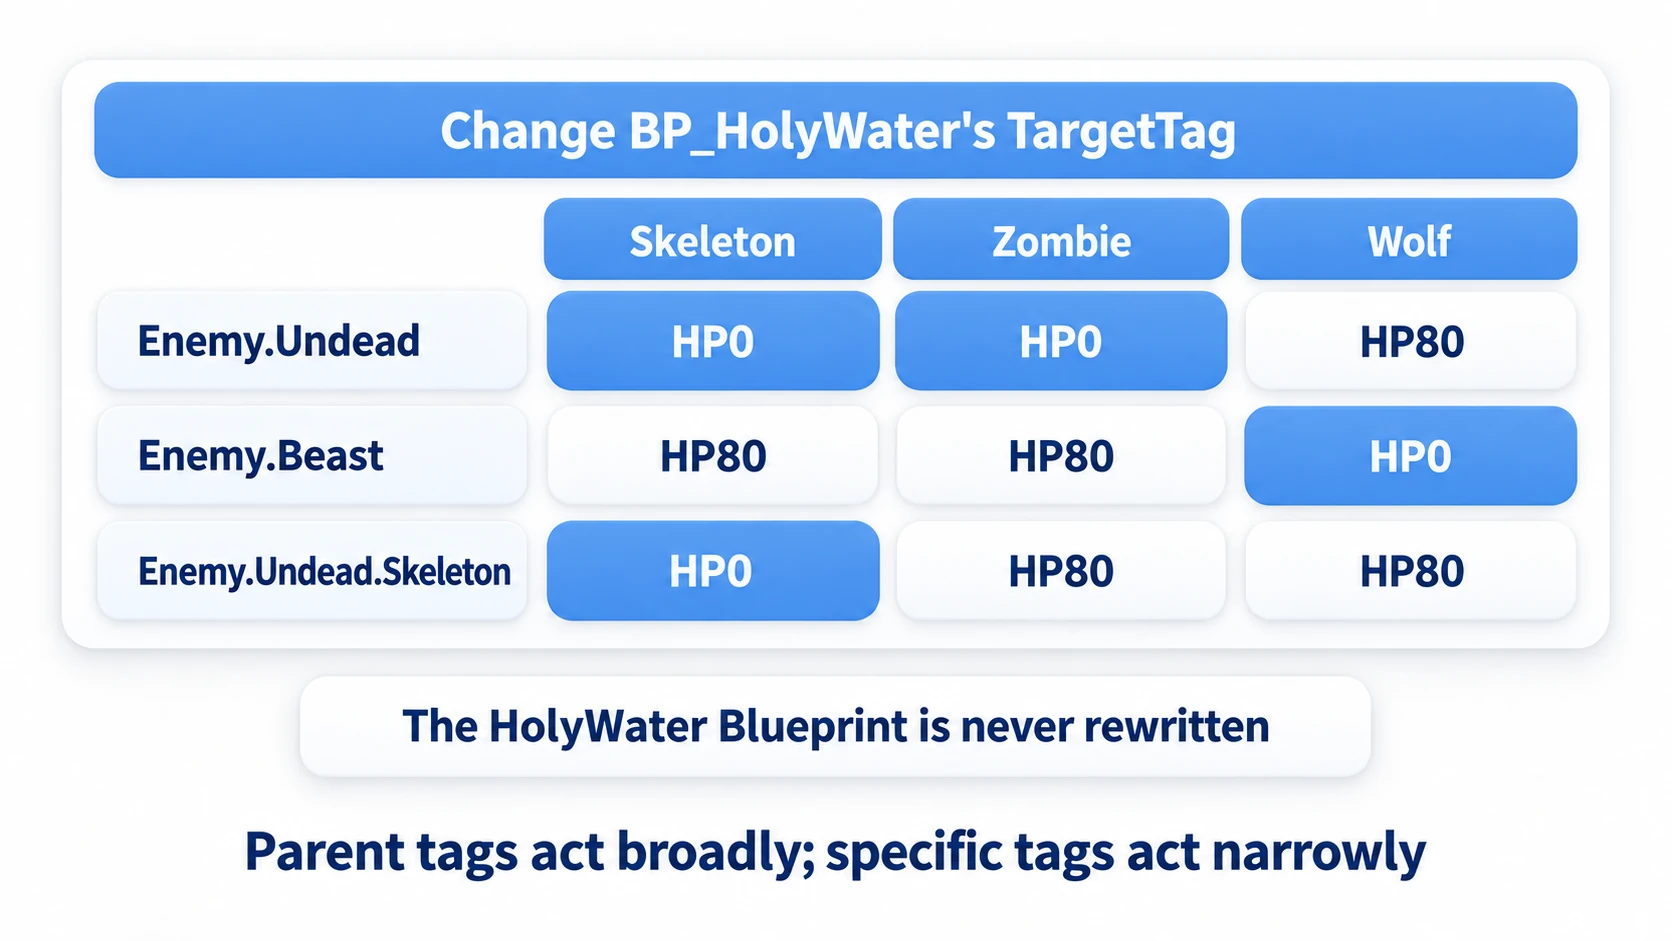
| Enemy.Undead | HP 0 | HP 0 | HP 80 |
| Enemy.Beast | HP 80 | HP 80 | HP 0 |
| Enemy.Undead.Skeleton | HP 0 | HP 80 | HP 80 |
Asking with a parent tag hits a broad group; asking with a fine tag hits a narrow classification. Because "the tags an enemy has" and "the tag an attack tests" are separate, the same BP works as a different affinity.
Bonus: Good to Know Up Front
Attaching a tag does not produce an effect
Attaching a poison tag does not drain HP by itself. A tag is data representing a state; what happens in that state is decided by logic.
To add and remove at runtime, use Add Gameplay Tag and Remove Gameplay Tag on EnemyTags. Whether it is right to remove the tag when one of several stacked poisons expires is a separate question. Tag presence alone does not track stack counts or remaining duration.
Calling All with an empty condition returns true
If Has All Tags' Other Container is empty, "there is no required tag", so it returns true. Has Any Tags returns false, because there is no candidate to find. If you load conditions from data, decide whether empty is allowed.
Check usage sites for renames and C++ definitions too
You can rename registered tags from the management screen. After renaming, check the assets and saved data that reference them. Do not assume tag names written as strings in code are all fixed automatically.
In C++ you can define tags with the macros in NativeGameplayTags.h and reference them as variables from code. Compilation catches misspelled variable names, but it does not guarantee the meaning or spelling of the tag string in the definition. None of this is needed for our Blueprint hands-on.
Extending to attack ranges and skills
The Get All Actors of Class here is a fetch method for comparing tag differences. When extending to area attacks, select targets with collision or Line Trace and inspect those targets' EnemyTags the same way. Tags do not change collision settings.
To combine complex abilities and effects, tags are also used in the Gameplay Ability System. Confirming in a small experiment which classification changes what, as we did here, makes that easier to understand.
When building a tag hierarchy, use "is there a classification I want to handle as a group?" as your criterion. Narrowing to the groups you actually test, rather than cramming appearance and material into long names, keeps the consuming logic readable too.
Summary
- Tags are hierarchical, so
Enemy.Undeadtests a whole group - The dictionary (registered tags) is separate from the tags actually attached
- Turning Exact Match off picks up the levels below as well
- Any and All separate "at least one" from "every one"
The design question to ask is "will this test gain more members later?" If it will, receive it through a tag hierarchy.
To hold it on the data side, go to Data Asset; to build it as an ability, go to GAS Basics.
Reference: Gameplay Tags, Has Tag, Has All Tags, Matches Tag.