Tested with: Unity 2022.3 LTS / Unity 6
Walking, running, jumping, attacking — you've got the animation clips ready, but the moment you try to "switch between them based on what's happening," you're not sure where to even start. It's the first wall everyone hits once their character starts moving.
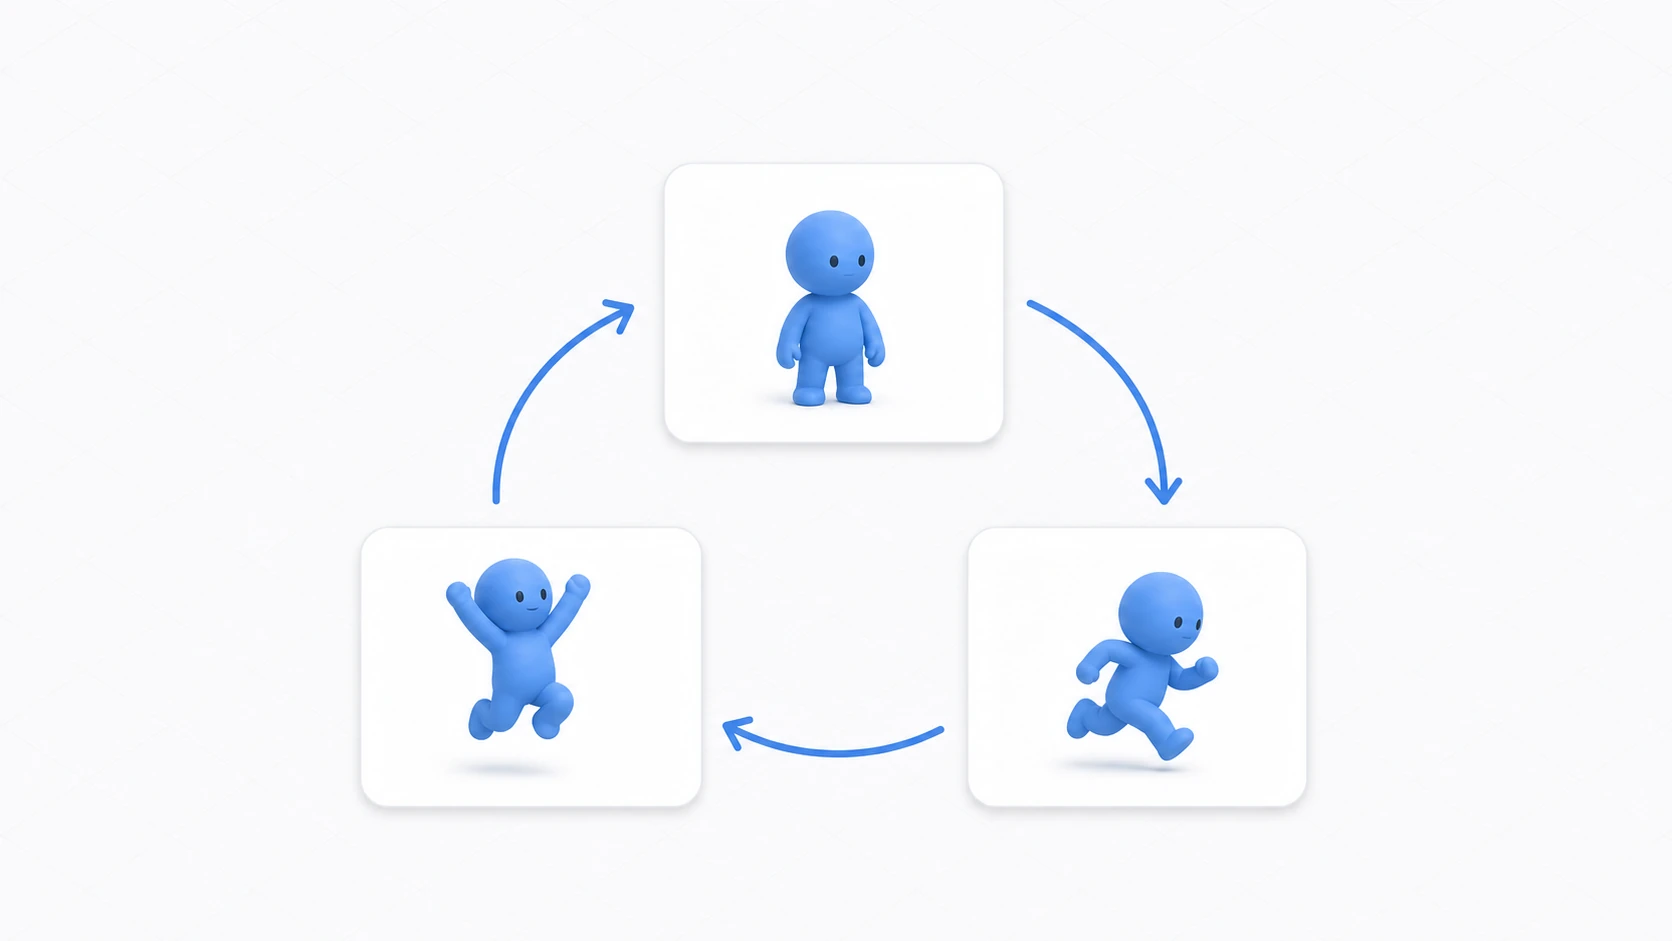
The Animator Controller is Unity's official animation management system. It lets you manage multiple animation clips visually and design "when to play which animation" by connecting states with arrows in a State Machine.
What You'll Learn
- Creating and assigning an Animator Controller (including the Apply Root Motion pitfall)
- State Machine basics——Entry, Any State, Exit, and state transitions
- Parameters (Float/Int/Bool/Trigger) and controlling them from scripts
- Smoothly switching between walking and running with a Blend Tree
- Layering an upper-body action like "shoot while walking" with Animation Layers
- Practical Transition setups for jumps, attacks, and combo attacks
Creating an Animator Controller
Method 1: Create Manually
- Right-click in the Project window
- Select "Create" → "Animator Controller"
- Name the file (e.g., "PlayerAnimator")
Method 2: Automatic Creation
When you animate a GameObject in the Animation window, an Animator Controller is created automatically.
Assigning It to a GameObject
- Select the GameObject
- In the Inspector, choose "Add Component" → "Animator"
- Drag and drop the Animator Controller you created onto the Controller field of the Animator component
About Apply Root Motion
The Animator component has a checkbox called "Apply Root Motion".
| Setting | Behavior |
|---|---|
| On | Movement and rotation baked into the animation are applied to the character |
| Off | Movement and rotation from the animation are ignored; you control them from scripts |
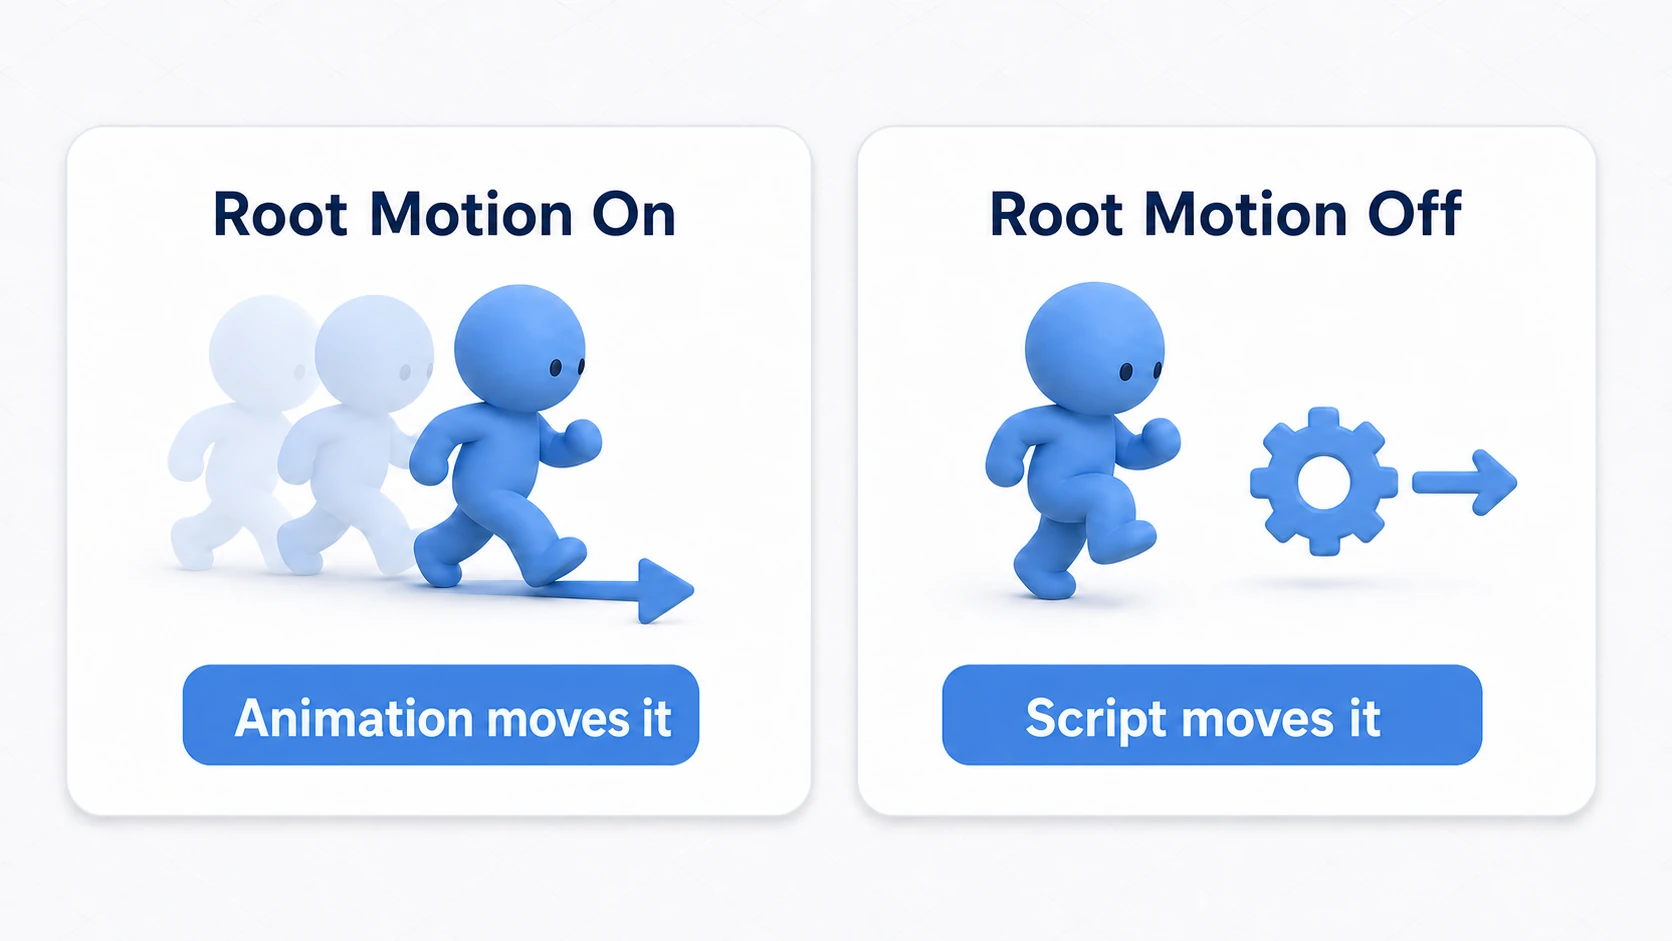
On moves the character using the displacement baked into the animation data (a motion-captured walk carries the character forward as-is). Off just marches in place, and the actual movement is handled by your transform or CharacterController script.
Beginner tip: If you move your character from a script, turn this off. If it stays on, movement gets applied by both the animation and the script, so the character double-moves or slides in unintended ways.
State Machine Basics
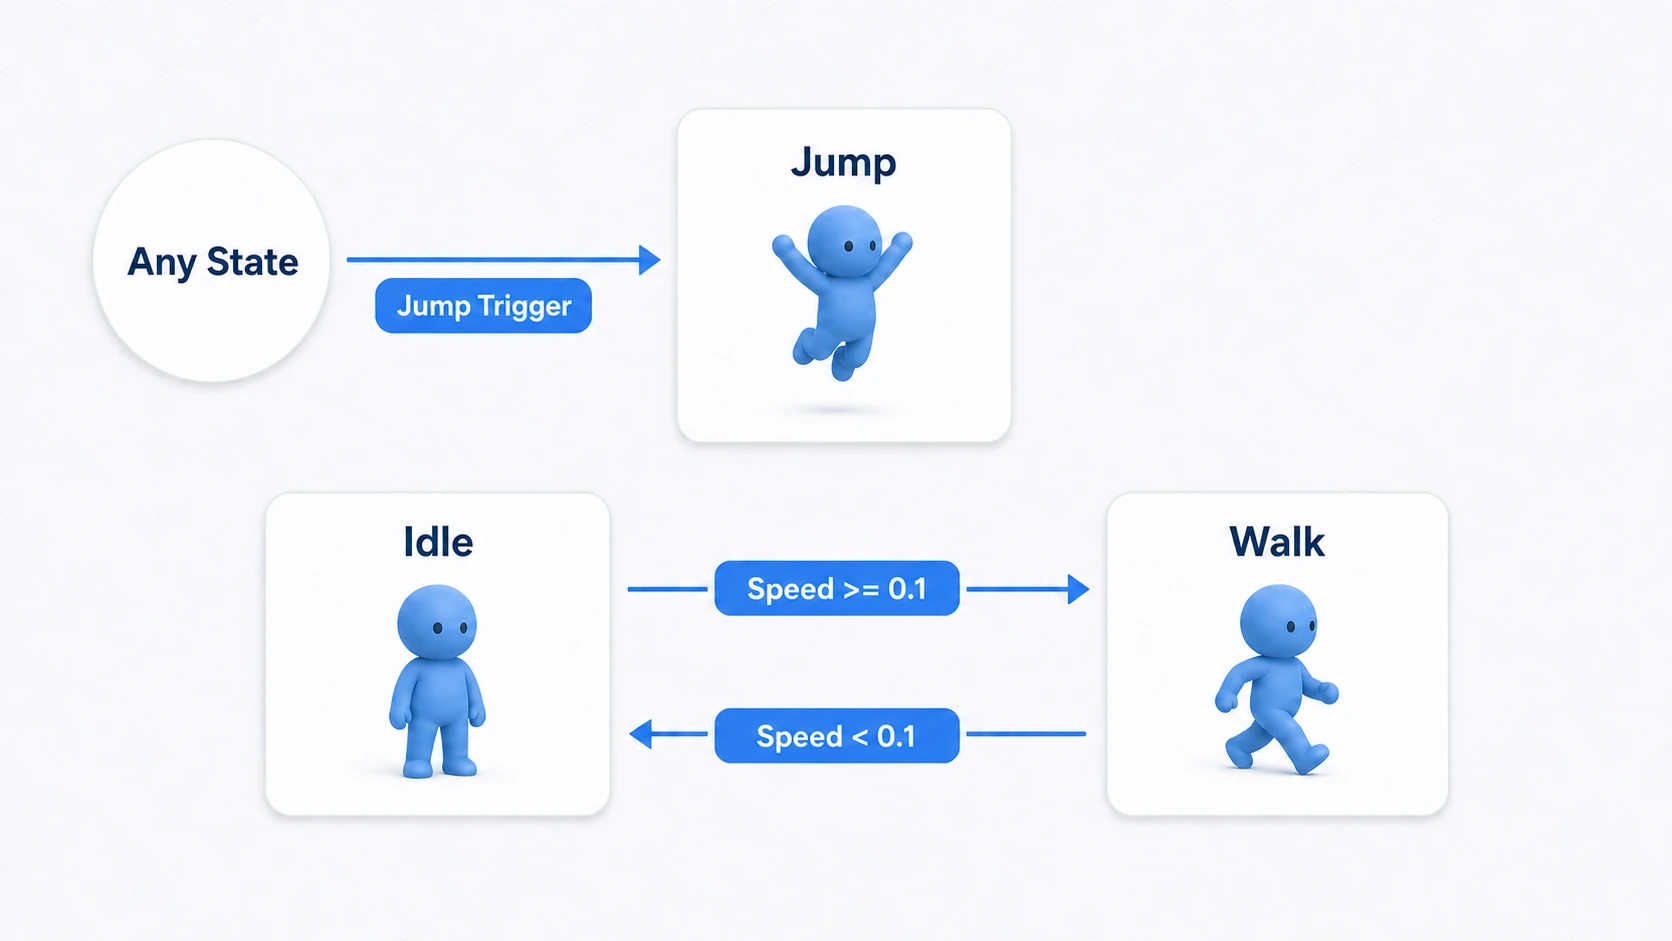
When you open the Animator window, several states are provided by default.
| State | Description |
|---|---|
| Entry | The state where animation transitions start |
| Any State | A state that can transition to any state from anywhere |
| Exit | Returns from a Sub-State Machine to the parent layer (in the root layer, it goes back to the default state right after Entry) |
How Exit behaves: When used inside a Sub-State Machine, Exit hands control back to the parent State Machine. In a root-level State Machine, transitioning to Exit routes through Entry and returns to the default state.
Creating States
- Right-click on an empty area in the Animator window
- Select "Create State" → "Empty"
- Assign an animation clip to the Motion field
Alternatively, drag and drop an animation clip directly from the Project window, and a state is created automatically.
Creating Transitions
- Right-click the source state
- Select "Make Transition"
- Click the destination state
Transition Settings
| Setting | Description |
|---|---|
| Has Exit Time | On: transitions after the animation finishes. Off: transitions immediately |
| Transition Duration | Duration of the transition (how smooth the blend is) |
| Conditions | Conditions that trigger the transition |
Using Parameters
Parameters are used for communication between your scripts and the Animator Controller.
Parameter Types
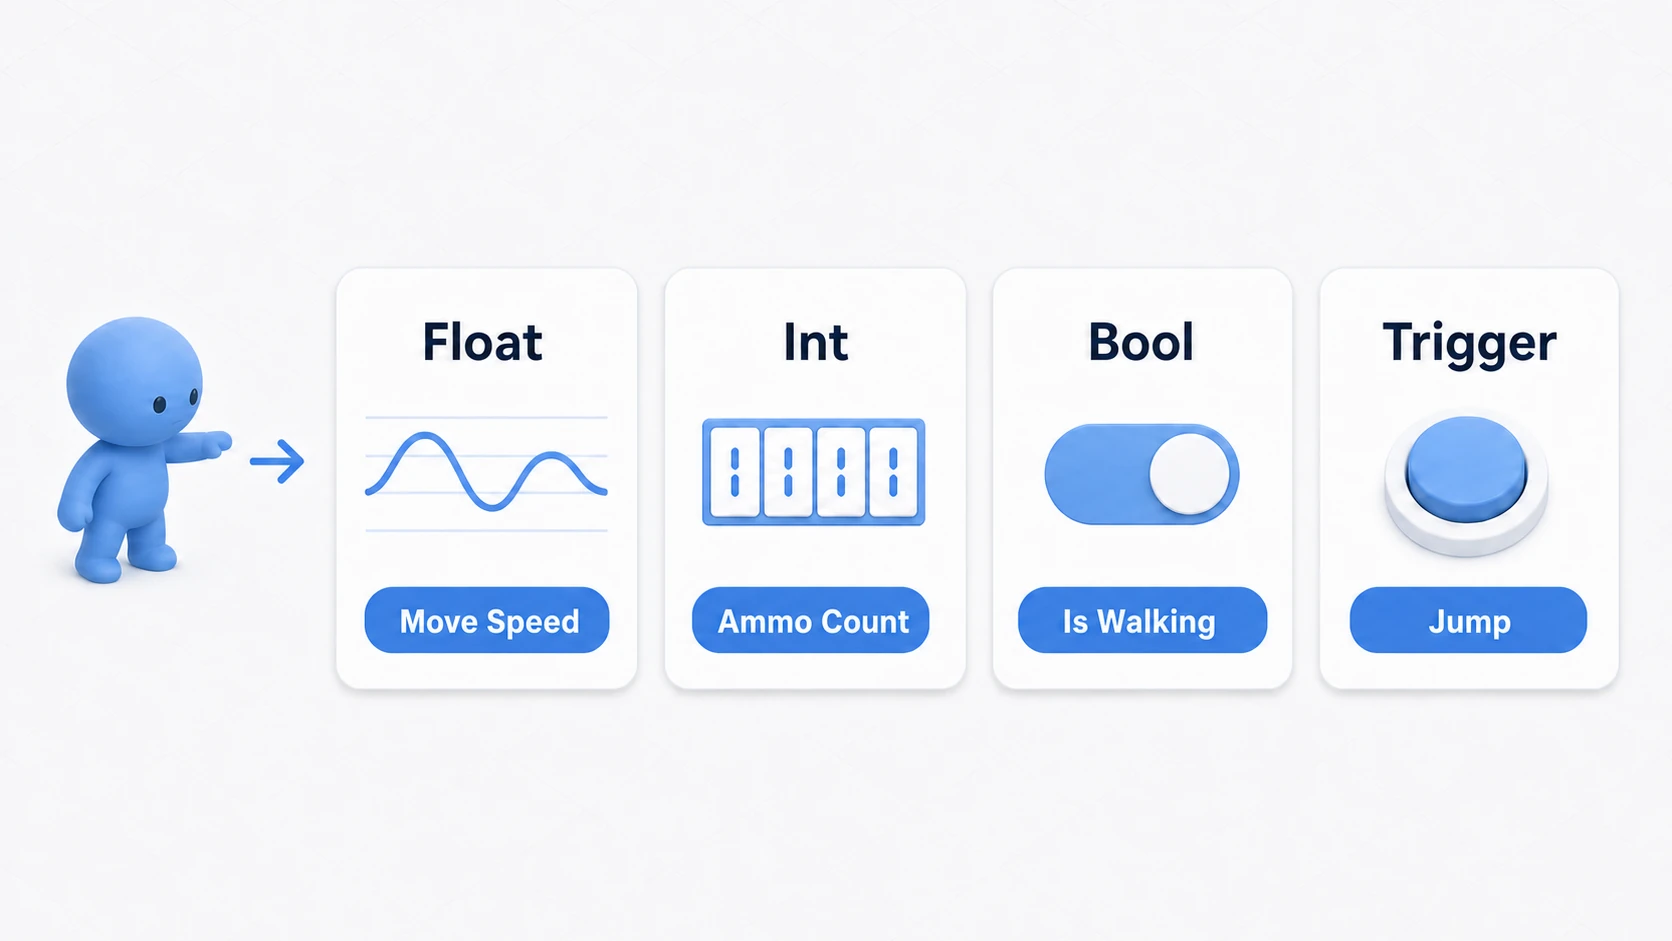
| Type | Use Case |
|---|---|
| Float | Floating-point numbers (e.g., movement speed) |
| Int | Integers (e.g., ammo count) |
| Bool | True/false values (e.g., whether the character is walking) |
| Trigger | One-shot flags (e.g., jump) |
Creating Parameters
Click the "Parameters" tab on the left side of the Animator window and add parameters with the "+" button.
Controlling the Animator from Scripts
using UnityEngine;

public class PlayerController : MonoBehaviour
{
    private Animator animator;

    void Start()
    {
        animator = GetComponent<Animator>();
    }

    void Update()
    {
        // Get movement input
        float horizontal = Input.GetAxis("Horizontal");
        float vertical = Input.GetAxis("Vertical");
        Vector3 movement = new Vector3(horizontal, 0, vertical);
        float speed = movement.magnitude;

        // Set the Animator parameter
        animator.SetFloat("Speed", speed);

        // Jump input
        if (Input.GetKeyDown(KeyCode.Space))
        {
            animator.SetTrigger("Jump");
        }
    }
}
Parameter Setter Methods
animator.SetBool("isWalking", true);
animator.SetFloat("Speed", 5.0f);
animator.SetInteger("AmmoCount", 10);
animator.SetTrigger("Jump");
Using Blend Trees
A Blend Tree smoothly blends multiple animations based on the value of a parameter.
Creating a Blend Tree
- Right-click on an empty area in the Animator window
- Select "Create State" → "From New Blend Tree"
- Double-click the Blend Tree to open its editor
- Choose a "Blend Type" (usually "1D")
- Choose a "Parameter" (e.g., "Speed")
- Add animation clips and set their Thresholds
Example:
- Idle - Threshold: 0
- Walk - Threshold: 0.5
- Run - Threshold: 1.0
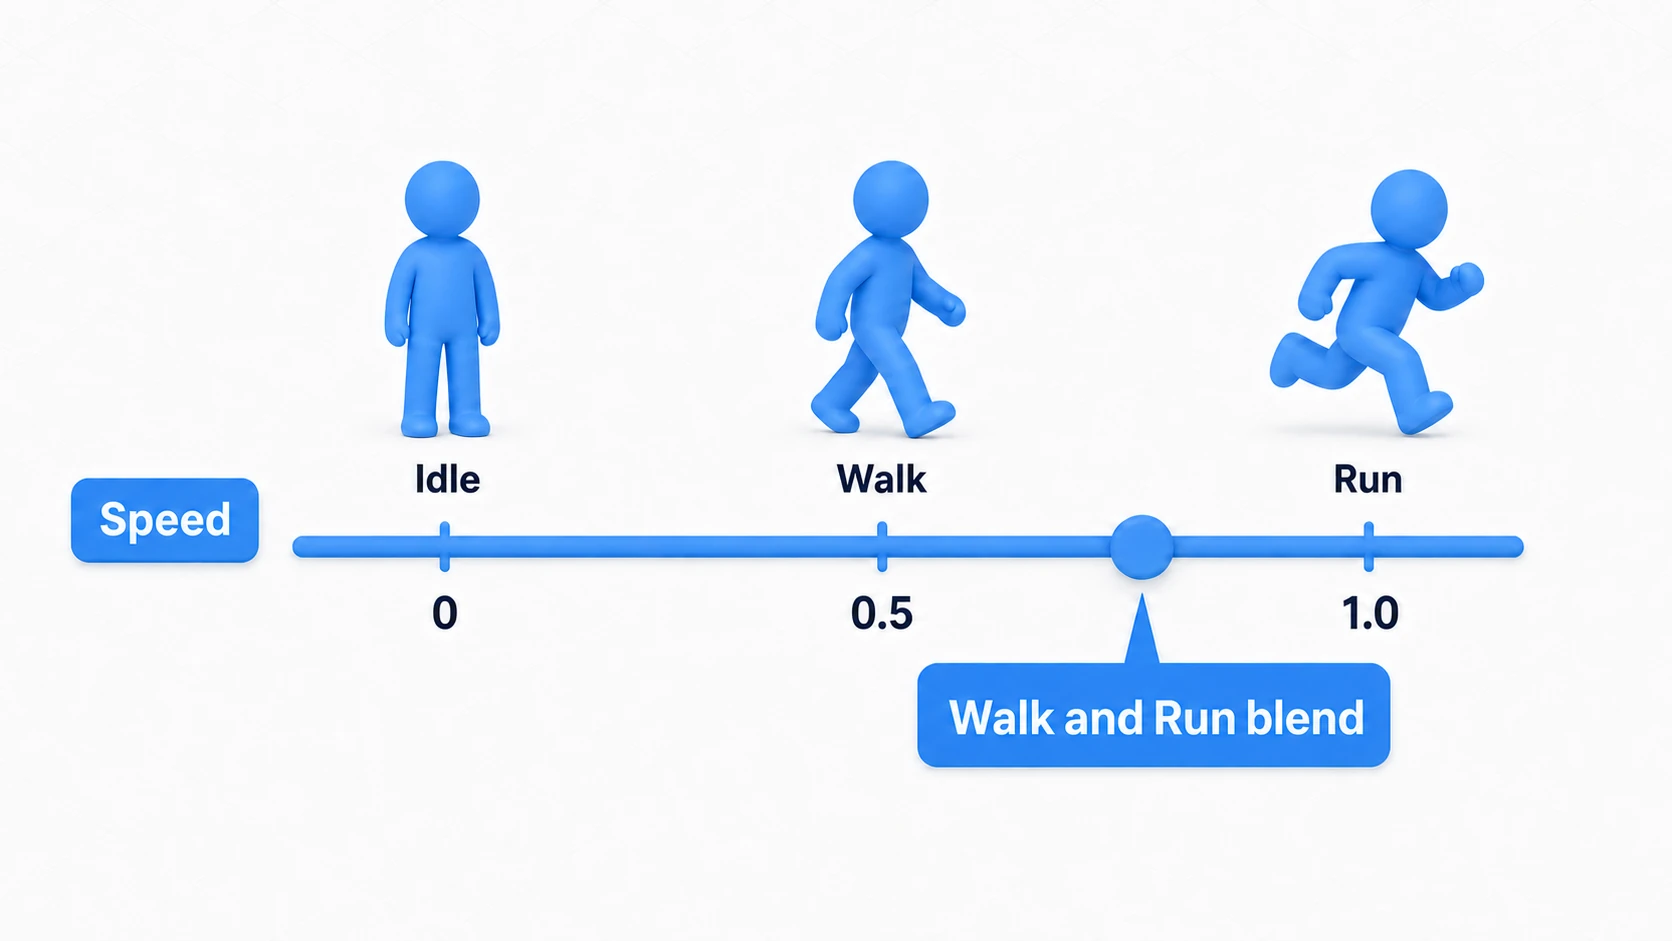
Now, when Speed is at an in-between value, the neighboring animations mix automatically. The "pop" of switching disappears, and walk-to-run transitions become smooth.
Using Animation Layers
Animation Layers let you stack multiple State Machines and play them together. Use them when you want one character to do "movement on the lower body, a different action on the upper body" at the same time.
Take "shoot while walking" as an example. You play the walking motion on a Base Layer (lower body) and the shooting motion on an Upper Body Layer, on separate layers. Then you use an Avatar Mask to say "this layer only drives the upper-body bones," so the shooting motion is layered on top without disturbing the walk.
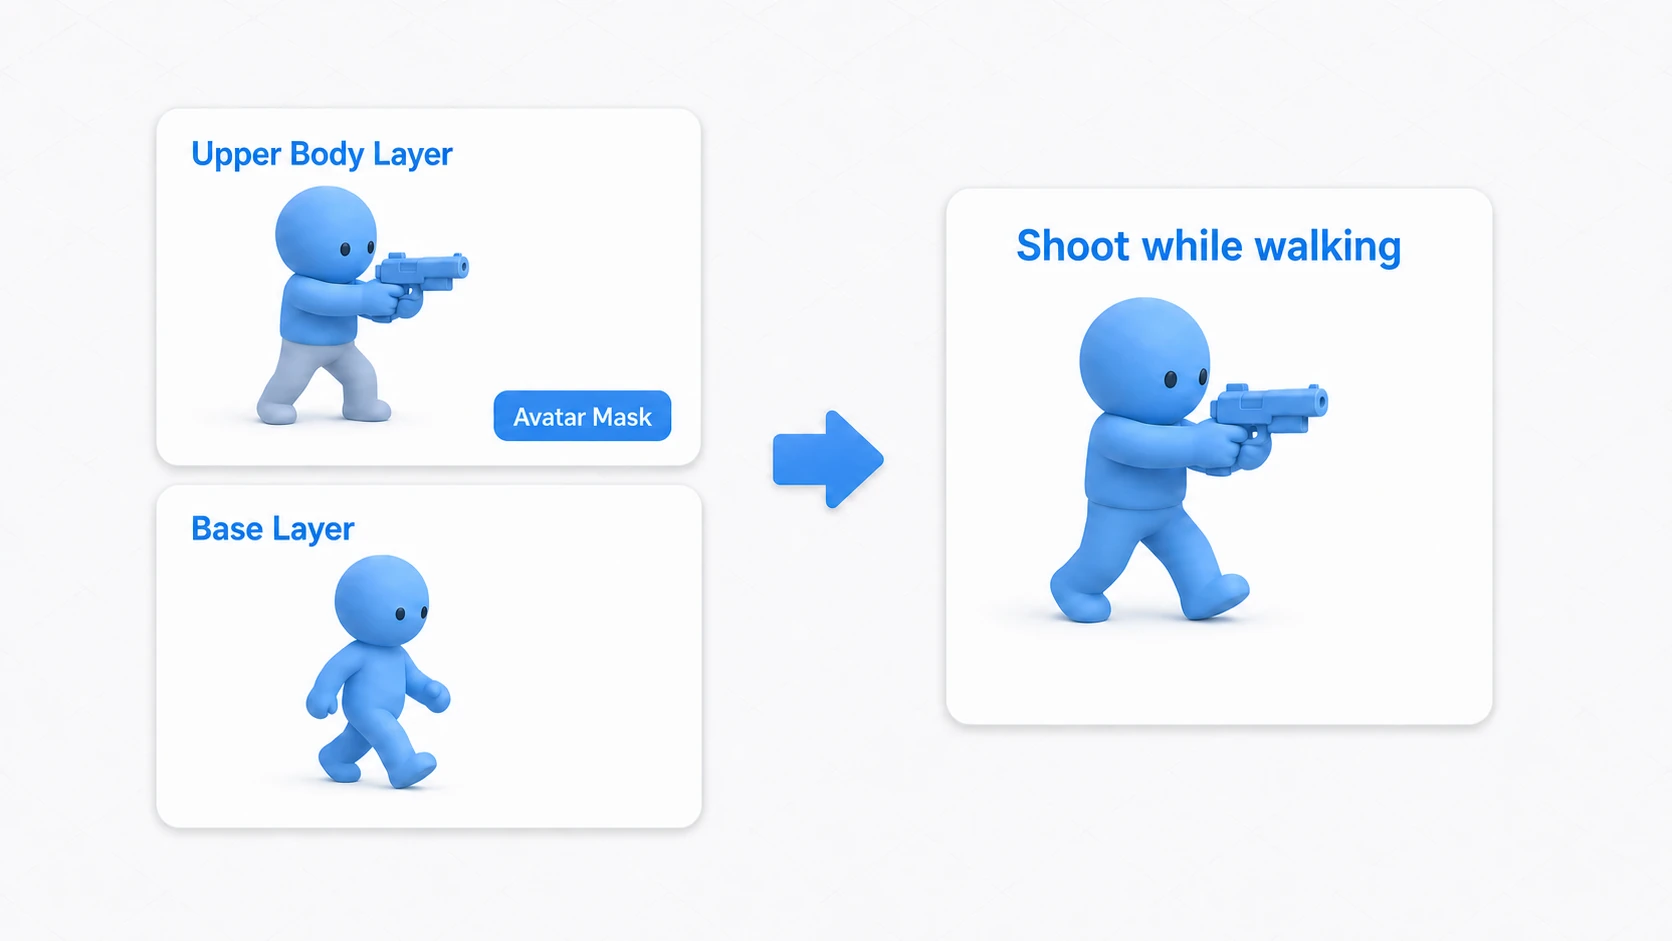
Layer Settings
| Setting | Description |
|---|---|
| Weight | The layer's weight (0–1). 0 disables it, 1 fully overrides |
| Blending | Override or Additive |
| Mask | Which body parts the layer applies to (specified via Avatar Mask) |
Cramming attack, hit, and shoot all into the movement State Machine causes a combinatorial explosion, but splitting them into layers lets you manage "lower-body state × upper-body state" independently.
Hands-On: Movement, Jump, and Attack in One Controller
The hero of a 3D action game, the player character of a top-down ARPG, a soulslike enemy — the genres differ, but a character's foundation is the same combination: "movement (Blend Tree) + jump and attack interrupts." Let's assemble the pieces you've learned into a single Animator Controller.
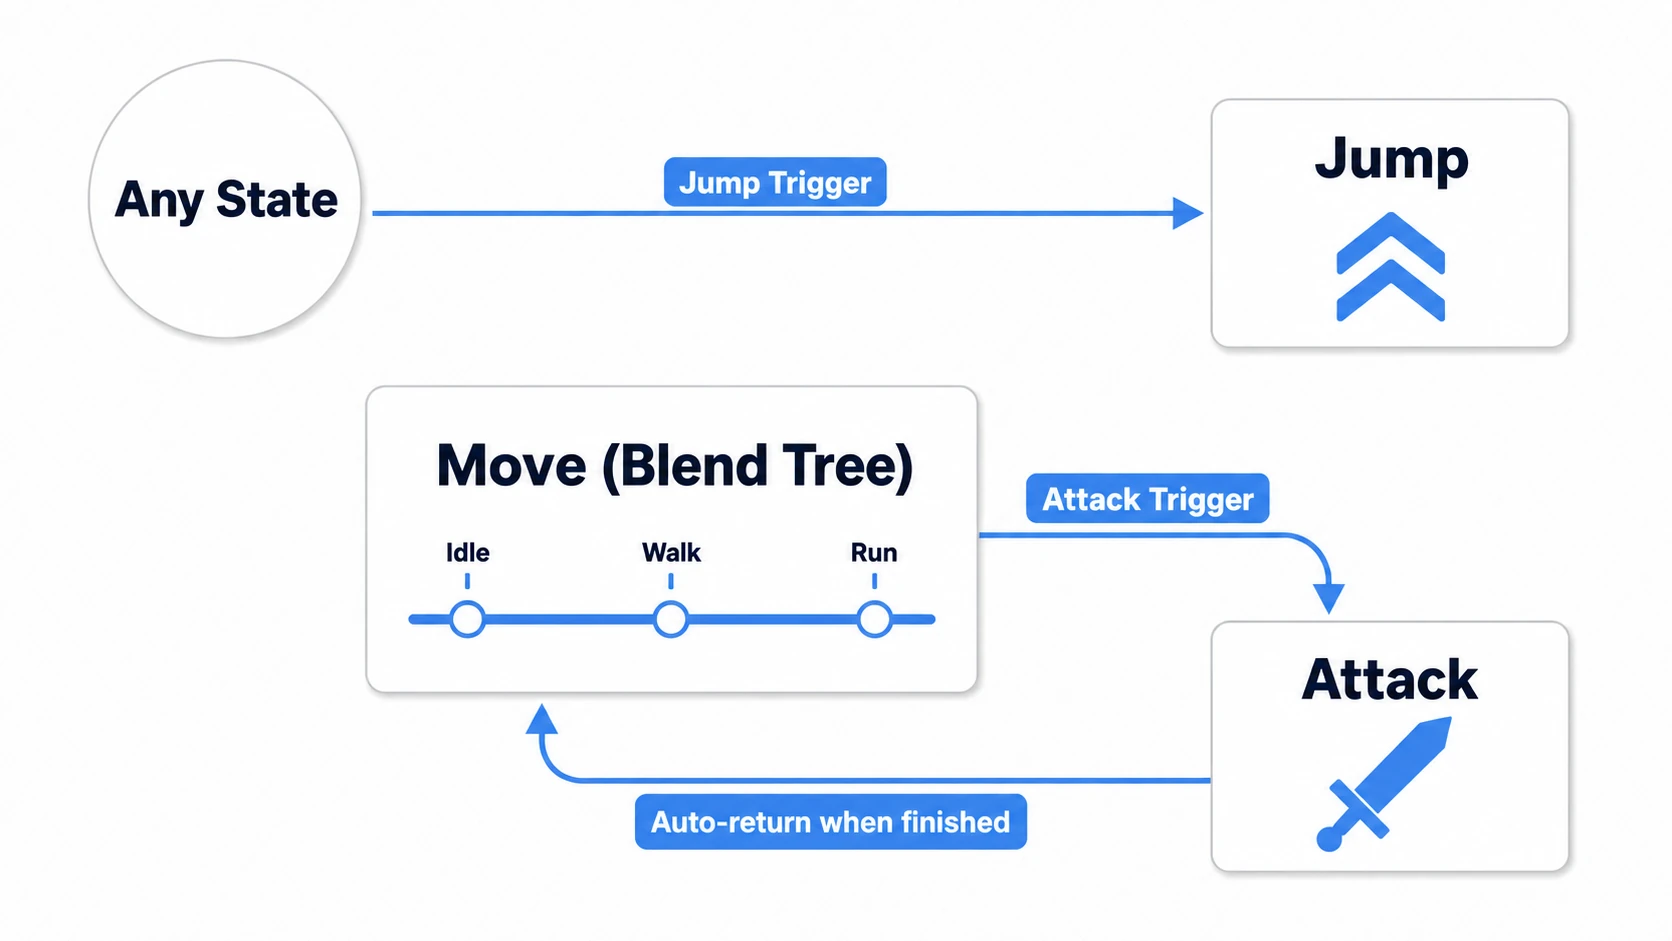
Example 1: Movement Animation (Blend Tree + Script)
using UnityEngine;

public class MovementAnimator : MonoBehaviour
{
    [SerializeField] private float walkSpeed = 2f;
    [SerializeField] private float runSpeed = 5f;

    private Animator animator;
    private CharacterController controller;

    // Hash the parameter name for better performance
    private static readonly int SpeedHash = Animator.StringToHash("Speed");

    void Start()
    {
        animator = GetComponent<Animator>();
        controller = GetComponent<CharacterController>();
    }

    void Update()
    {
        float h = Input.GetAxis("Horizontal");
        float v = Input.GetAxis("Vertical");
        Vector3 move = new Vector3(h, 0, v);

        // Run check (Shift key)
        float targetSpeed = Input.GetKey(KeyCode.LeftShift) ? runSpeed : walkSpeed;

        // Normalize to match the Blend Tree Thresholds (0-1)
        // move.magnitude reaches sqrt(2) (~1.41) on diagonal movement, so clamp it
        float normalizedSpeed = Mathf.Clamp01(move.magnitude) * (targetSpeed / runSpeed);
        animator.SetFloat(SpeedHash, normalizedSpeed);

        // Movement
        controller.Move(move.normalized * targetSpeed * Time.deltaTime);
    }
}
Performance tip: Hashing parameter names with
Animator.StringToHashavoids string comparisons every frame. It pays off for frequently called methods likeSetFloatandSetBool. There's a second benefit: typo protection — a misspelled parameter name doesn't raise an error, it just silently does nothing, so consolidating names into hash constants in one place makes mistakes far easier to spot.
Example 2: Jump Animation
// Transition setup from Any State to Jump:
// - Conditions: Jump (Trigger)
// - Has Exit Time: off
// - Transition Duration: 0.1

void Update()
{
    if (Input.GetKeyDown(KeyCode.Space) && isGrounded)
    {
        animator.SetTrigger("Jump");
    }
}
Example 3: Attack Animation (with Combo Support)
// Transition setup:
// - Idle to Attack: Conditions: Attack (Trigger), Has Exit Time: off
// - Attack to Idle: Has Exit Time: on (auto-transitions after the attack animation ends)

void Update()
{
    if (Input.GetMouseButtonDown(0))
    {
        animator.SetTrigger("Attack");
    }
}
Mashing warning (Triggers are "reservations"): Click again mid-attack, and that
SetTriggerdoesn't vanish — it stays pending as a reservation, and a second attack fires on its own the instant you return to Idle. If you don't want mashing to misfire, either ignore input during the attack (only callSetTriggerwhen attacking is allowed) or clear stale reservations withanimator.ResetTrigger("Attack")when an attack starts. Flip it around, though, and this "reservation" behavior is the foundation of input buffering for fighting-game-style combos.
Two points matter most.
- Movement is a "value"; jump and attack are "signals": Leave continuously changing movement to a Float + Blend Tree, and let one-shot events interrupt via Triggers. The whole art of choosing among the four parameter types boils down to this one sentence.
- "Going in" is Has Exit Time off; "coming back" is on: React to input instantly (off), and let motions play to the end before automatically returning (on). Most cases of "my attack gets cut off" or "it never returns after attacking" come from mixing these two up.
As your character roster grows, you can reuse this whole structure and swap only the clips inside — that's the Animator Override Controller, up next.
Animator Override Controller
An Animator Override Controller lets you reuse the structure of an existing Animator Controller (State Machine, Transitions) while swapping out only the animation clips.
Use Cases
- Enemy variations (same movement, different look)
- Swapping attack motions per weapon
- Character skins
How to Create One
- Right-click in the Project window → Create → Animator Override Controller
- Set the base Animator Controller in the "Controller" field
- Replace the animations shown in the list
// Swapping dynamically from a script
public AnimatorOverrideController slimeOverride;
public AnimatorOverrideController goblinOverride;

void SetEnemyType(EnemyType type)
{
    animator.runtimeAnimatorController = type == EnemyType.Slime
        ? slimeOverride
        : goblinOverride;
}
Bonus: Good Things to Know in Advance
Once you can build an Animator Controller, these topics come into view next. Even just knowing the names keeps you from getting lost.
- You can call code mid-animation (Animation Events): "Play a footstep the moment the foot lands" or "spawn the damage hitbox right at the swing" — the standard tool is an Animation Event placed on the clip that calls a function in your script.
- Off-screen Animators can be skipped automatically (Culling Mode): Setting the Animator component's
Culling ModetoCull Update Transformsreduces the cost of characters the camera can't see. It pays off in games with lots of characters on screen. - Humanoid vs Generic is an import-settings topic: The Humanoid setup for sharing animations between human-shaped characters is covered in the 3D model import guide. And 2D sprite animation is driven by this very same Animator Controller (see the 2D animation guide).
Summary
The Animator Controller is Unity's official animation management system.
- Manage multiple animations visually with the State Machine
- Control animations from scripts with Parameters
- Set up transitions between animations with Transitions
- Blend multiple animations smoothly with Blend Trees
- Layer multiple animations with Animation Layers
Start with just three states — Idle, Walk, and Jump. What "states" does your character have?
Once you have these basics down, the next step is techniques specific to 3D characters. 8-directional movement (2D Blend Trees), upper-body-only control (Avatar Masks), and when to use Root Motion are covered in 3D Character Animation in Practice.