You repeated the same 30 clicks again today. Select a prefab, nudge its position, select the next one, nudge again — and somewhere along the way you thought, "Couldn't this be a single button?" Well, in Unity, you can grant that wish yourself.
Editor extensions are techniques for extending the Unity Editor itself. From adding menu items to creating custom windows to rebuilding the Inspector, you can write tools tailored to your own project in C#. It's code that adds zero bytes to your game — it exists purely to make development faster.
What You'll Learn
- The fundamental rule of editor extensions — placing scripts in an Editor folder
- How to build MenuItem, EditorWindow, CustomEditor, and PropertyDrawer extensions
- How to use editor APIs such as AssetDatabase, Selection, and Undo
- Practical: building a bulk alignment tool that tidies a messy level in one click
Tested with: Unity 2022.3 LTS / Unity 6
- The Editor Folder
- MenuItem: Adding Menu Items
- EditorWindow: Creating Custom Windows
- CustomEditor: Customizing the Inspector
- PropertyDrawer: Customizing Property Display
- EditorGUILayout Reference
- OnSceneGUI: Drawing in the Scene View
- AssetDatabase: Working with Assets
- Selection: The Currently Selected Objects
- Undo: Implementing Undo/Redo
- Practical: Building a Bulk Alignment Tool
- Best Practices
- Summary
The Editor Folder
Editor extension scripts must always be placed inside an Editor folder.
Why the Editor Folder Matters
- Keeps editor-only code separate
- Automatically excluded from builds
- Allows the use of editor-only APIs
- Controls compilation order
Where to Place It
- An Editor folder can live anywhere in your project
Assets/Editoris the most common location- You can have multiple Editor folders
- Resources used by editor extensions (images, fonts, etc.) go in an
Editor Default Resourcesfolder
MenuItem: Adding Menu Items
First, knowing where in the editor each of the four extension types makes its change will make the rest of this article easier to follow.
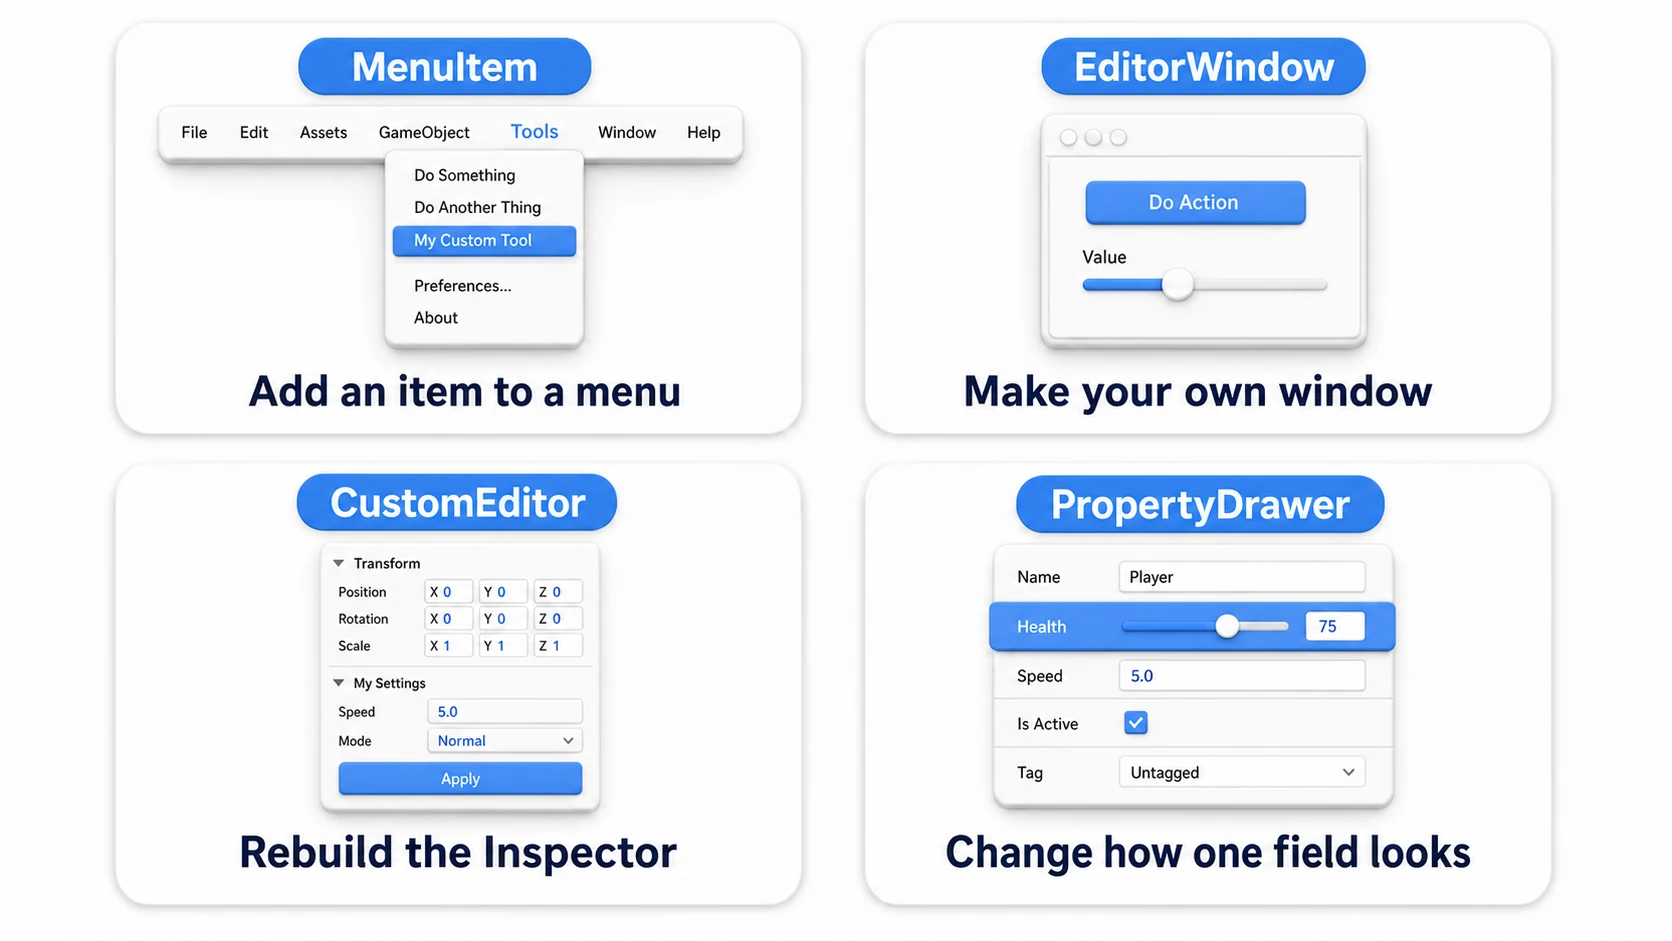
MenuItem is the simplest editor extension: it adds items to the Unity Editor's menu bar.
Basic Usage
using UnityEngine;
using UnityEditor;

public class MenuItemExample
{
    [MenuItem("Tools/Do Something")]
    static void DoSomething()
    {
        Debug.Log("Something!");
    }
}
This example adds a Tools > Do Something menu item.
Assigning Shortcut Keys
[MenuItem("Tools/Do Something %g")] // Ctrl+G (Windows) / Cmd+G (Mac)
static void DoSomething()
{
    Debug.Log("Something!");
}
Shortcut key symbols:
%: Ctrl (Windows) / Cmd (Mac)#: Shift&: Alt_: A plain key (e.g._gis G)
Enabling/Disabling Menu Items
[MenuItem("Tools/Do Something")]
static void DoSomething()
{
    Debug.Log("Something!");
}

[MenuItem("Tools/Do Something", true)]
static bool ValidateDoSomething()
{
    // Only enabled when something is selected
    return Selection.activeGameObject != null;
}
Adding Context Menu Items
[MenuItem("CONTEXT/Transform/Reset Position")]
static void ResetPosition(MenuCommand command)
{
    Transform transform = (Transform)command.context;
    Undo.RecordObject(transform, "Reset Position");
    transform.position = Vector3.zero;
}
Important: Whenever you modify an object, support Undo by calling
Undo.RecordObject(). When you useUndo.RecordObject(), callingEditorUtility.SetDirty()is not needed (Undo itself tracks the change).
EditorWindow: Creating Custom Windows
EditorWindow is a powerful feature that lets you create your own windows.
Basic Usage
using UnityEngine;
using UnityEditor;

public class MyEditorWindow : EditorWindow
{
    [MenuItem("Window/My Editor Window")]
    static void Open()
    {
        GetWindow<MyEditorWindow>("My Editor Window");
    }

    void OnGUI()
    {
        GUILayout.Label("Hello, Editor Window!");
    }
}
Using UI Toolkit (Unity 2021 and later)
From Unity 2022 onward, UI Toolkit is the recommended UI system for editor extensions.
using UnityEngine;
using UnityEditor;
using UnityEngine.UIElements;

public class MyEditorWindow : EditorWindow
{
    [MenuItem("Window/My Editor Window")]
    static void Open()
    {
        GetWindow<MyEditorWindow>("My Editor Window");
    }

    void CreateGUI()
    {
        // Label
        var label = new Label("Hello, UI Toolkit!");
        rootVisualElement.Add(label);

        // Text field
        var textField = new TextField("Name");
        textField.RegisterValueChangedCallback(evt => Debug.Log(evt.newValue));
        rootVisualElement.Add(textField);

        // Button
        var button = new Button(() => Debug.Log("Clicked!")) { text = "Click Me" };
        rootVisualElement.Add(button);
    }
}
Why UI Toolkit: It lets you separate styling into stylesheets (USS) and supports data binding. Consider UI Toolkit for any new editor extension.
Persisting Data
public class MyEditorWindow : EditorWindow
{
    string text = "";

    void OnGUI()
    {
        text = EditorGUILayout.TextField("Text", text);
    }

    void OnEnable()
    {
        text = EditorPrefs.GetString("MyEditorWindow_Text", "");
    }

    void OnDisable()
    {
        EditorPrefs.SetString("MyEditorWindow_Text", text);
    }
}
CustomEditor: Customizing the Inspector
CustomEditor lets you customize how a specific component appears in the Inspector.
Basic Usage (Recommended: SerializedObject)
// Component
using UnityEngine;

public class MyComponent : MonoBehaviour
{
    public int value;
    public string text;
}
// Custom editor (recommended pattern)
using UnityEditor;

[CustomEditor(typeof(MyComponent))]
public class MyComponentEditor : Editor
{
    SerializedProperty valueProp;
    SerializedProperty textProp;

    void OnEnable()
    {
        valueProp = serializedObject.FindProperty("value");
        textProp = serializedObject.FindProperty("text");
    }

    public override void OnInspectorGUI()
    {
        serializedObject.Update();

        EditorGUILayout.PropertyField(valueProp);
        EditorGUILayout.PropertyField(textProp);

        if (GUILayout.Button("Reset"))
        {
            valueProp.intValue = 0;
            textProp.stringValue = "";
        }

        serializedObject.ApplyModifiedProperties();
    }
}
Important: Using
SerializedObjectautomatically gives you Undo/Redo support, multi-object editing, and Prefab override detection. There is no need to callEditorUtility.SetDirty().
⚠️ Manipulating target Directly (Not Recommended)
Warning: This approach does not support Undo/Redo or multi-object editing, so use the SerializedObject version above instead. It is shown here only to help you understand existing code.
// Deprecated pattern - no Undo/Redo support
[CustomEditor(typeof(MyComponent))]
public class MyComponentEditor : Editor
{
    public override void OnInspectorGUI()
    {
        MyComponent myComponent = (MyComponent)target;

        // Direct edits don't support Undo or multi-object editing
        myComponent.value = EditorGUILayout.IntField("Value", myComponent.value);
        myComponent.text = EditorGUILayout.TextField("Text", myComponent.text);

        if (GUI.changed)
        {
            EditorUtility.SetDirty(target);  // Notify Unity of the change (deprecated pattern)
        }
    }
}
About SetDirty: When you use
SerializedObject.ApplyModifiedProperties(),EditorUtility.SetDirty()is not needed.SetDirty()is only required when manipulatingtargetdirectly — and that pattern itself is discouraged.
Benefits of SerializedObject
- Undo/Redo: Supported automatically
- Multi-object editing: Works when multiple objects are selected
- Prefabs: Override values are automatically shown in bold
- No SetDirty needed:
ApplyModifiedProperties()notifies Unity of changes automatically
EditorGUILayout Reference
A quick reference of commonly used EditorGUILayout fields.
| Method | Purpose | Return value |
|---|---|---|
IntField | Integer input | int |
FloatField | Float input | float |
TextField | String input | string |
Toggle | Checkbox | bool |
Popup | Dropdown selection | int (index) |
EnumPopup | Enum selection | Enum |
ObjectField | Object reference | Object |
Vector3Field | Vector3 input | Vector3 |
ColorField | Color picker | Color |
Slider | Slider | float |
IntSlider | Integer slider | int |
Foldout | Foldout | bool |
BeginHorizontal/EndHorizontal | Horizontal layout | - |
BeginVertical/EndVertical | Vertical layout | - |
Space | Add spacing | - |
OnSceneGUI: Drawing in the Scene View
Implementing OnSceneGUI in a CustomEditor lets you draw handles and guides in the Scene view.
// Waypoint manager component
using UnityEngine;

public class WaypointManager : MonoBehaviour
{
    public Transform[] waypoints;
}
// Custom editor (implements OnSceneGUI)
using UnityEditor;
using UnityEngine;

[CustomEditor(typeof(WaypointManager))]
public class WaypointManagerEditor : Editor
{
    void OnSceneGUI()
    {
        WaypointManager manager = (WaypointManager)target;

        // Draw lines between waypoints
        Handles.color = Color.yellow;
        for (int i = 0; i < manager.waypoints.Length - 1; i++)
        {
            Handles.DrawLine(
                manager.waypoints[i].position,
                manager.waypoints[i + 1].position
            );
        }

        // Show draggable handles
        for (int i = 0; i < manager.waypoints.Length; i++)
        {
            EditorGUI.BeginChangeCheck();
            Vector3 newPos = Handles.PositionHandle(
                manager.waypoints[i].position,
                Quaternion.identity
            );
            if (EditorGUI.EndChangeCheck())
            {
                Undo.RecordObject(manager.waypoints[i], "Move Waypoint");
                manager.waypoints[i].position = newPos;
            }
        }
    }
}
Use cases: Placing waypoints, tuning attack ranges, setting spawn positions — anywhere you want to edit things intuitively right in the Scene view.
PropertyDrawer: Customizing Property Display
PropertyDrawer lets you customize how a specific property is displayed.
Basic Usage
// Custom class
using UnityEngine;

[System.Serializable]
public class Range
{
    public float min;
    public float max;
}
// PropertyDrawer
using UnityEditor;
using UnityEngine;

[CustomPropertyDrawer(typeof(Range))]
public class RangeDrawer : PropertyDrawer
{
    public override void OnGUI(Rect position, SerializedProperty property, GUIContent label)
    {
        EditorGUI.BeginProperty(position, label, property);

        position = EditorGUI.PrefixLabel(position, GUIUtility.GetControlID(FocusType.Passive), label);

        var minRect = new Rect(position.x, position.y, position.width / 2 - 5, position.height);
        var maxRect = new Rect(position.x + position.width / 2 + 5, position.y, position.width / 2 - 5, position.height);

        EditorGUI.PropertyField(minRect, property.FindPropertyRelative("min"), GUIContent.none);
        EditorGUI.PropertyField(maxRect, property.FindPropertyRelative("max"), GUIContent.none);

        EditorGUI.EndProperty();
    }
}
Using PropertyAttribute (a ReadOnly Attribute Example)
// Attribute definition
using UnityEngine;

public class ReadOnlyAttribute : PropertyAttribute
{
}
// PropertyDrawer
using UnityEditor;
using UnityEngine;

[CustomPropertyDrawer(typeof(ReadOnlyAttribute))]
public class ReadOnlyDrawer : PropertyDrawer
{
    public override void OnGUI(Rect position, SerializedProperty property, GUIContent label)
    {
        GUI.enabled = false;
        EditorGUI.PropertyField(position, property, label, true);
        GUI.enabled = true;
    }
}
Usage:
public class MyComponent : MonoBehaviour
{
    [ReadOnly]
    public int readOnlyValue;
}
AssetDatabase: Working with Assets
AssetDatabase is the API for working with assets in your project.
// Find all prefabs
string[] guids = AssetDatabase.FindAssets("t:Prefab");
foreach (string guid in guids)
{
    string path = AssetDatabase.GUIDToAssetPath(guid);
    GameObject prefab = AssetDatabase.LoadAssetAtPath<GameObject>(path);
    Debug.Log(prefab.name);
}

// Create a ScriptableObject
MyScriptableObject asset = ScriptableObject.CreateInstance<MyScriptableObject>();
AssetDatabase.CreateAsset(asset, "Assets/MyAsset.asset");
AssetDatabase.SaveAssets();

// Delete, rename, and move assets
AssetDatabase.DeleteAsset("Assets/MyAsset.asset");
AssetDatabase.RenameAsset("Assets/OldName.asset", "NewName");
AssetDatabase.MoveAsset("Assets/OldPath/MyAsset.asset", "Assets/NewPath/MyAsset.asset");
Selection: The Currently Selected Objects
The Selection class lets you get and set the objects currently selected in the Unity Editor.
// Get the selected object
GameObject selectedObject = Selection.activeGameObject;

// Get multiple selected objects
GameObject[] selectedObjects = Selection.gameObjects;
foreach (GameObject obj in selectedObjects)
{
    Debug.Log(obj.name);
}

// Select an object
GameObject obj = GameObject.Find("MyObject");
Selection.activeGameObject = obj;
Undo: Implementing Undo/Redo
The Undo class lets you implement Undo/Redo support in your editor extensions.
// Record a change to an object
Undo.RecordObject(myObject, "Change Value");
myObject.value = 10;

// Record object creation
GameObject obj = new GameObject("New Object");
Undo.RegisterCreatedObjectUndo(obj, "Create Object");

// Record object deletion
Undo.DestroyObjectImmediate(obj);
Practical: Building a Bulk Alignment Tool
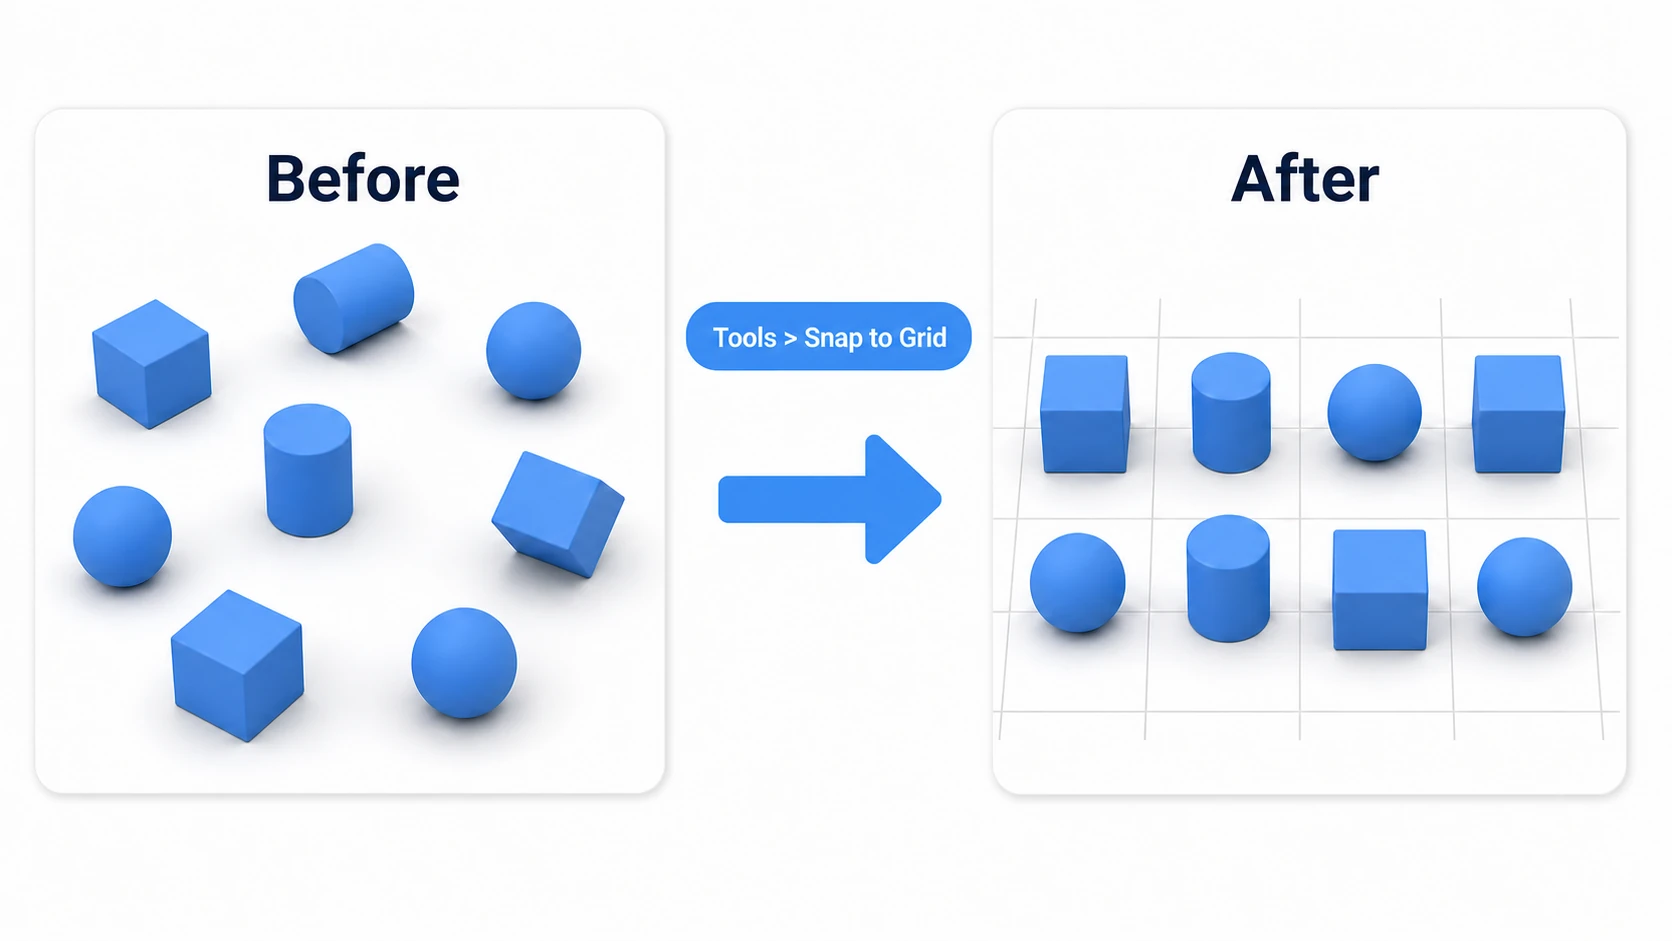
Fences and streetlights placed across a 3D level, tile-based platforms in a 2D stage, aligning UI — "the objects I placed by hand are slightly off" is a universal level-design headache. Combining the pieces from this article (MenuItem + Selection + Undo), let's build a tool that snaps the selected objects to a grid all at once.
// Assets/Editor/SnapToGrid.cs
using UnityEngine;
using UnityEditor;

public static class SnapToGrid
{
    private const float GridSize = 0.5f; // Snap increment

    [MenuItem("Tools/Snap to Grid %#g")] // Ctrl+Shift+G
    static void Snap()
    {
        foreach (GameObject obj in Selection.gameObjects)
        {
            // Undo support: Ctrl+Z reverts to before the alignment
            Undo.RecordObject(obj.transform, "Snap to Grid");

            Vector3 p = obj.transform.position;
            obj.transform.position = new Vector3(
                Mathf.Round(p.x / GridSize) * GridSize,
                Mathf.Round(p.y / GridSize) * GridSize,
                Mathf.Round(p.z / GridSize) * GridSize);
        }
    }

    // Gray out the menu when nothing is selected
    [MenuItem("Tools/Snap to Grid %#g", true)]
    static bool Validate() => Selection.gameObjects.Length > 0;
}
To use it, multi-select the scattered objects and press Ctrl+Shift+G — that's it. Fifty props snap right onto a 0.5-unit grid. The level whose misalignment was bugging you is tidy in three seconds.
There are two key points. "Always build Undo into your editor extensions" (that one line of Undo.RecordObject turns a tool's mistakes into "just try it, Ctrl+Z reverts it." A tool you can't undo won't get used by your team) and "Control the menu's enabled state with a Validate function" (just graying it out when it can't be used makes a big difference in how trustworthy the tool feels). From here, grow it — "let the increment be set from an EditorWindow," "snap rotation to 90 degrees too" — and your project's own toolbox keeps expanding.
Other Classic Recipes
Example 1: Delete All Selected Objects
[MenuItem("Tools/Delete Selected Objects")]
static void DeleteSelectedObjects()
{
    if (Selection.gameObjects.Length == 0)
    {
        Debug.LogWarning("No objects selected.");
        return;
    }

    foreach (GameObject obj in Selection.gameObjects)
    {
        Undo.DestroyObjectImmediate(obj);
    }
}

[MenuItem("Tools/Delete Selected Objects", true)]
static bool ValidateDeleteSelectedObjects()
{
    return Selection.gameObjects.Length > 0;
}
Example 2: Listing Assets in a Custom Window
public class AssetBrowserWindow : EditorWindow
{
    List<GameObject> prefabs = new List<GameObject>();
    Vector2 scrollPosition;

    [MenuItem("Window/Asset Browser")]
    static void Open()
    {
        GetWindow<AssetBrowserWindow>("Asset Browser");
    }

    void OnEnable()
    {
        LoadPrefabs();
    }

    void LoadPrefabs()
    {
        prefabs.Clear();
        string[] guids = AssetDatabase.FindAssets("t:Prefab");
        foreach (string guid in guids)
        {
            string path = AssetDatabase.GUIDToAssetPath(guid);
            GameObject prefab = AssetDatabase.LoadAssetAtPath<GameObject>(path);
            prefabs.Add(prefab);
        }
    }

    void OnGUI()
    {
        if (GUILayout.Button("Reload"))
        {
            LoadPrefabs();
        }

        scrollPosition = EditorGUILayout.BeginScrollView(scrollPosition);

        foreach (GameObject prefab in prefabs)
        {
            EditorGUILayout.ObjectField(prefab, typeof(GameObject), false);
        }

        EditorGUILayout.EndScrollView();
    }
}
Best Practices
- Place scripts in an Editor folder - Editor extension scripts always belong in an Editor folder
- Implement Undo/Redo - Always use
Undo.RecordObjectwhen modifying objects - Use SerializedObject - In a CustomEditor, use SerializedObject to support multi-object editing
- Handle errors - Handle errors properly with try-catch to keep the editor stable
- Mind performance - OnGUI runs every frame, so cache the results of expensive operations
Summary
Unity editor extensions are a powerful way to dramatically improve your development efficiency.
- MenuItem - Add items to the menu bar, complete with shortcut keys
- EditorWindow - Create custom windows and build complex tools
- CustomEditor - Customize the Inspector and provide a friendlier UI
- PropertyDrawer - Customize how specific properties are displayed
- Always build Undo into your tools — a tool you can't revert won't get used
Automate repetitive tasks, standardize workflows across your team, and build tools tailored to your project's specific needs. That operation you repeated 30 times today — the code to make it a single button can probably be written in about 20 lines.