"I want controls that work with both keyboard and gamepad." "I want players to be able to customize their key bindings." If you have ever struggled to achieve these goals with the old Input System, the New Input System is here to help.
New Input System is the next-generation input handling system introduced in Unity 2019. It uses an abstracted concept called Input Actions to achieve flexible, device-independent input processing.
What You'll Learn
- How Input Actions work (device-independent input handling)
- The workflow from creating an Input Actions Asset to script implementation
- When to use the Player Input approach vs. the generated C# class approach
- How to fix classic problems like "my character won't stop moving"
Tested with: Unity 2022.3 LTS / Unity 6
- Installation and Initial Setup
- Differences from the Old Input System
- Components of the New Input System
- Creating and Configuring Input Actions
- Script Implementation
- Interactions and Processors
- Device Connection/Disconnection Detection
- Hands-On: Building One Complete Player
- Common Issues and Troubleshooting
- Bonus: Good to Know for Later
- Summary
Installation and Initial Setup
Installing the Package
- Open
Window > Package Manager - Select
Unity Registryfrom the dropdown at the top-left - Search for
Input Systemand install it - Click "Yes" when prompted to restart
Configuring Active Input Handling
- Open
Edit > Project Settings > Player - Check
Other Settings > Configuration > Active Input Handling - Select Both or Input System Package (New)
- The Editor will restart
Both: Allows using both the old and new Input Systems simultaneously. Useful during the migration period.
Differences from the Old Input System
Problems with the Old Input System
- Required separate code for each device
- Difficult to customize key bindings
- Cross-platform support was cumbersome
- Local multiplayer was difficult to implement
Advantages of the New Input System
- Device-independent implementation - Same code works across multiple devices
- Cross-platform support - Centrally managed via configuration files
- Key binding customization - Provided as a built-in feature
- Local multiplayer support - Easily implemented with the Player Input component
- Complex input patterns - Long press, double-click, etc. achieved through configuration alone
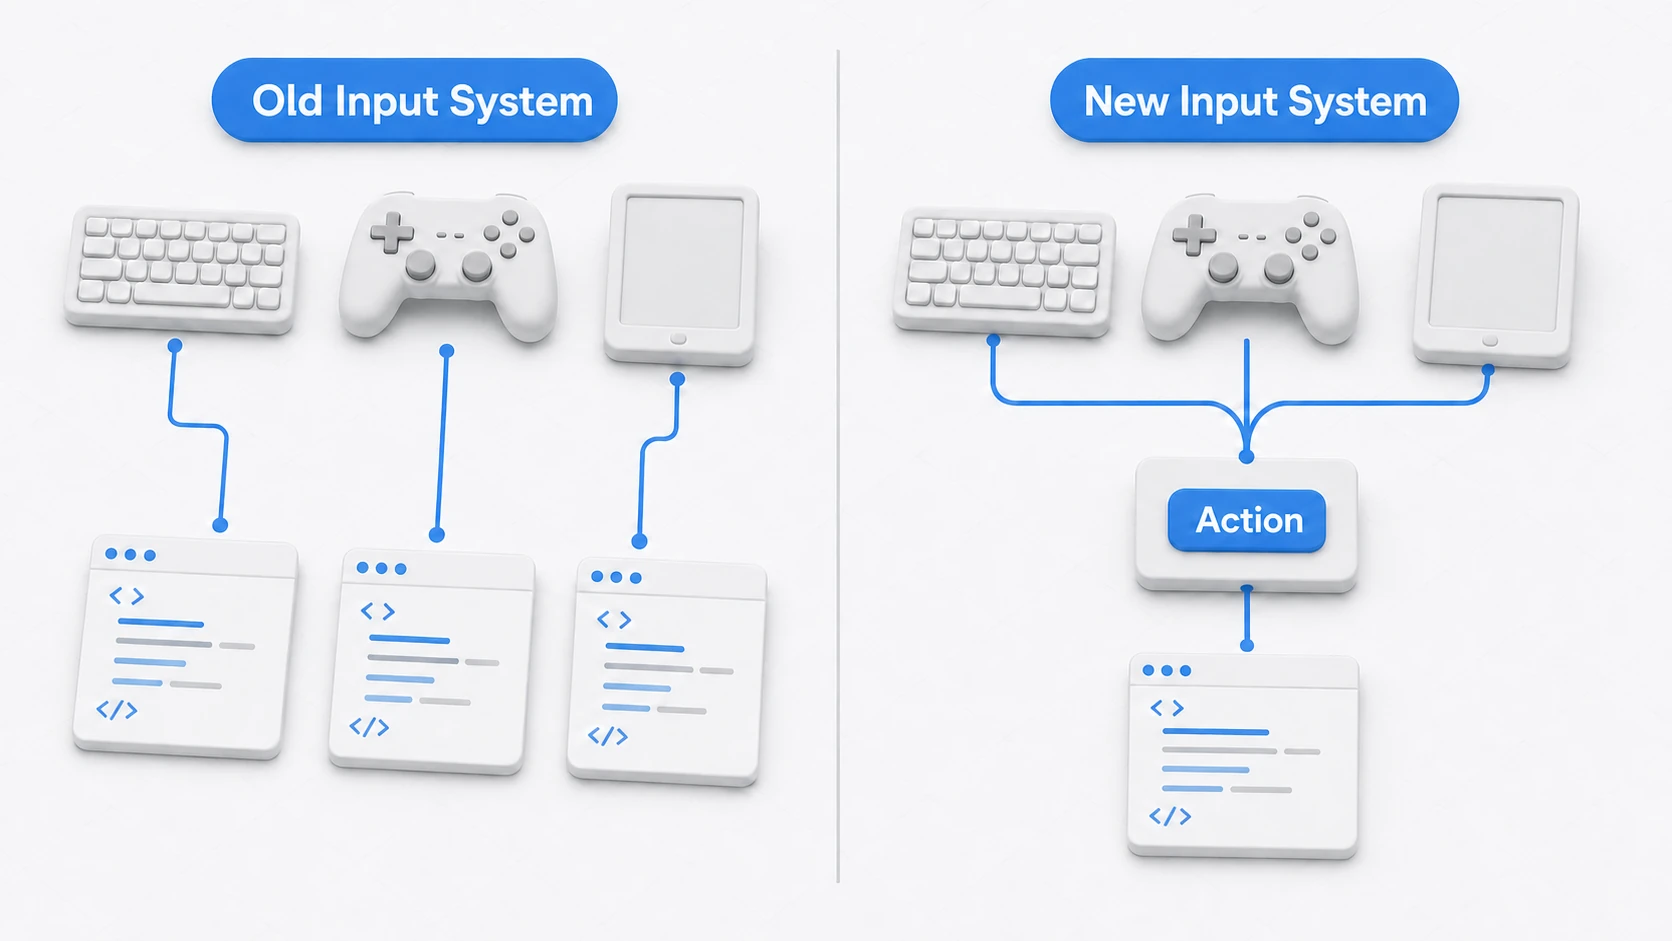
Comparing the structures of the old and new systems side by side makes the goal of the New Input System clear: input handling that used to be scattered across per-device code is now funneled through a single gateway called an "Action."
Components of the New Input System
| Element | Description |
|---|---|
| Input Actions Asset | A file that stores input configuration |
| Action Map | A group of related Actions |
| Action | A unit of operation (movement, jump, etc.) |
| Binding | Links an Action to an actual input device |
| Player Input | A component that receives input events |
Action Type
| Type | Use Case |
|---|---|
| Value | Continuous values (movement stick, triggers, etc.) |
| Button | Button press state (jump, attack, etc.) |
| Pass-through | Passes input directly (handling multiple input sources) |
Creating and Configuring Input Actions
Creating an Input Actions Asset
- Right-click in the Project window
- Select
Create > Input Actions - Double-click the asset to open the editing window
Creating an Action Map
Click the + button at the top-left to add a new Action Map (e.g., "Player")
Creating an Action
- Click the
+button with an Action Map selected - Enter an Action name (e.g., "Move", "Jump")
- Configure the Action Type and Control Type
Adding Bindings
Example for WASD keys:
- Select the "Move" Action
- Click
+and chooseAdd Up/Down/Left/Right Composite - Set Up: W, Down: S, Left: A, Right: D
Adding a gamepad left stick:
- Select the same "Move" Action
- Click
+and chooseAdd Binding - Select
Gamepad > Left Stickin the Path
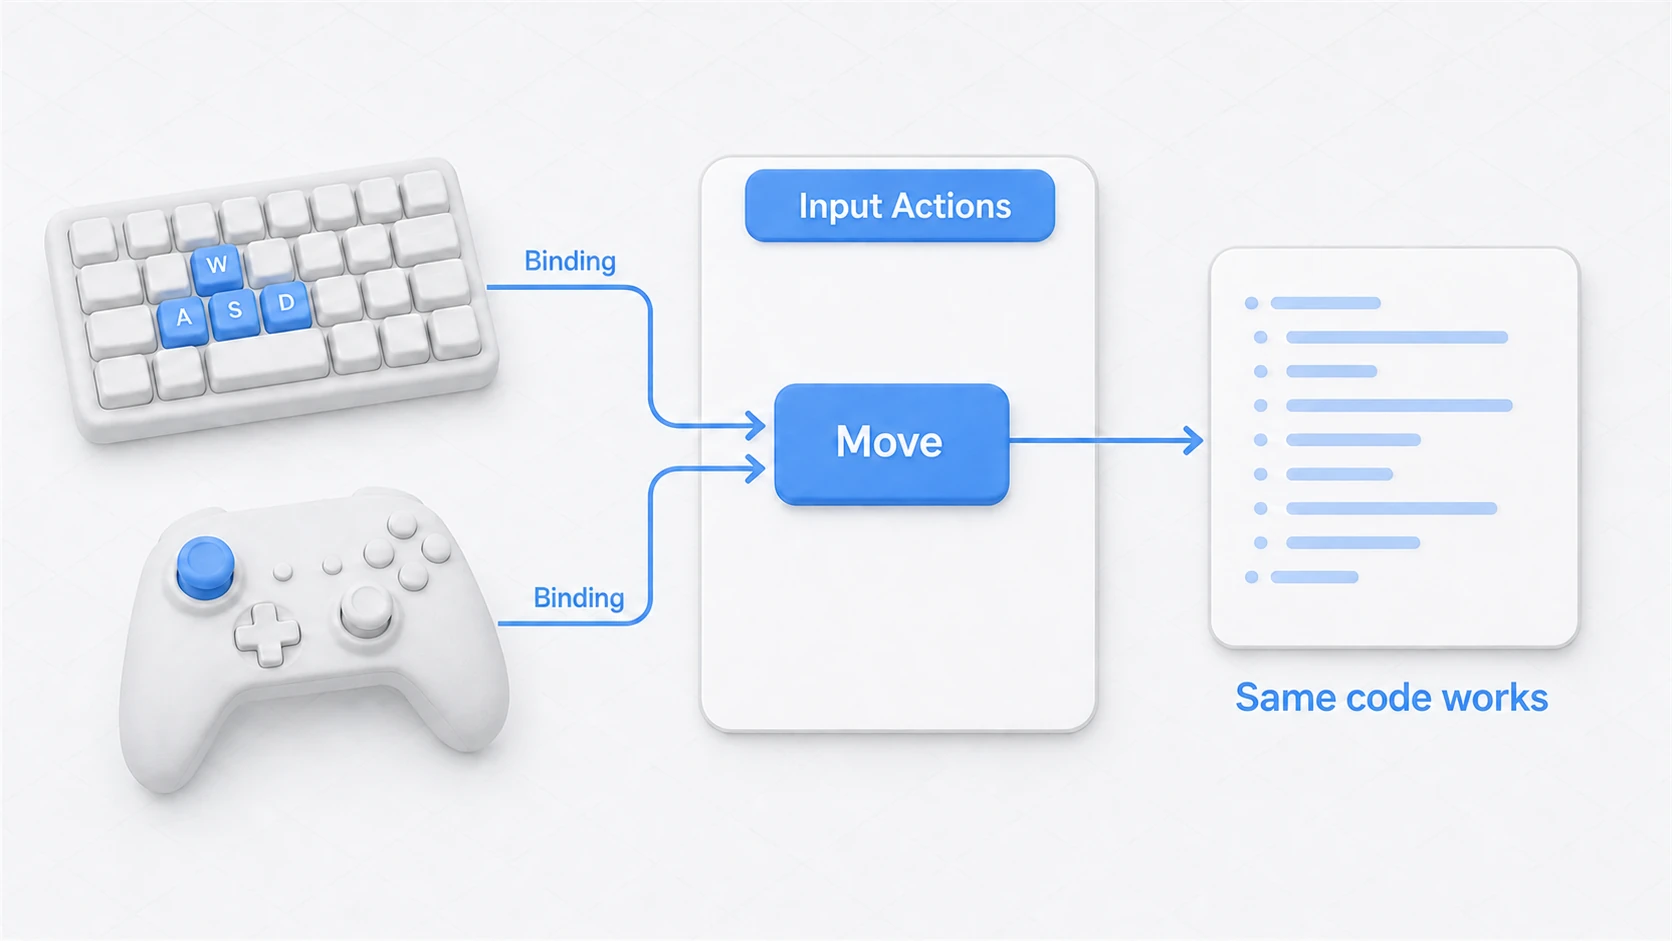
Multi-device support: By adding multiple Bindings to the same Action, the same code works for both keyboard and gamepad.
Generating a C# Class (Recommended)
You can auto-generate a type-safe class from the Input Actions Asset.
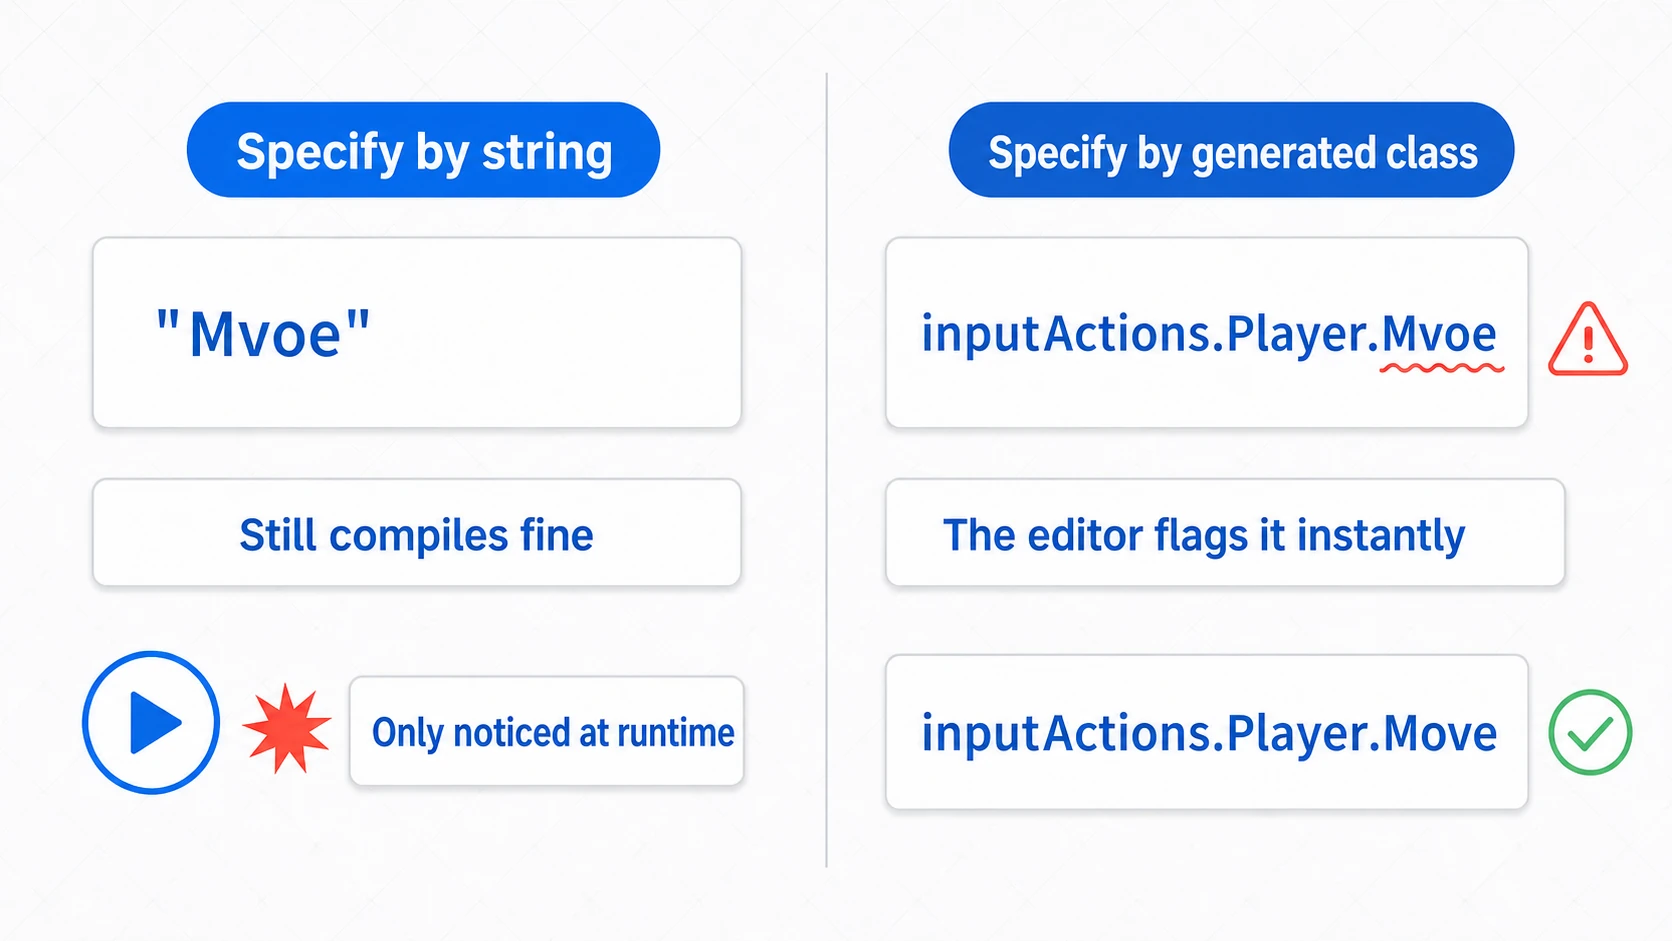
So what does "type-safe" mean?: It means your safety is guaranteed by types. If you reference an Action with a string like
"Move", a typo such as"Mvoe"still compiles just fine — you only discover the mistake when you run the game and nothing works. With the generated class, you write the reference as part of your code, likeinputActions.Player.Move, so the editor flags a typo the instant you make it, and you get autocompletion (IntelliSense) too. That is the benefit of being "type-safe."
- Select the Input Actions Asset in the Project window
- Check Generate C# Class in the Inspector
- Set the Class Name (e.g.,
PlayerInputActions) - Optionally set a Namespace
- Click Apply
This generates PlayerInputActions.cs, which can be instantiated with new PlayerInputActions().
Script Implementation
Choosing the Right Approach
| Method | Best For |
|---|---|
| Player Input + Unity Events | Small projects, prototyping, when non-programmers need to modify settings |
| C# Class Generation | Medium to large projects, type-safe implementation, complex input handling |
Warning (double activation): don't mix the
Player Inputcomponent approach and the generated-C#-class (new) approach on the same Action asset. The same Actions get enabled twice, callbacks fire twice each, and you get the classic "every input registers twice" bug. Pick one approach per project and stick to it.
Method 1: Player Input + Unity Events
The Player Input component lets you link Actions to methods in the Inspector.
Configuring the Player Input Component
- Add a
Player Inputcomponent to the GameObject - Set the
Actionsto the Input Actions Asset - Change
Behaviorto Unity Events - An
Eventssection appears - Register methods for each Action
using UnityEngine;
using UnityEngine.InputSystem;

public class PlayerController : MonoBehaviour
{
    private Vector2 moveInput;

    public void OnMove(InputAction.CallbackContext context)
    {
        moveInput = context.ReadValue<Vector2>();
    }

    public void OnJump(InputAction.CallbackContext context)
    {
        if (context.performed)
        {
            Debug.Log("Jump!");
        }
    }
}
Method 2: C# Class Generation (Recommended)
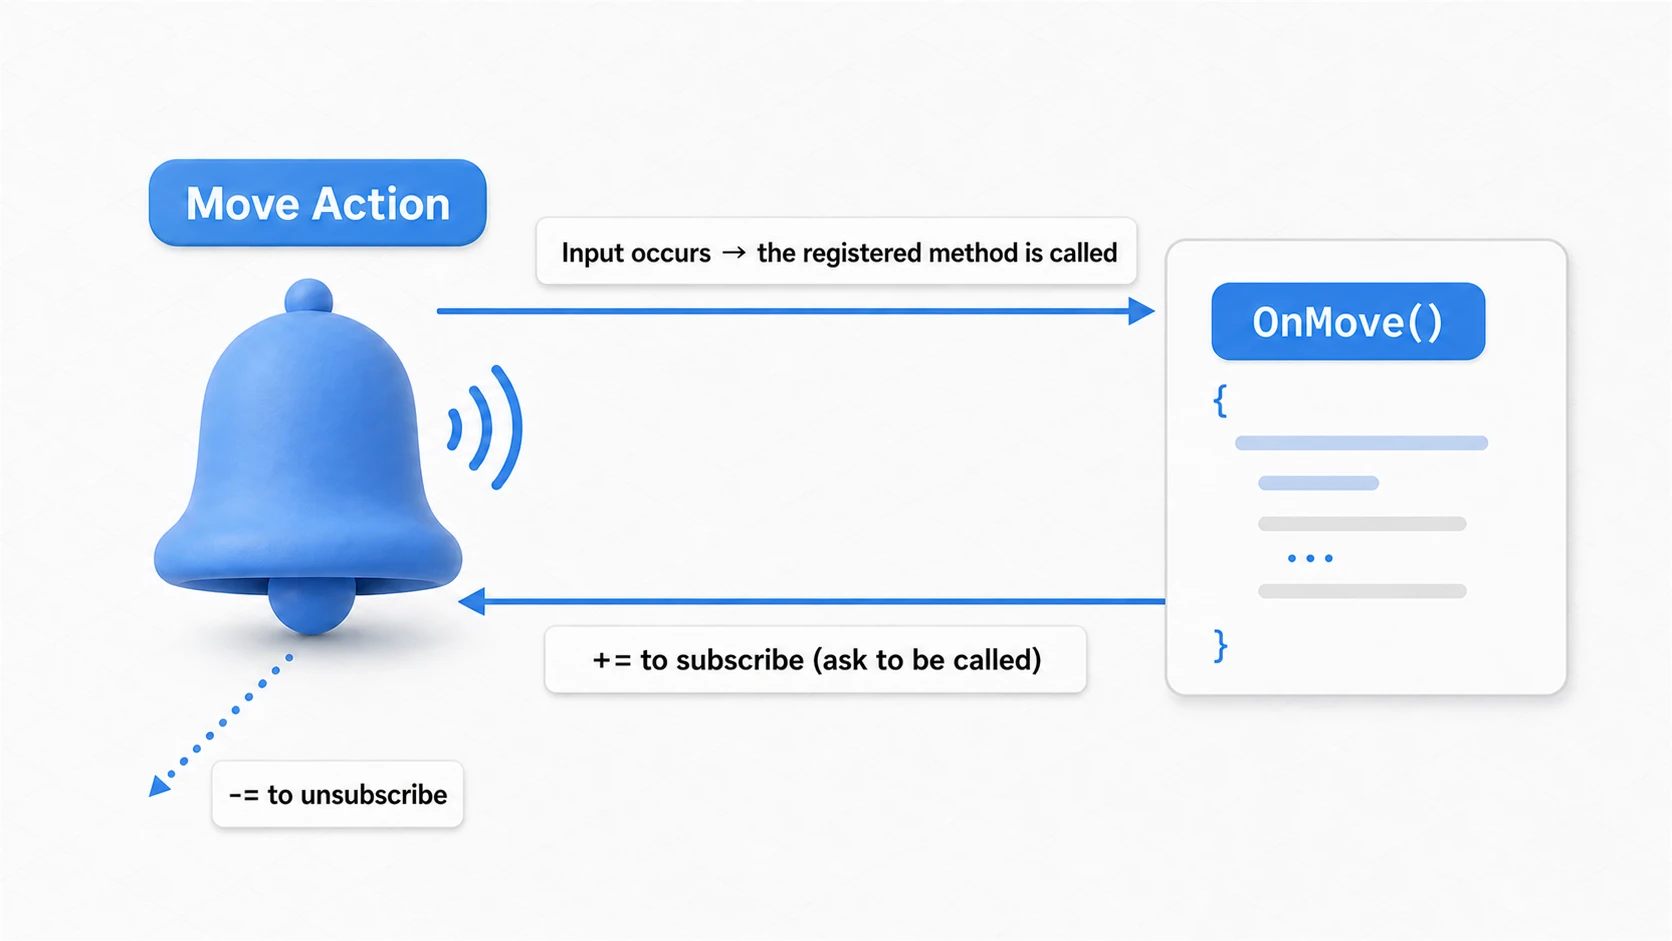
The code for this approach uses an unfamiliar-looking += operator. This is a mechanism called event subscription — think of it as signing up in advance: "when this Action fires, please call this method of mine." Once subscribed, Unity automatically calls your method every time the input occurs. Conversely, -= unsubscribes, saying "you don't need to call me anymore."
using UnityEngine;
using UnityEngine.InputSystem;

public class PlayerController : MonoBehaviour
{
    private PlayerInputActions inputActions;
    private Vector2 moveInput;

    void Awake()
    {
        inputActions = new PlayerInputActions();
        inputActions.Player.Move.performed += OnMove;
        inputActions.Player.Move.canceled += OnMove;
        inputActions.Player.Jump.performed += OnJump;
    }

    void OnEnable() => inputActions.Enable();
    void OnDisable() => inputActions.Disable();

    void OnDestroy()
    {
        // Unsubscribe event handlers (prevent memory leaks)
        inputActions.Player.Move.performed -= OnMove;
        inputActions.Player.Move.canceled -= OnMove;
        inputActions.Player.Jump.performed -= OnJump;
        inputActions.Dispose();
    }

    private void OnMove(InputAction.CallbackContext context)
    {
        moveInput = context.ReadValue<Vector2>();
    }

    private void OnJump(InputAction.CallbackContext context)
    {
        Debug.Log("Jump!");
    }
}
Preventing memory leaks: Unsubscribe event handlers with
-=inOnDestroyand callDispose()to prevent memory leaks when the object is destroyed.
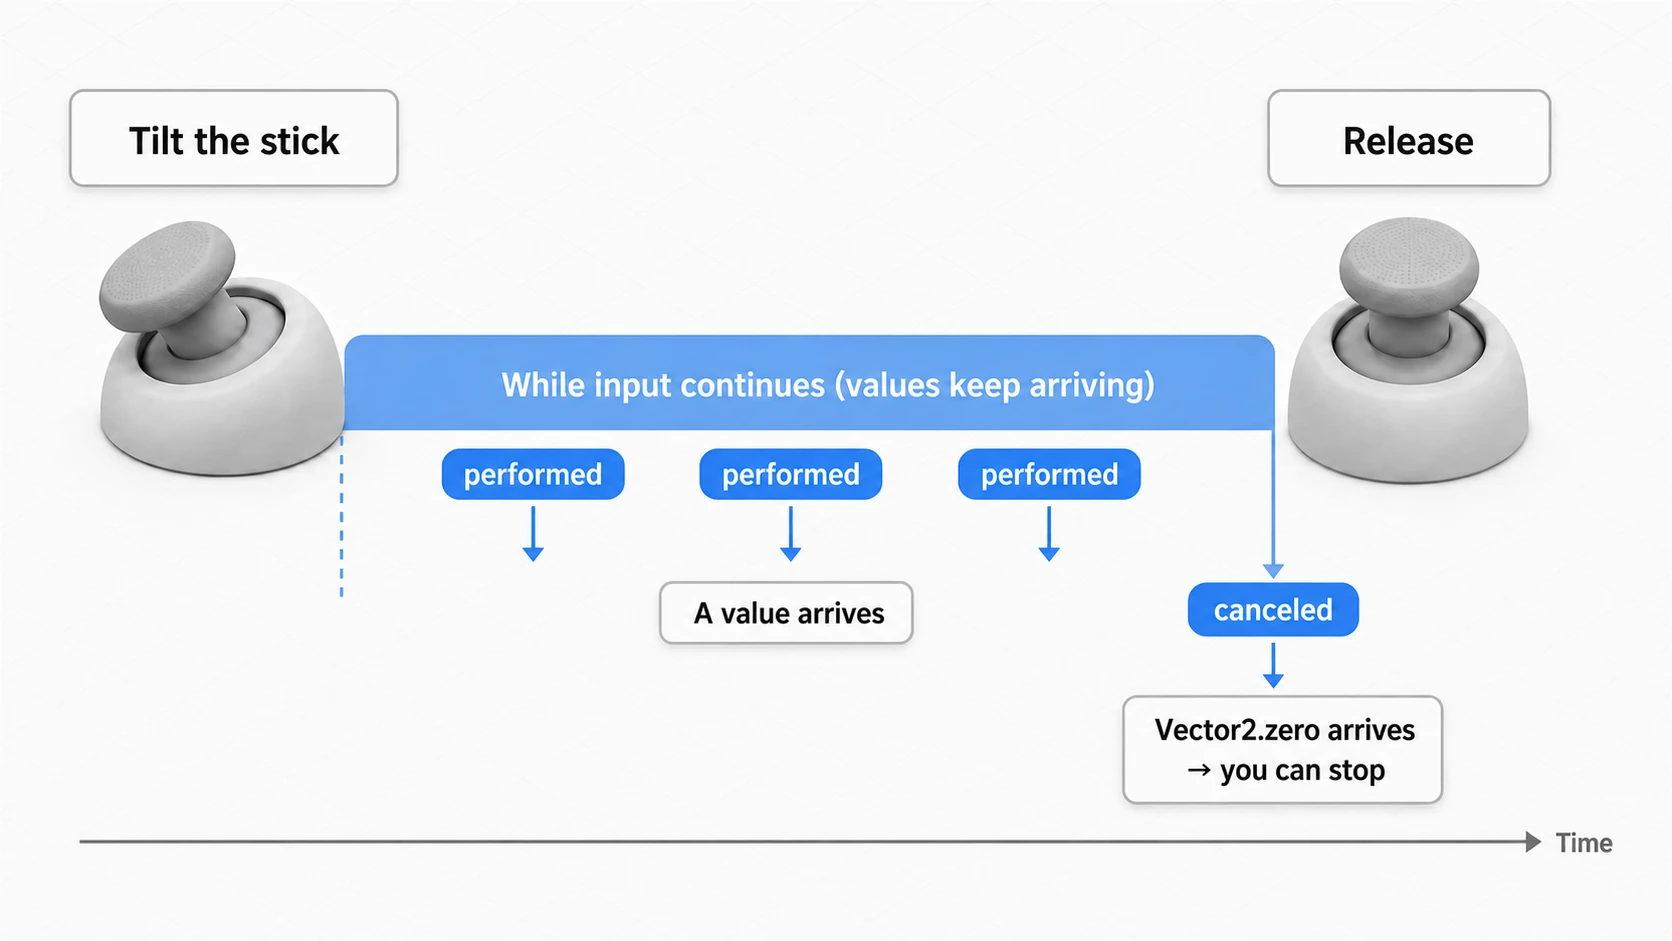
By the way, why does Move subscribe to both performed and canceled? An Action fires events at three main phases: started (input began), performed (input was completed), and canceled (input ended). For operations like movement, where you want a value continuously while the input is held, subscribing to performed alone means the last value lingers after you release the stick — and your character keeps moving. By also subscribing to canceled, Vector2.zero is delivered the moment you let go, so the character stops right on cue.
Switching Action Maps
You can switch the active Action Map between gameplay and UI operations.
public class InputManager : MonoBehaviour
{
    private PlayerInputActions inputActions;

    void Awake()
    {
        inputActions = new PlayerInputActions();
    }

    // During gameplay: Enable Player map, Disable UI map
    public void EnableGameplayInput()
    {
        inputActions.Player.Enable();
        inputActions.UI.Disable();
    }

    // During UI interaction: Enable UI map, Disable Player map
    public void EnableUIInput()
    {
        inputActions.Player.Disable();
        inputActions.UI.Enable();
    }
}
Example use case: Switch to the UI map when the pause menu is opened, and switch back to the Player map when it is closed. This prevents the character from moving during menu navigation.
Interactions and Processors
Interactions
| Interaction | Use Case |
|---|---|
| Hold | Fires on long press |
| Tap | Detects short taps |
| Multi Tap | Detects consecutive taps such as double-click |
Processors
| Processor | Use Case |
|---|---|
| Normalize | Normalizes vectors (corrects diagonal movement speed) |
| Invert | Inverts input values |
| Scale | Scales input values (sensitivity adjustment) |
| Dead Zone | Ignores slight stick tilts |
Device Connection/Disconnection Detection
You can detect device state changes, such as plugging and unplugging gamepads.
using UnityEngine;
using UnityEngine.InputSystem;

public class DeviceManager : MonoBehaviour
{
    void OnEnable()
    {
        InputSystem.onDeviceChange += OnDeviceChange;
    }

    void OnDisable()
    {
        InputSystem.onDeviceChange -= OnDeviceChange;
    }

    void OnDeviceChange(InputDevice device, InputDeviceChange change)
    {
        switch (change)
        {
            case InputDeviceChange.Added:
                Debug.Log($"Device connected: {device.displayName}");
                break;
            case InputDeviceChange.Removed:
                Debug.Log($"Device disconnected: {device.displayName}");
                break;
        }
    }
}
Example use case: Show a pause screen when a gamepad is disconnected, or display a "Controller detected" notification when one is connected.
Hands-On: Building One Complete Player
All the parts are on the table. Now let's assemble the "complete input kit for one player" that every genre needs—a 3D action protagonist, a 2D platformer hero, a top-down ARPG character—into a single script. The kit has three pieces: ① move + jump, ② pausing that switches Player⇄UI Maps, and ③ auto-pause when the gamepad is unplugged.
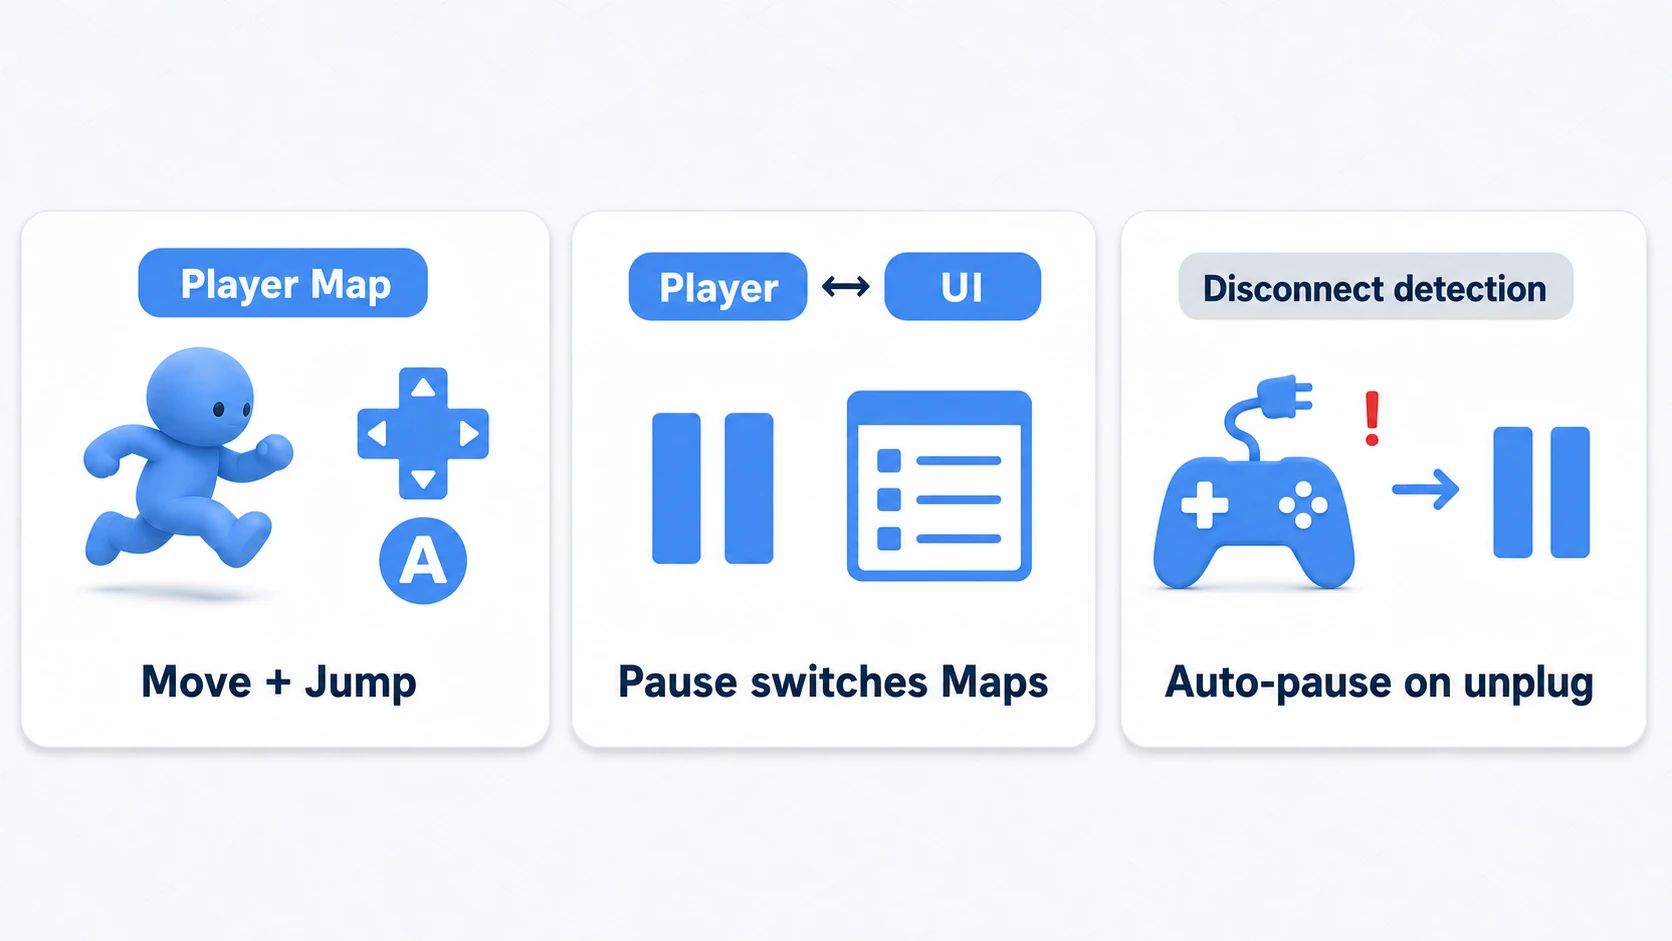
Input Actions setup: in the Player map create Move (Vector2), Jump (Button), and Pause (Button; bind Esc and the gamepad's menu button); in the UI map create Resume (Button). Then generate the C# class.
using UnityEngine;
using UnityEngine.InputSystem;

[RequireComponent(typeof(CharacterController))]
public class OnePlayerController : MonoBehaviour
{
    [SerializeField] private float moveSpeed = 5f;
    [SerializeField] private GameObject pausePanel; // The pause screen UI

    private PlayerInputActions input;
    private CharacterController controller;
    private Vector2 moveInput;

    void Awake()
    {
        controller = GetComponent<CharacterController>();
        input = new PlayerInputActions();

        // Subscribe in Awake, unsubscribe in OnDestroy (managed as a pair)
        input.Player.Move.performed += OnMove;
        input.Player.Move.canceled += OnMove;
        input.Player.Jump.performed += OnJump;
        input.Player.Pause.performed += OnPause;
        input.UI.Resume.performed += OnResume;
    }

    void OnEnable()
    {
        // Enable/disable as a pair in OnEnable/OnDisable
        input.Player.Enable();
        InputSystem.onDeviceChange += OnDeviceChange;
    }

    void OnDisable()
    {
        input.Disable();
        InputSystem.onDeviceChange -= OnDeviceChange;
    }

    void OnDestroy()
    {
        input.Player.Move.performed -= OnMove;
        input.Player.Move.canceled -= OnMove;
        input.Player.Jump.performed -= OnJump;
        input.Player.Pause.performed -= OnPause;
        input.UI.Resume.performed -= OnResume;
        input.Dispose();
    }

    void Update()
    {
        // Movement (simplified; see the CharacterController article for camera-relative movement)
        Vector3 move = new Vector3(moveInput.x, 0f, moveInput.y);
        controller.SimpleMove(move * moveSpeed);
    }

    private void OnMove(InputAction.CallbackContext ctx) => moveInput = ctx.ReadValue<Vector2>();
    private void OnJump(InputAction.CallbackContext ctx) => Debug.Log("Jump!");
    private void OnPause(InputAction.CallbackContext ctx) => OpenPause();
    private void OnResume(InputAction.CallbackContext ctx) => ClosePause();

    private void OpenPause()
    {
        pausePanel.SetActive(true);
        input.Player.Disable(); // Hand control over to the UI map
        input.UI.Enable();
        Time.timeScale = 0f;
    }

    private void ClosePause()
    {
        pausePanel.SetActive(false);
        input.UI.Disable();
        input.Player.Enable();
        Time.timeScale = 1f;
    }

    private void OnDeviceChange(InputDevice device, InputDeviceChange change)
    {
        // Auto-pause the instant the gamepad is unplugged (no dying while standing helpless)
        if (device is Gamepad && change == InputDeviceChange.Removed && !pausePanel.activeSelf)
        {
            OpenPause();
        }
    }
}
Press Play and try it. WASD / left stick moves, Space jumps, Esc opens the pause menu and the character stops responding (the Player map is disabled), Resume brings you back. And if you yank the gamepad's USB cable mid-play, the pause screen opens that instant—the exact behavior you see in shipped games.
Two takeaways: "subscribe in Awake/OnDestroy, enable in OnEnable/OnDisable—each managed as a pair" (the structure itself prevents dangling subscriptions and stuck activations), and "tie the Map switch one-to-one with opening/closing the pause" (a Time.timeScale-only pause lets input leak through; switching whole Maps is why attacks don't fire during pause. For the full pause picture, see the pause implementation article).
Common Issues and Troubleshooting
Input Not Responding
- Verify that
inputActions.Enable()is called inOnEnable - Check that the Action Map is enabled
- Verify that Bindings are configured correctly
- If not included in the build: Check the Input Actions Asset settings (see below)
Input Actions Asset Not Included in Build
To include the Input Actions Asset in the build, use one of the following methods:
- Reference via Player Input component - Reference it in a Player Input component attached to a GameObject
- Reference from script - Reference the asset with
[SerializeField] - Register as Addressable - Manage it as an Addressable Asset
Note: The "Preload" checkbox that existed in Input System 1.1 and earlier has been deprecated (Unity 2021+). Reference the asset using one of the methods above.
Movement Doesn't Stop
Register the canceled event as well:
inputActions.Player.Move.performed += OnMove;
inputActions.Player.Move.canceled += OnMove;
Why can you use the same method?: When the
canceledevent fires,context.ReadValue<Vector2>()automatically returnsVector2.zero. Therefore, using the sameOnMovemethod for bothperformedandcanceledcorrectly setsVector2.zerowhen there is no input.
Diagonal Movement is Too Fast
- Set the Composite Binding Mode to "Digital Normalized"
- Or add the "Normalize Vector 2" Processor
Bonus: Good to Know for Later
Once you are comfortable with the New Input System, these topics are worth exploring next.
- Implementing key rebinding: Letting players customize their own key bindings is possible with the
PerformInteractiveRebinding()API. It is one of the biggest reasons to choose the New Input System. - Your old Input System knowledge is not wasted: The legacy
Inputclass is still very much alive in existing projects and Asset Store code. Knowing both via the old Input System article makes you stronger at migration and debugging. - Understanding when to read input: Detecting input and implementing character movement requires understanding when to use
Updatevs.FixedUpdate. We recommend reading the Update vs FixedUpdate article alongside this one. - The official docs are a reliable resource: For fine details like the full list of Interactions and Processors, the official Unity Input System documentation is the most accurate source.
Summary
The New Input System has a steeper learning curve, but offers powerful features that make it worthwhile.
- Input Actions for device-independent input handling
- Action Maps for context-sensitive input switching
- Bindings to assign the same Action to multiple devices
- Interactions and Processors for complex input patterns through configuration alone
- C# Class Generation for type-safe implementation
Start with simple movement and jump, then gradually take on more complex features.