Tested with: Unity 2022.3 LTS / Unity 6
"I changed this code, and now something else is broken..." Sound familiar? A bug you thought you fixed pops up somewhere else — as your codebase grows, manual checking simply can't keep up.
Unity Test Framework is Unity's official testing framework. It integrates NUnit, the go-to testing library, into Unity, letting you write down checks like "if I pass this value to this method, I should get this result" as code — and re-run them any number of times with a single click. Every test you write becomes a watchdog that tells you "nothing's broken" each time you change your code.

What You'll Learn
- The crucial difference between your usual "check it with Debug.Log" routine and automated tests
- When to use Edit Mode tests vs. Play Mode tests
- How to write tests with the AAA pattern — and the red-to-green drill of breaking one on purpose
- Frame-spanning Play Mode tests with
[UnityTest]- What Assembly Definitions really are and how to set them up
- A practical guide to what's actually worth testing in game development
- How Is This Different from Checking with Debug.Log?
- Why Tests Pay Off
- What Should You Test in a Game?
- Edit Mode Tests vs. Play Mode Tests
- Installation
- Your First Test
- How to Write Tests
- Simulating Real-World Tests
- Play Mode Tests
- Common Problems and Solutions
- Best Practices
- Running Tests in CI/CD
- Bonus: Good to Know for Later
- Summary
How Is This Different from Checking with Debug.Log?
In everyday development, most of us print values with Debug.Log, hit Play, eyeball the output, and call it good (the approach from our debugging guide). That works fine for making progress — so why bother writing tests?
There's exactly one difference. A Debug.Log check vanishes on the spot; a test preserves the check.
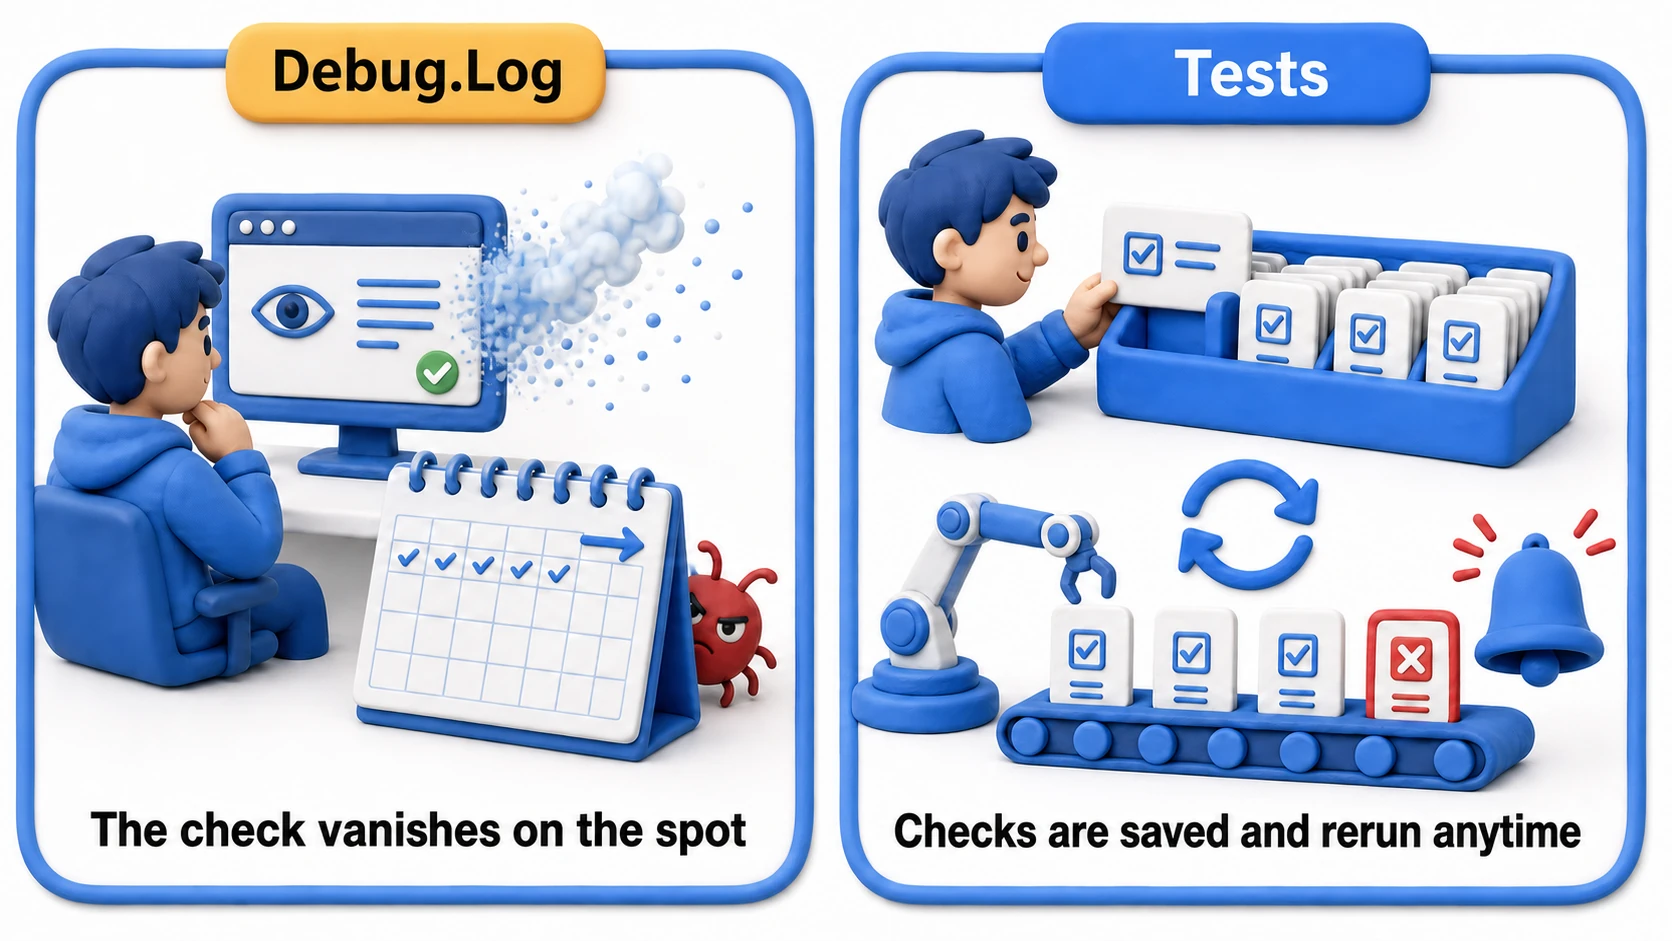
- Debug.Log check: You confirm "this is correct right now, with my own eyes" exactly once. Once you're done, you delete the log — and the fact that you ever checked disappears with it
- Test: You save the check "this input should produce this result" as code. From then on, the machine re-verifies it hundreds of times at the push of a button
Where this pays off is later. Say you add a critical-hit rule to your RPG's damage formula and accidentally introduce a regression: "enemies with high defense take 0 damage." With the Debug.Log approach, you might find out three weeks later from a player report. With five saved damage-calculation tests, you'd hear "the defense-100 case is failing" the moment you save the code.
In other words, a test is a mechanism that automates and preserves the manual checks your past self did, for the benefit of your future self.
Why Tests Pay Off
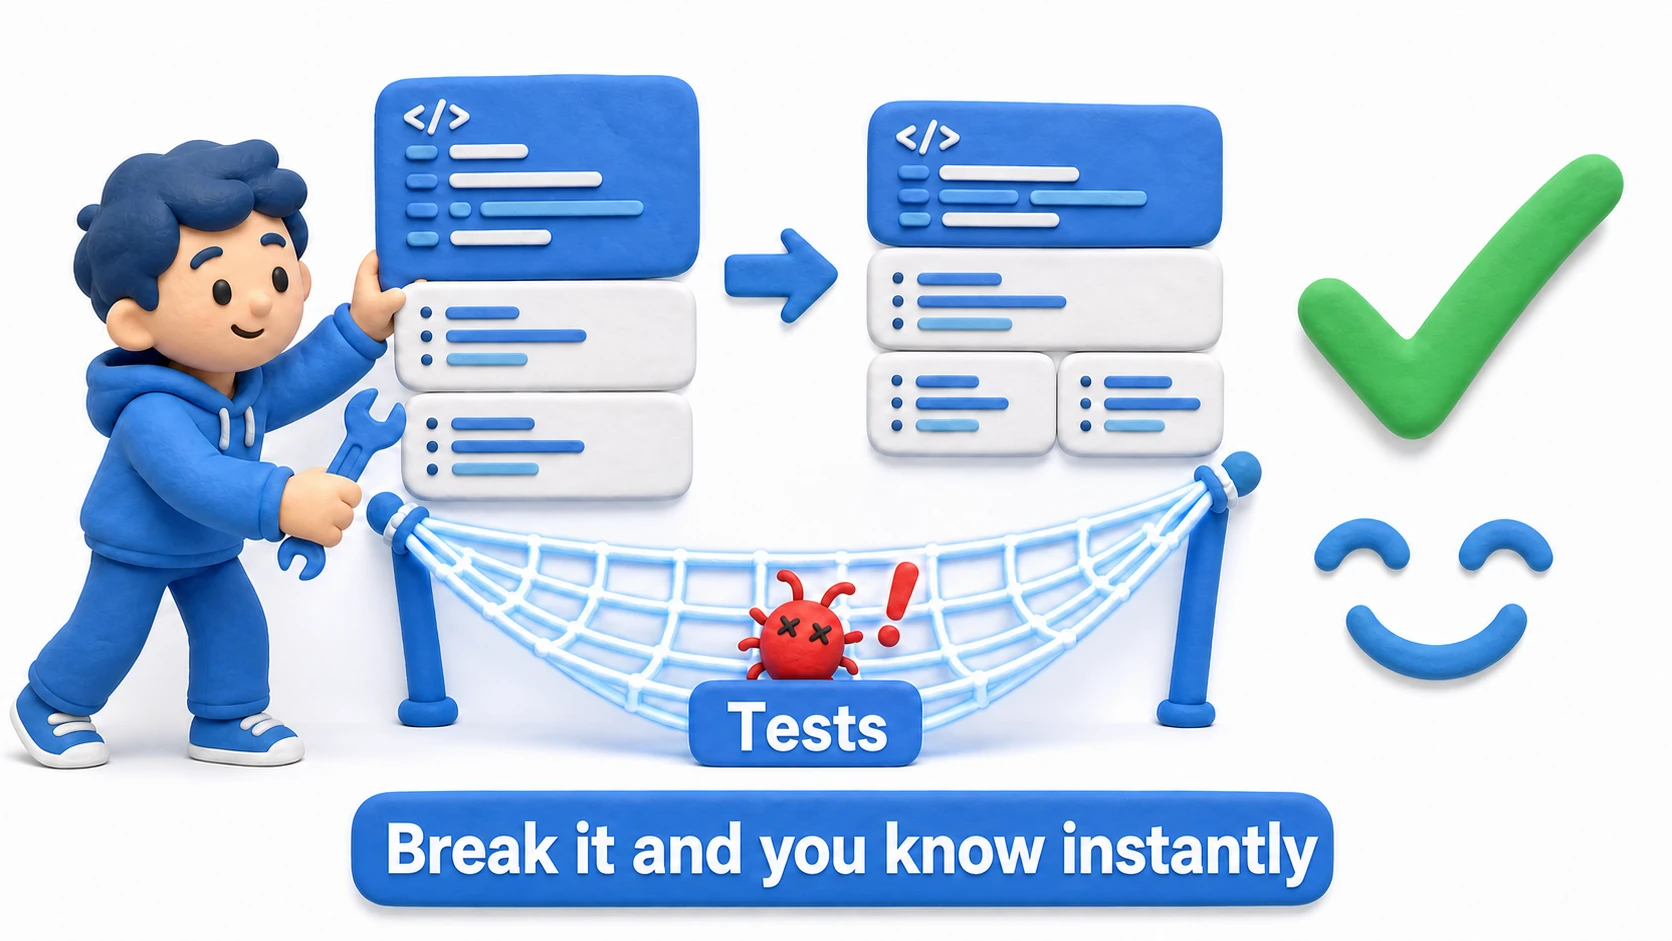
- Early bug detection - Find bugs immediately after changing code
- Safer refactoring - Verify existing features still work
- Better code quality - Testable code tends to be well-designed code
- Living documentation - Tests show how the code is meant to be used
The second one is where tests really shine. With tests in place, you get the confidence of "if I break something, I'll know right away" — which means you can tackle code cleanup and improvements boldly. The reason refactoring a large untested codebase feels scary is precisely because this safety net is missing.
What Should You Test in a Game?
"Testing a game" sounds overwhelming, but the places where you actually write tests are surprisingly limited. Calculations with a definite right answer are your top-priority test targets.
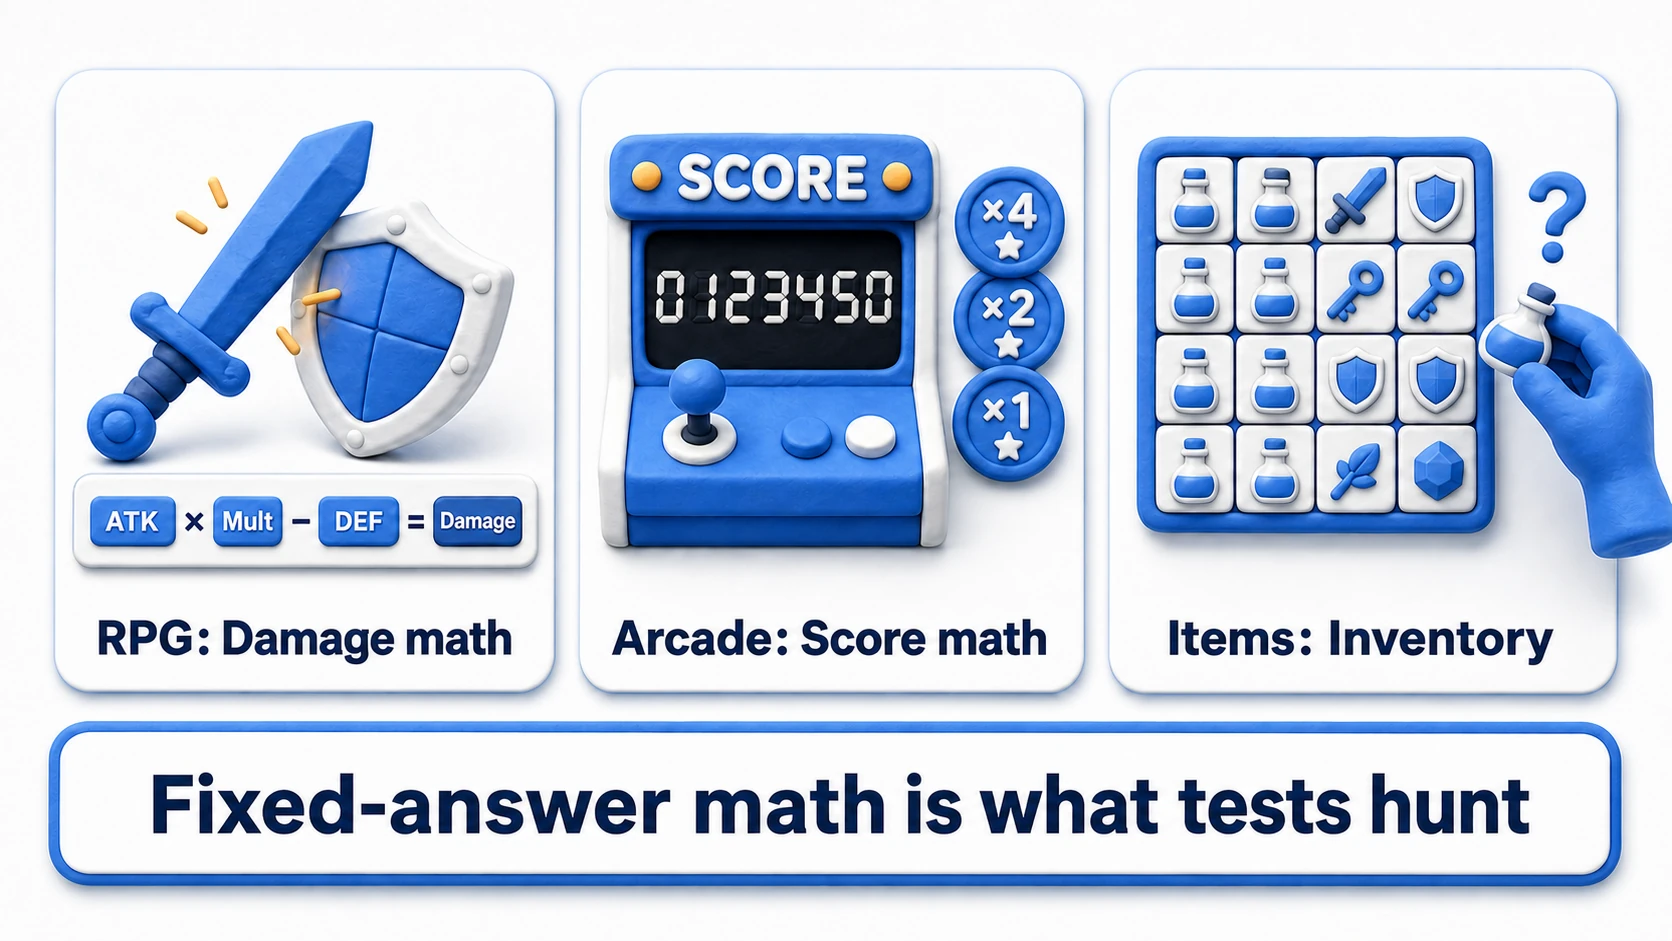
- RPG damage calculations: "Attack 50, defense 30, critical hit — what's the result?" The more complex the formula gets, the more it becomes a breeding ground for regressions
- Arcade game score calculations: Manually verifying every combination of combo multipliers and bonus conditions is practically impossible
- Item inventory handling: "What if I pick up an item when the inventory is full?" "What happens past the 99-item cap?" Boundary bugs like these are exactly the prey tests hunt best
On the flip side, game feel — "does the jump feel good," "is the enemy AI challenging" — can't be tested. We'll dig into where to draw that line in the bonus section at the end.
Edit Mode Tests vs. Play Mode Tests
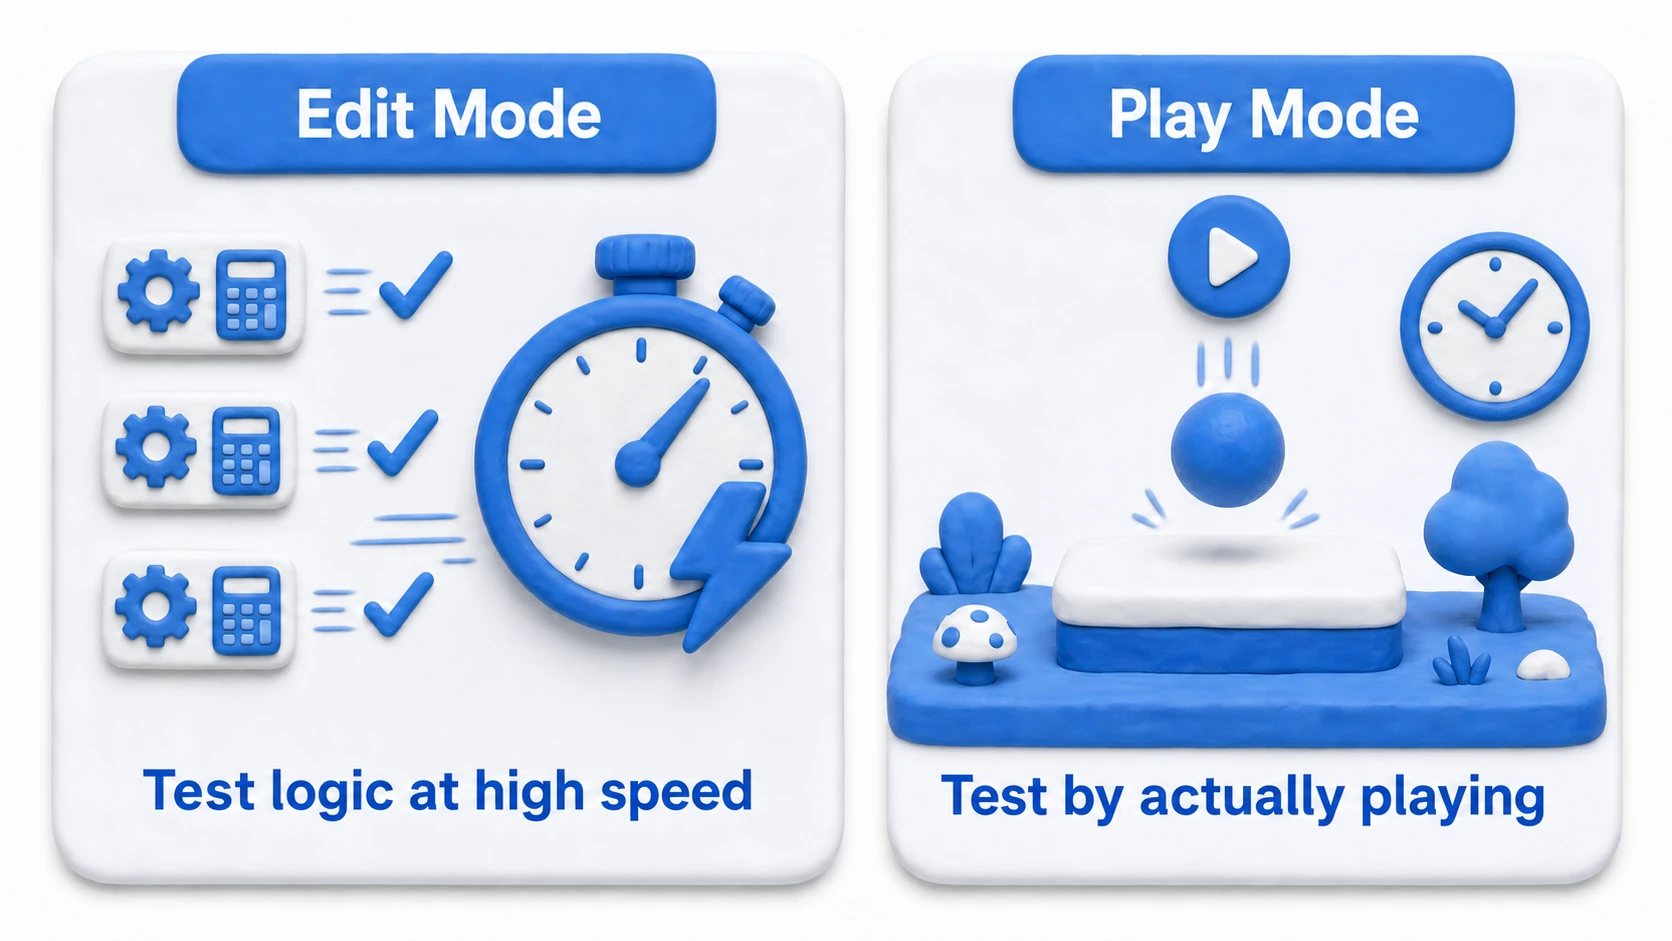
| Aspect | Edit Mode Tests | Play Mode Tests |
|---|---|---|
| Runs in | Unity Editor only | Editor or Player |
| Speed | Fast | Slow |
| Best for | Testing logic | Testing gameplay |
| Lifecycle | EditorApplication.update | Awake, Start, Update |
| Code access | Editor code + game code | Editor code too when run in Editor; game code only when run in Player |
Installation
Note: In Unity 2019.2 and later, the Test Framework is installed by default. No manual installation via the Package Manager is needed.
Open the Test Runner window via Window > General > Test Runner.
What Is an Assembly Definition, Anyway?
The first stumbling block when adopting tests is this unfamiliar thing called an Assembly Definition (.asmdef). Once you know what it really is, it's simple.
Normally, Unity binds all the scripts in your project into a single book (an assembly called Assembly-CSharp — a bundle of compiled code). But you don't want test code mixed into your game build, so it needs to be bound as a "separate book just for tests." A .asmdef file is what defines these separate volumes.
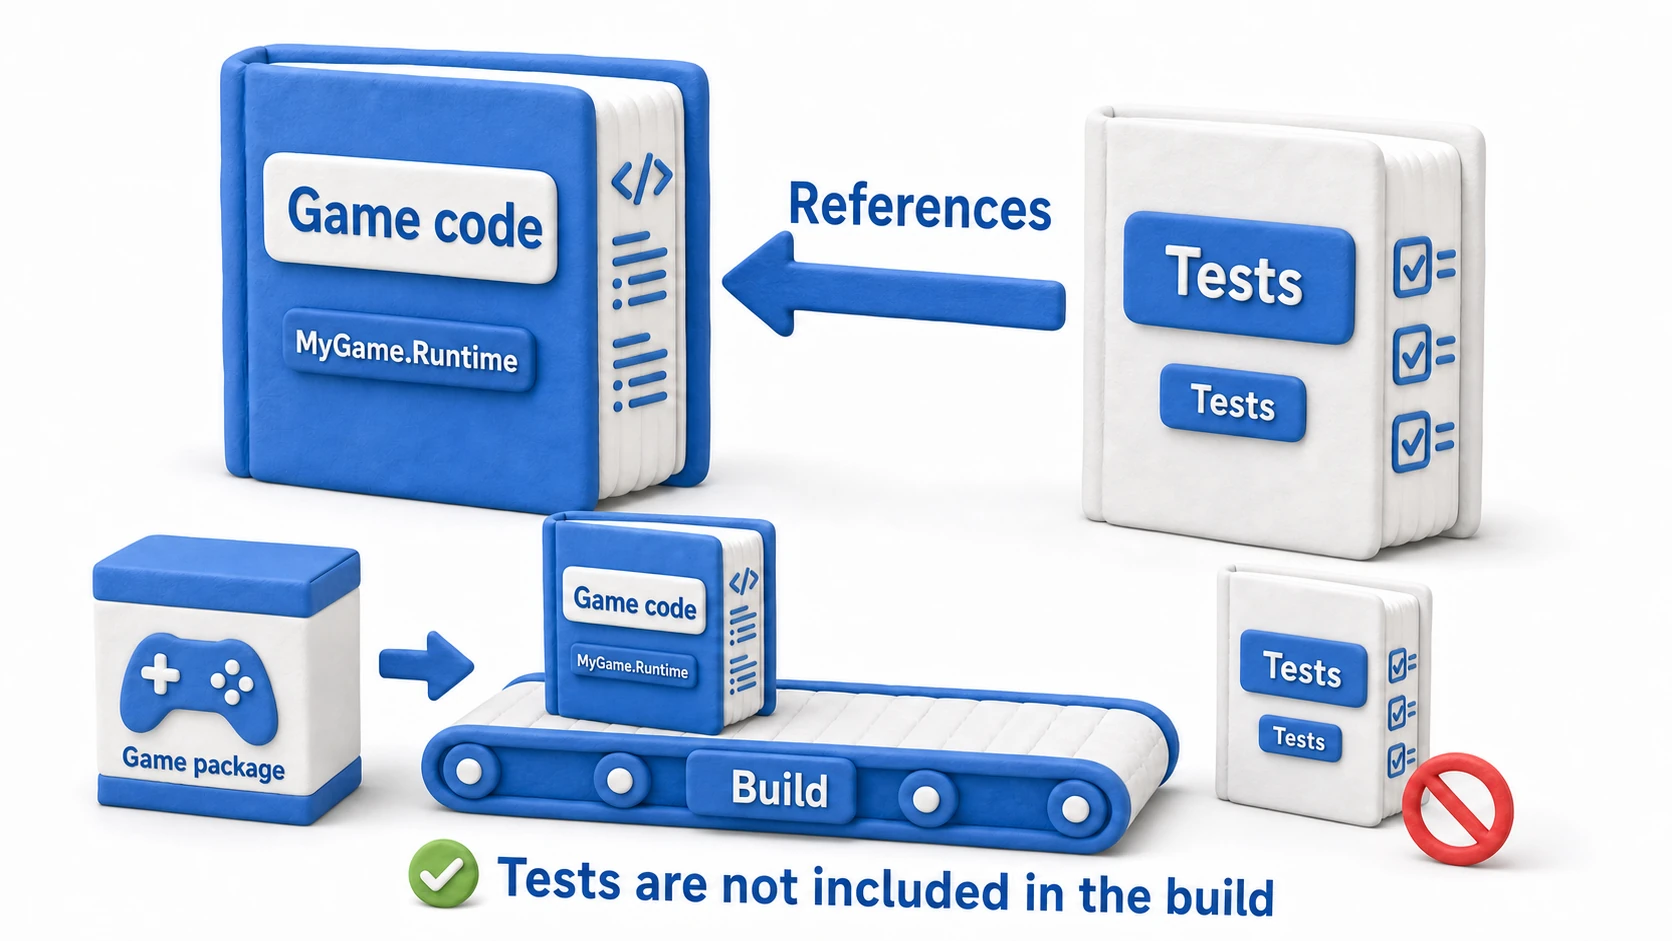
Here's the catch: once split into separate books, one book can no longer see inside the other. That's why calling PlayerController or DamageCalculator from your test code produces a compile error. The fix is to declare "the test book references the main book" — and that declaration is all an Assembly Definition setup really is.
Tip: The folder created by the Test Runner's "Create Test Assembly Folder" button comes with a test .asmdef auto-generated. The only thing you configure yourself is "adding the reference to the main code." Note that your main code also needs to be split out with its own .asmdef (e.g.
MyGame.Runtime) — you can't select plainAssembly-CSharpas a reference target.
Setup Steps in the Inspector
- Select the Tests.asmdef file
- Open the Assembly Definition References section
- Click the
+button - Select the asmdef of the production code you want to reference (e.g.
MyGame.Runtime) - Click Apply
Example asmdef JSON
For Edit Mode tests:
{
    "name": "Tests.EditMode",
    "references": ["MyGame.Runtime"],
    "includePlatforms": ["Editor"],
    "defineConstraints": ["UNITY_INCLUDE_TESTS"]
}
For Play Mode tests:
{
    "name": "Tests.PlayMode",
    "references": ["MyGame.Runtime"],
    "includePlatforms": [],
    "defineConstraints": ["UNITY_INCLUDE_TESTS"]
}
Important: For Play Mode tests,
"includePlatforms": []must be an empty array. If it stays["Editor"], the tests won't be included in the build and can't run on a Player.
Your First Test
Creating a Test Assembly
- Select the
Edit Modetab in the Test Runner window - Click the
Create EditMode Test Assembly Folderbutton
Preparing Game Code to Test
First, let's look at the "code under test" — the RPG damage calculator we've been using as an example since the intro. It's a plain C# class that doesn't inherit from MonoBehaviour, so an Edit Mode test can verify it in an instant.
// Game-side code (the code under test)
public class DamageCalculator
{
    // Damage = attack - defense, with a guaranteed minimum of 1
    public int Calculate(int attack, int defense)
    {
        int damage = attack - defense;
        return damage < 1 ? 1 : damage;
    }
}
Writing the Test Script
Now let's test this class. A test is, in essence, code that actually calls your game's class and checks the returned answer against the "expected answer."
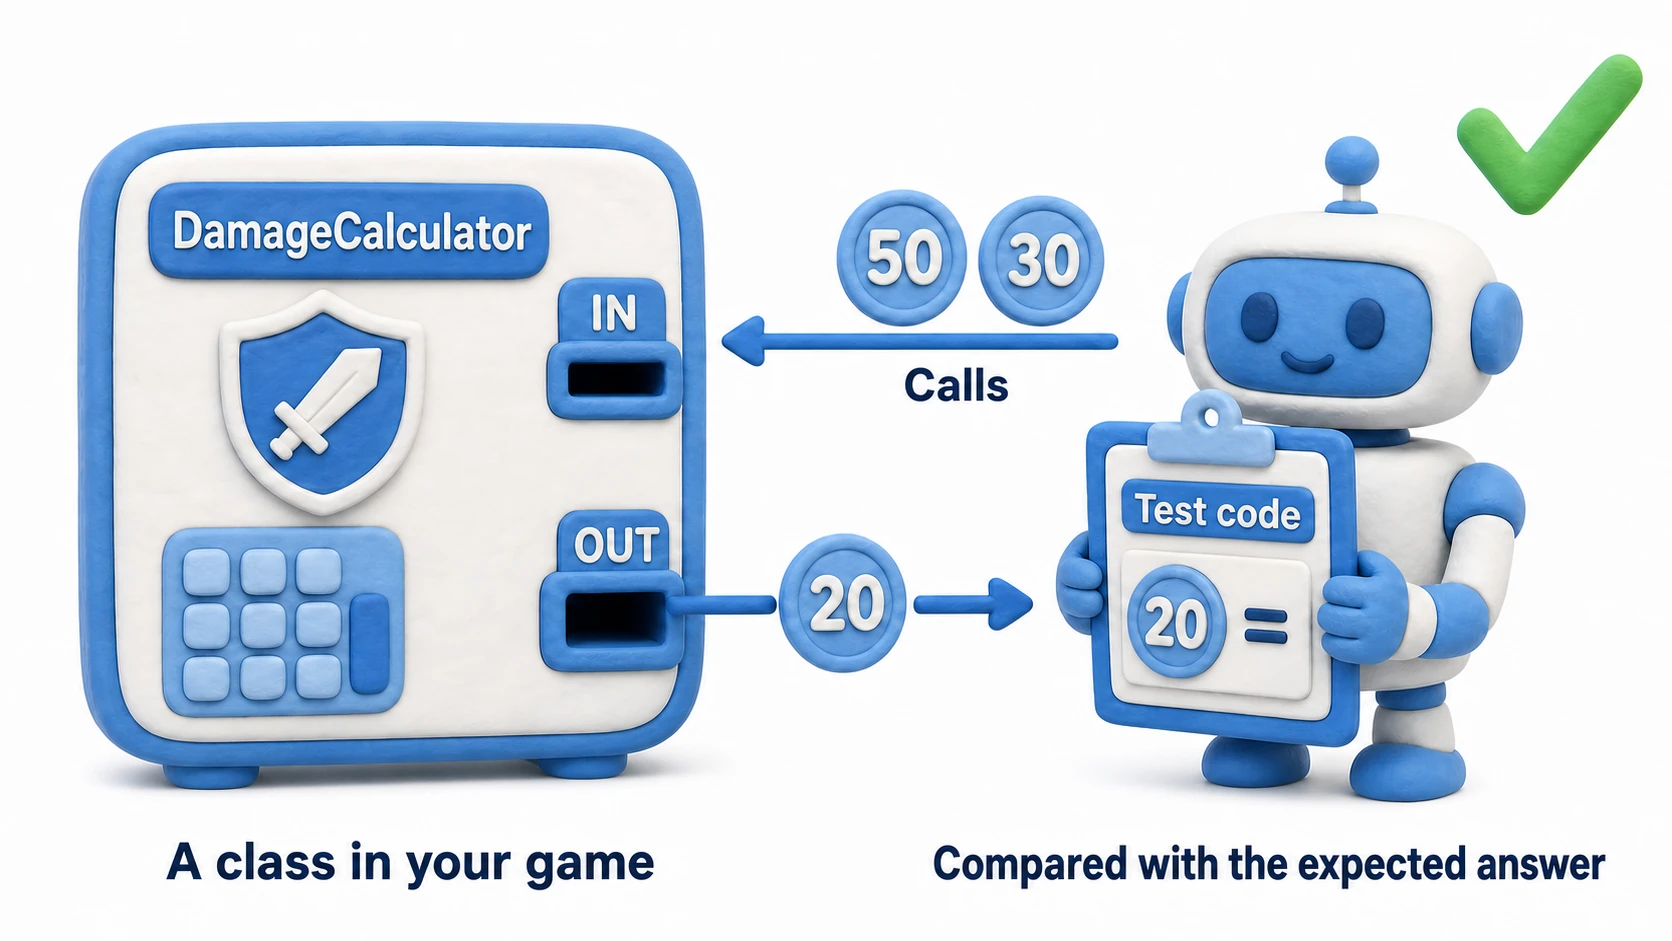
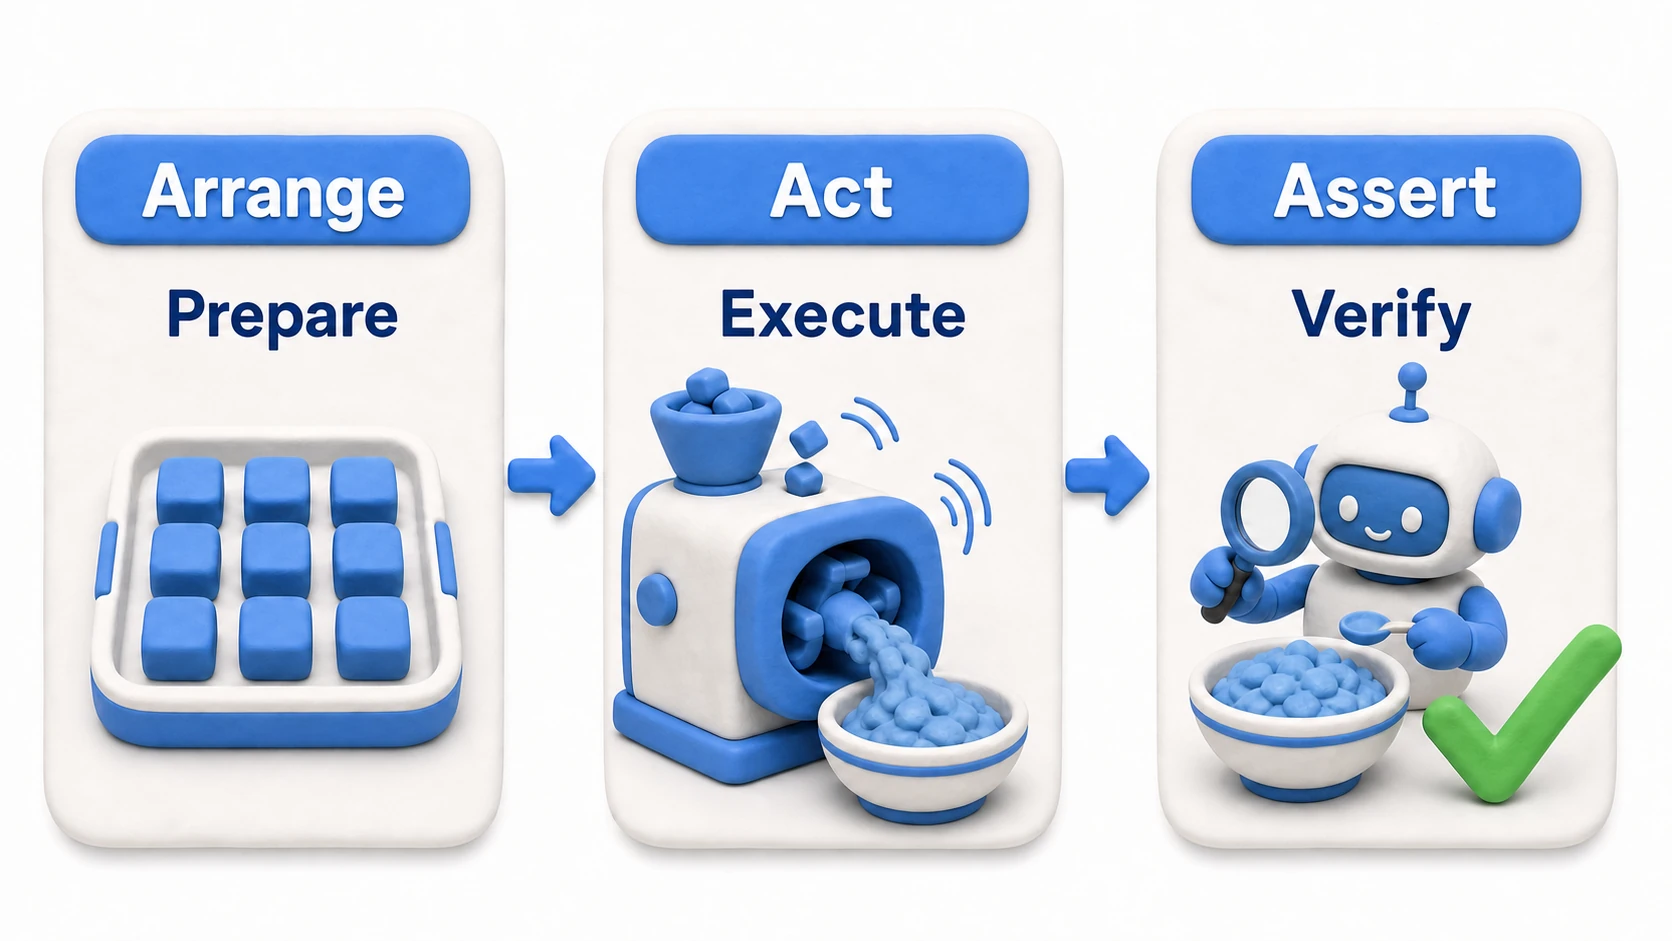
The standard way to write it is the AAA pattern — three steps: Arrange (set up), Act (execute), Assert (verify). Think "lay out the ingredients, cook, taste."
using NUnit.Framework;

public class DamageCalculatorTest
{
    [Test]
    public void Calculate_Attack50_Defense30_Returns20()
    {
        // Arrange: set up the calculator and input values
        var calculator = new DamageCalculator();
        int attack = 50;
        int defense = 30;

        // Act: actually call the game's method
        int damage = calculator.Calculate(attack, defense);

        // Assert: check the answer — "50 - 30 should be 20"
        Assert.AreEqual(20, damage);
    }

    [Test]
    public void Calculate_DefenseHigherThanAttack_ReturnsAtLeast1()
    {
        // This test catches the regression from the intro: "0 damage against high-defense enemies"
        var calculator = new DamageCalculator();

        int damage = calculator.Calculate(attack: 30, defense: 100);

        // No matter how high the defense, damage should be at least 1
        Assert.AreEqual(1, damage);
    }
}
Run these in the Test Runner and both get green checkmarks. And if someone ever accidentally deletes that "minimum of 1" line in the future — the second test turns red that instant and lets you know. That's what "preserving the check" really means.
Break It on Purpose — the Real Practice
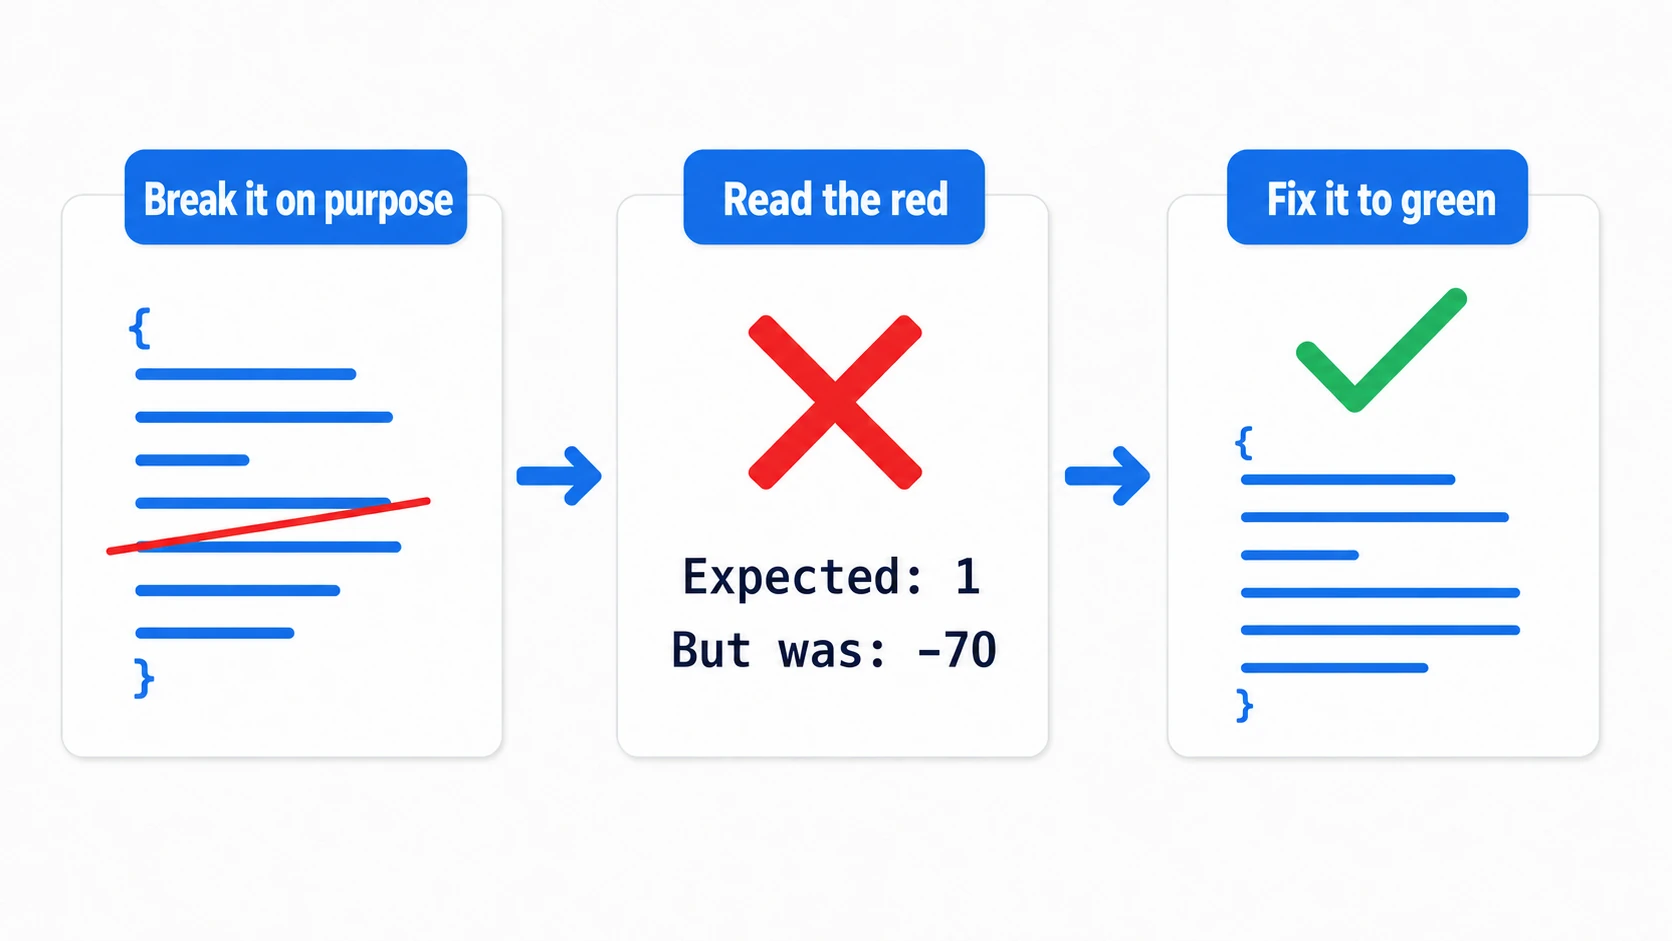
Watching green checkmarks is only half the training. What you really want to learn is how to read a failing test, so let's experience it now, while it's safe. That "someone accidentally deletes it someday"? Make it happen with your own hands.
public int Calculate(int attack, int defense)
{
    int damage = attack - defense;
    return damage;  // Broken on purpose (was: return damage < 1 ? 1 : damage;)
}
Re-run the Test Runner and the second test gets a red X. Click it and you'll see:
Calculate_DefenseHigherThanAttack_ReturnsAtLeast1
  Expected: 1
  But was:  -70
It reads exactly like it looks — "it should be 1 (Expected), but it was actually -70 (But was)." Which test, what it expected, and what actually happened — all in a few lines, so reading this message beats scattering logs around. Restore the line, re-run, and it's green again.
Once you can turn that loop — break it, read the red, fix it to green — with your own hands, testing has become a real tool for you. While you're at it, run the same test a few times in a row and confirm you get the same result every time. That steadiness is the foundation of a watchdog you can trust; when it wobbles, the culprits are covered below in flaky tests.
How to Write Tests
Assertions
Assert comes in several flavors depending on the kind of check you need. Pairing each with where you'd use it in a game makes them easy to remember.
// Equality: the score total should be 300 after adding points
Assert.AreEqual(300, scoreManager.TotalScore);

// Boolean: a full inventory should refuse further additions
Assert.IsFalse(inventory.Add(potion));

// Boolean: the skill should be unlocked at level 10
Assert.IsTrue(player.HasSkill("FireBall"));

// Null: looking up a nonexistent item ID should return null
Assert.IsNull(itemDatabase.Find("no_such_item"));

// Exception: passing a negative level should throw
Assert.Throws<System.ArgumentException>(() => player.SetLevel(-1));

// Constraint Model syntax (recommended in NUnit 3)
Assert.That(inventory.Count, Is.EqualTo(3));          // Quest reward should add 3 items
Assert.That(damage, Is.InRange(90, 110));             // Randomized damage (±10%) should stay in range
Constraint Model: NUnit 3 recommends the
Assert.Thatsyntax. It reads better and can express more complex conditions, like "is this randomized value within range?"
Testing Multiple Input Patterns at Once (TestCase)
Tests that fit a "table of inputs and expected values" — like damage calculations — can be consolidated into a single method with [TestCase]. Want another case? Just add one line.
// Attack, defense, expected damage
[TestCase(50, 30, 20)]   // Normal: 50 - 30 = 20
[TestCase(30, 100, 1)]   // Minimum 1 even when defense wins (permanently guards the regression from the intro)
[TestCase(10, 0, 10)]    // Zero defense passes damage through unchanged
[TestCase(1, 1, 1)]      // Right at the boundary
public void Calculate_DamageTable(int attack, int defense, int expected)
{
    var calculator = new DamageCalculator();

    int damage = calculator.Calculate(attack, defense);

    Assert.AreEqual(expected, damage);
}
Setup and Teardown (SetUp / TearDown)
When you write a bunch of inventory tests, you want each one to start from a brand-new inventory. Leftover items from a previous test would contaminate the results. SetUp and TearDown automate this per-test "prepare and clean up" routine.
public class InventoryTest
{
    private Inventory inventory;

    [SetUp]
    public void SetUp()
    {
        // Runs before every test: prepare a fresh inventory (capacity 10)
        inventory = new Inventory(capacity: 10);
    }

    [TearDown]
    public void TearDown()
    {
        // Runs after every test: put cleanup here if needed
    }

    [Test]
    public void Add_NewItem_CountIncreases()
    {
        inventory.Add(new Item("Potion"));
        Assert.AreEqual(1, inventory.Count);  // One item added to a fresh inventory is always 1
    }

    [Test]
    public void Add_WhenFull_ReturnsFalse()
    {
        // This test also starts "fresh," unaffected by previous tests
        for (int i = 0; i < 10; i++)
        {
            inventory.Add(new Item("Potion"));
        }

        Assert.IsFalse(inventory.Add(new Item("Elixir")));  // A full inventory should refuse
    }
}
There are also [OneTimeSetUp] / [OneTimeTearDown] for logic that should run "just once before/after all tests" (loading heavy data, for example).
Note (test class attributes): Some codebases put a
[TestFixture]attribute on test classes, but it's usually optional (required only for parameterized or generic test classes).
Simulating Real-World Tests
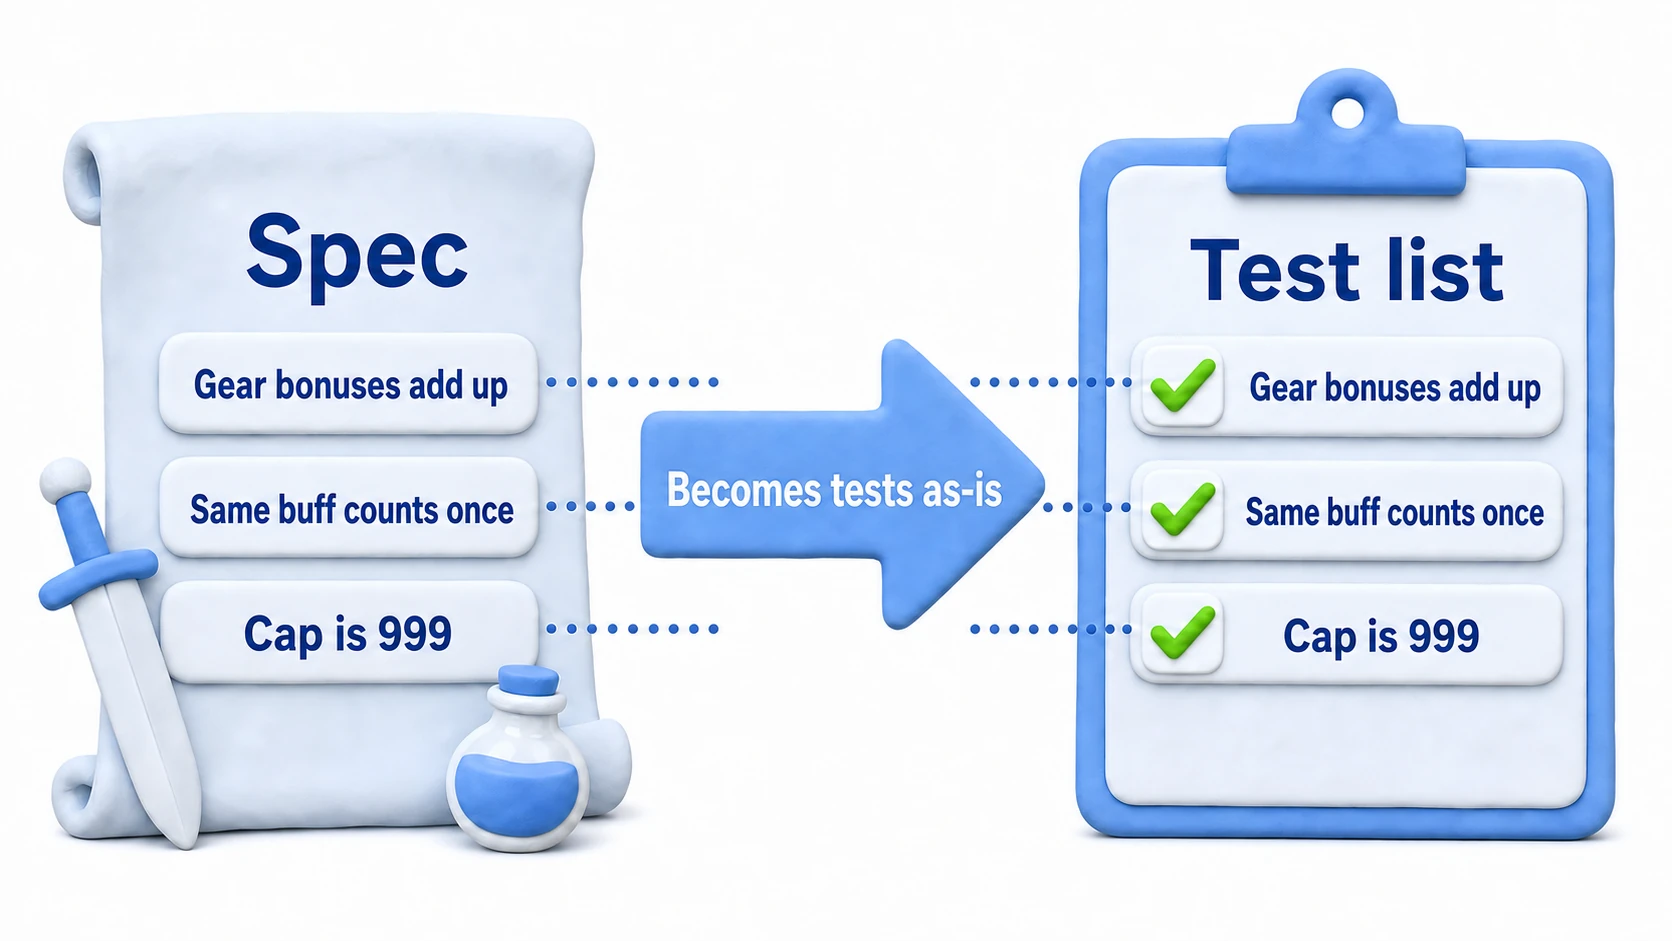
The examples so far were simple one-method calculations. So how complex do tests get in real development? The key insight: your bulleted spec list becomes your test list, line for line. Let's simulate two genres.
Example 1: RPG "Stats with Equipment and Buffs"
Calculating final attack power with equipment and buffs in the mix. Written out in plain language, the spec looks like this:
- Final attack = (base attack + total equipment bonuses) × buff multiplier
- Stacking the same buff twice only applies it once
- The final value is clamped to the range 1–999
Each line of this spec becomes a test, one for one.
public class CharacterStatsTest
{
    private CharacterStats stats;

    [SetUp]
    public void SetUp()
    {
        // Start every test with a "bare" character (base attack 100, no gear, no buffs)
        stats = new CharacterStats(baseAttack: 100);
    }

    [Test]
    public void FinalAttack_NoEquipNoBuff_ReturnsBase()
    {
        Assert.AreEqual(100, stats.FinalAttack);  // A bare character should return the base value as-is
    }

    [Test]
    public void FinalAttack_TwoWeapons_AddsBothBonuses()
    {
        stats.Equip(new Item("Sword", attackBonus: 30));
        stats.Equip(new Item("Ring", attackBonus: 20));

        Assert.AreEqual(150, stats.FinalAttack);  // 100 + 30 + 20
    }

    [Test]
    public void FinalAttack_SameBuffTwice_AppliesOnlyOnce()
    {
        stats.AddBuff("AttackUp", multiplier: 1.5f);
        stats.AddBuff("AttackUp", multiplier: 1.5f);  // Stacked!

        Assert.AreEqual(150, stats.FinalAttack);  // 100 × 1.5 (if it becomes ×2.25, that's a bug)
    }

    [Test]
    public void FinalAttack_ExtremeBuff_IsClampedTo999()
    {
        stats.Equip(new Item("LegendarySword", attackBonus: 900));
        stats.AddBuff("AttackUp", multiplier: 10f);

        Assert.AreEqual(999, stats.FinalAttack);  // The upper clamp should kick in
    }
}
Pay special attention to the third test. "The same buff stacking into a squared effect" is a bug that actually shows up all the time in RPG development. And once equipment, buffs, and caps interact, manual checking can't cover all the combinations. Write this test suite when the spec is settled, and you can extend the buff system later with confidence.
Example 2: Puzzle Game "Match Detection"
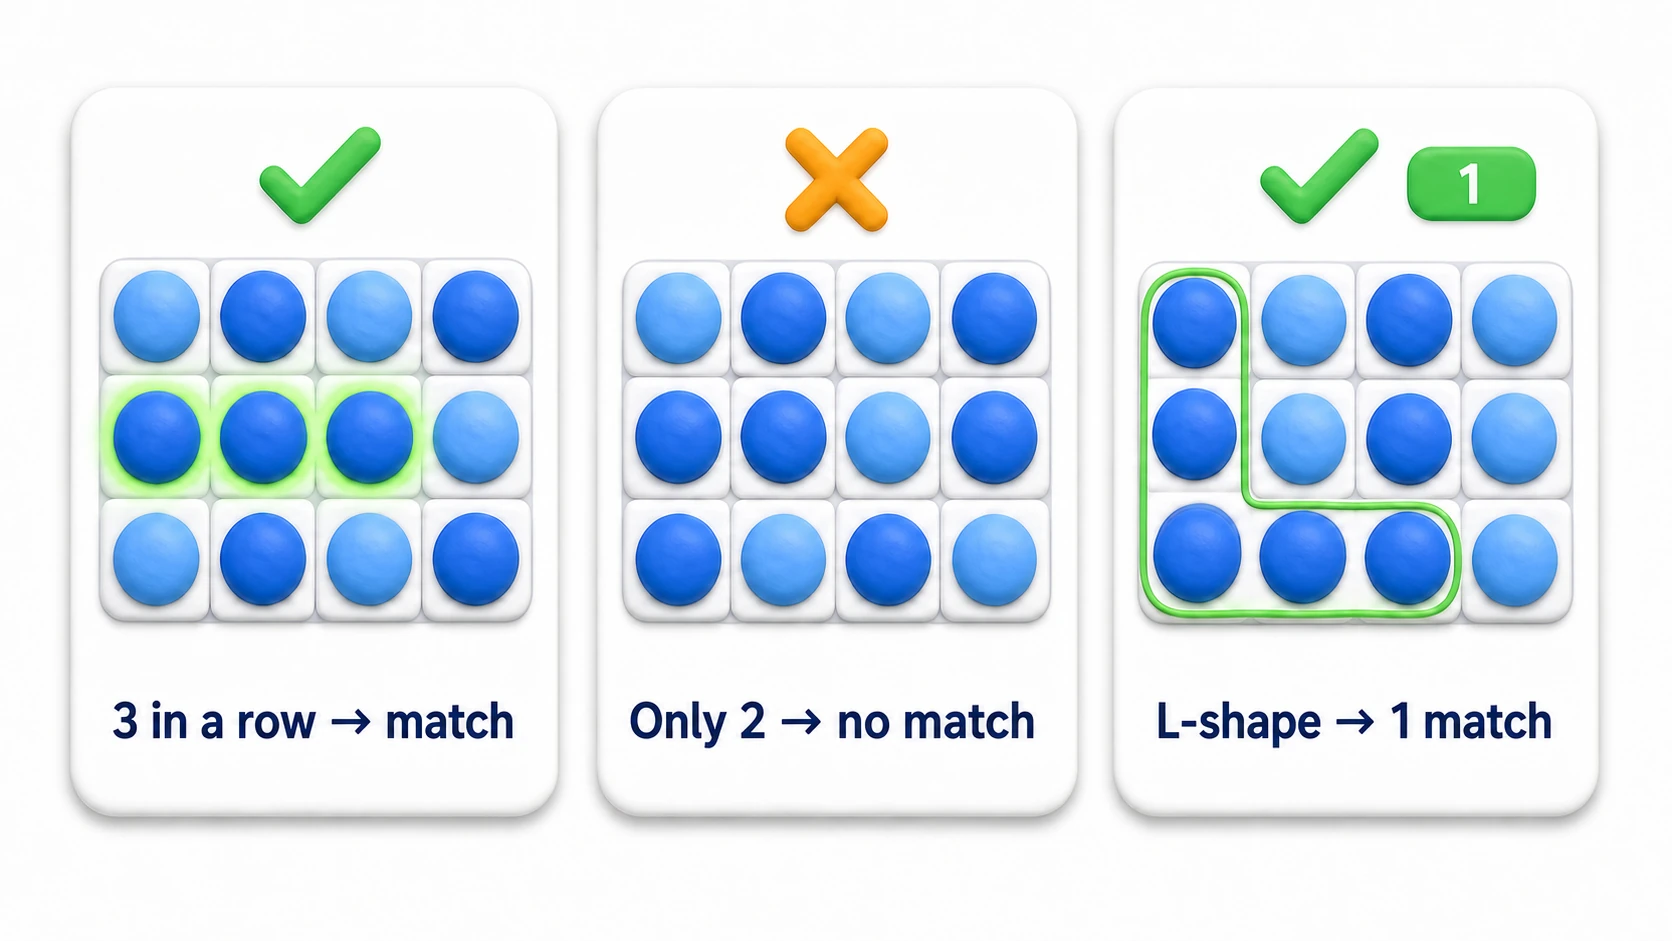
Match detection logic for a match-3 puzzle (pieces clear when three of the same color line up). The realistic twist here is that Arrange (setting up the board) gets big. Placing cells one at a time in every test is painful, so a classic technique is a helper that builds the board from strings.
public class MatchFinderTest
{
    // Helper that builds a board from strings (R = red, B = blue, . = empty)
    // When Arrange gets complicated, extracting helpers like this is standard practice
    private Board CreateBoard(params string[] rows)
    {
        return Board.FromText(rows);
    }

    [Test]
    public void Find_ThreeInARow_DetectsMatch()
    {
        var board = CreateBoard(
            "R R R B",
            "B B R B",
            ". B B R");

        var matches = new MatchFinder().Find(board);

        Assert.AreEqual(1, matches.Count);  // The horizontal RRR in the top row should be detected as 1 match
    }

    [Test]
    public void Find_OnlyTwoInARow_NoMatch()
    {
        var board = CreateBoard(
            "R R B B",
            "B R B R");

        var matches = new MatchFinder().Find(board);

        Assert.AreEqual(0, matches.Count);  // Two in a row is not a match
    }

    [Test]
    public void Find_LShape_DetectsAsSingleMatch()
    {
        var board = CreateBoard(
            "R B B",
            "R B .",
            "R R R");

        var matches = new MatchFinder().Find(board);

        Assert.AreEqual(1, matches.Count);  // Per spec, an L where vertical and horizontal cross counts as "one match"
    }
}
Ambiguous parts of the spec — like "is an L-shape one match or two?" — get flushed out precisely while you write tests. In real development, writing tests doubles as pinning down the spec, one decision at a time.
What Real-World Tests Have in Common
- Turn each bullet of the spec into a test name. The test list then functions as your spec document
- When Arrange bloats, extract helpers (board builders, character factories, etc.). Test code deserves refactoring just like production code
- When a bug report comes in, write a test that reproduces the bug first, then fix it. The test turns green the moment it's fixed — and guards against regression forever
Play Mode Setup and Teardown (IEnumerator version)
public class MyPlayModeTest
{
    [UnitySetUp]
    public IEnumerator SetUp()
    {
        // Asynchronous setup
        yield return null;
    }

    [UnityTearDown]
    public IEnumerator TearDown()
    {
        // Asynchronous cleanup
        yield return null;
    }
}
Play Mode Tests
The damage calculations and inventories so far were "pure calculations," so Edit Mode could test them in a flash. But checks involving physics, elapsed time, or GameObjects — like "does an object with a Rigidbody actually fall?" — can only be verified by actually running the game. Play Mode tests automate exactly that.
The UnityTest Attribute
using NUnit.Framework;
using UnityEngine;
using UnityEngine.TestTools;
using System.Collections;

public class MyPlayModeTest
{
    private GameObject testObject;

    [UnitySetUp]
    public IEnumerator SetUp()
    {
        testObject = new GameObject("TestObject");
        yield return null;
    }

    [UnityTearDown]
    public IEnumerator TearDown()
    {
        // Clean up reliably even if the test fails midway
        if (testObject != null)
        {
            Object.Destroy(testObject);
        }
        yield return null;
    }

    [UnityTest]
    public IEnumerator GameObject_WithRigidbody_FallsDown()
    {
        // Arrange
        testObject.AddComponent<Rigidbody>();
        var initialPosition = testObject.transform.position;

        // Act - wait until the condition is met (with a timeout)
        float timeout = 3f;
        float elapsed = 0f;
        while (testObject.transform.position.y >= initialPosition.y && elapsed < timeout)
        {
            elapsed += Time.deltaTime;
            yield return null;
        }

        // Assert
        Assert.Less(elapsed, timeout, "Timed out waiting for object to fall");
        Assert.Less(testObject.transform.position.y, initialPosition.y);
    }
}

// Comparing wait patterns
// yield return new WaitForSeconds(1.0f);        // Tends to slow down CI/CD
// yield return new WaitForFixedUpdate();        // One physics step (fast)
// for (int i = 0; i < 60; i++) yield return null;  // A specific frame count (~1 second at 60fps)
Categorizing Tests
[Category("Combat")]
[Test]
public void Damage_AppliedCorrectly() { }

[Category("Inventory")]
[Test]
public void Item_AddedToInventory() { }

// Run a specific category from the command line:
// Unity.exe -batchmode -runTests -testCategory Combat -projectPath /path/to/project
async/await Tests (Unity 2023.1 and Later)
// Available in Unity 2023.1 and later
[Test]
public async Task AsyncOperation_Completes()
{
    var result = await SomeAsyncMethod();
    Assert.IsNotNull(result);
}
Common Problems and Solutions
Tests Aren't Recognized
- Check that the Assembly Definition is set up correctly
- Check that test methods have the
[Test]or[UnityTest]attribute - Check that the test class is
public
Tests Fail Because of Error Logs
Use LogAssert.Expect() to declare that an error log is expected:
// Correct: call Expect first
LogAssert.Expect(LogType.Error, "Error message");
Debug.LogError("Error message");  // Expects a log emitted after this point

// Wrong: if the log is emitted first, the test fails
// Debug.LogError("Error message");
// LogAssert.Expect(LogType.Error, "Error message");  // Too late
Important: Always call
LogAssert.Expect()before the log is emitted. Get the order wrong and the test fails.
For tests that intentionally trigger errors:
[SetUp]
public void SetUp()
{
    // Ignore test failures caused by error logs during the test
    LogAssert.ignoreFailingMessages = true;
}

[TearDown]
public void TearDown()
{
    LogAssert.ignoreFailingMessages = false;  // Always restore it
}
Tests That Fail Only Sometimes (Flaky Tests)
A test whose result changes from run to run is not a game bug — it's a bug in the test itself. Left alone, it teaches everyone to shrug off "another false alarm" and erodes trust in the whole suite, so track the culprit down by its symptom.
| Symptom | Culprit | Fix |
|---|---|---|
| Fails only on CI or slow machines | Real-time waits like WaitForSeconds | Switch to "wait for the condition, with a timeout" (see the falling-object test above) |
| Fails maybe one run in ten | Unseeded randomness | Fix the seed at the top of the test, e.g. Random.InitState(12345) — or assert the whole range with Is.InRange |
| Passes alone, fails in a full run | Leftovers from previous tests (static values, objects left in the scene) | Reinitialize in SetUp and clean up reliably in TearDown. Know that statics and Singletons are prone to leaking between tests |
The minimum bar for a trustworthy watchdog: run the same test ten times in a row and get the same result all ten times.
Best Practices
- Keep tests small - Test one thing per test
- Use descriptive test names - Follow the
MethodName_Condition_ExpectedResultpattern - Follow the AAA pattern - Arrange, Act, Assert
- Keep tests independent - Don't depend on other tests
- Clean up in TearDown - Release resources reliably even when tests fail
- Refactor your tests regularly, too
Running Tests in CI/CD
You can run tests from the command line.
# Windows
Unity.exe -batchmode -runTests -testPlatform EditMode -projectPath /path/to/project

# macOS
/Applications/Unity/Hub/Editor/{version}/Unity.app/Contents/MacOS/Unity -batchmode -runTests -testPlatform EditMode -projectPath /path/to/project

# Output results as XML
Unity.exe -batchmode -runTests -testResults ./results.xml -projectPath /path/to/project
CI/CD integration: Run automated tests in GitHub Actions, Jenkins, GitLab CI, and the like — running tests on every pull request keeps quality high. Replace
{version}with the Unity version you're using (e.g. 2022.3.10f1).
Checking Test Coverage
Install the Code Coverage package (com.unity.testtools.codecoverage) to visualize how much of your code the tests cover.
- Install Code Coverage from the Package Manager
- Check it via
Window > Analysis > Code Coverage - Generate a report after running tests
Bonus: Good to Know for Later
Once you know how to write tests, the next question is what to write. Here's the practical line to draw for game development in particular.
- Don't test everything — start with "calculations": You can't test "does the jump feel good," but you can test "is the damage calculation correct." Starting with pure logic that doesn't depend on Unity (damage calculations, score tallying, inventory changes, save data conversion) gives you by far the best return on investment.
- Testability is decided by design: Logic buried inside a
MonoBehaviour'sUpdatecan't be tested. Extract the calculation into a plain C# class and Edit Mode tests can verify it in an instant. This connects directly to the loose-coupling ideas covered in the events and delegates article. - Testing async/await: Unity 2023.1 and later support
async Tasktests (see above). For when to use async in the first place, see the coroutines vs. async/await article.
The decision rule fits in one line: "If this code broke, would I fail to notice right away?" Calculations and data processing where breakage is hard to spot are exactly where a test watchdog earns its keep.
Summary
Unity Test Framework is a powerful tool for raising the quality of your Unity projects.
- Edit Mode tests - Best for testing logic, run fast
- Play Mode tests - Best for testing gameplay
- AAA pattern - Structure tests with Arrange, Act, Assert
- Setup/teardown - Define shared logic with SetUp and TearDown
- TestCase attribute - Run the same test with multiple inputs
The bigger your project grows, the more tests matter. Pick one calculation in your game with a fixed right answer, write two tests for it — then break one on purpose, once. Why not make that the closing ritual of today's dev session?