Have you ever tried to build a boss entrance sequence by lining up WaitForSeconds calls inside a coroutine? "The camera zooms in, 1.5 seconds later the boss roars, 0.5 seconds after that the music changes, then the name appears..."—rewrite the code, hit play, repeat, every time you adjust the timing. Tuning a sequence "to the second" in code is a nightmare.
Timeline solves this like a video editor. You arrange animation, audio, and camera movement visually on lanes along a time axis, and adjusting the timing becomes a matter of dragging clips.
What You'll Learn
- Timeline's building blocks (Timeline Asset, Playable Director, Track, Clip)
- How to use the main track types (Animation, Audio, Activation, Signal)
- Camera switching sequences with Cinemachine integration
- Controlling playback from scripts and common pitfalls
- Practical: building a boss entrance sequence with Timeline
Components
Timeline is made up of the following elements.
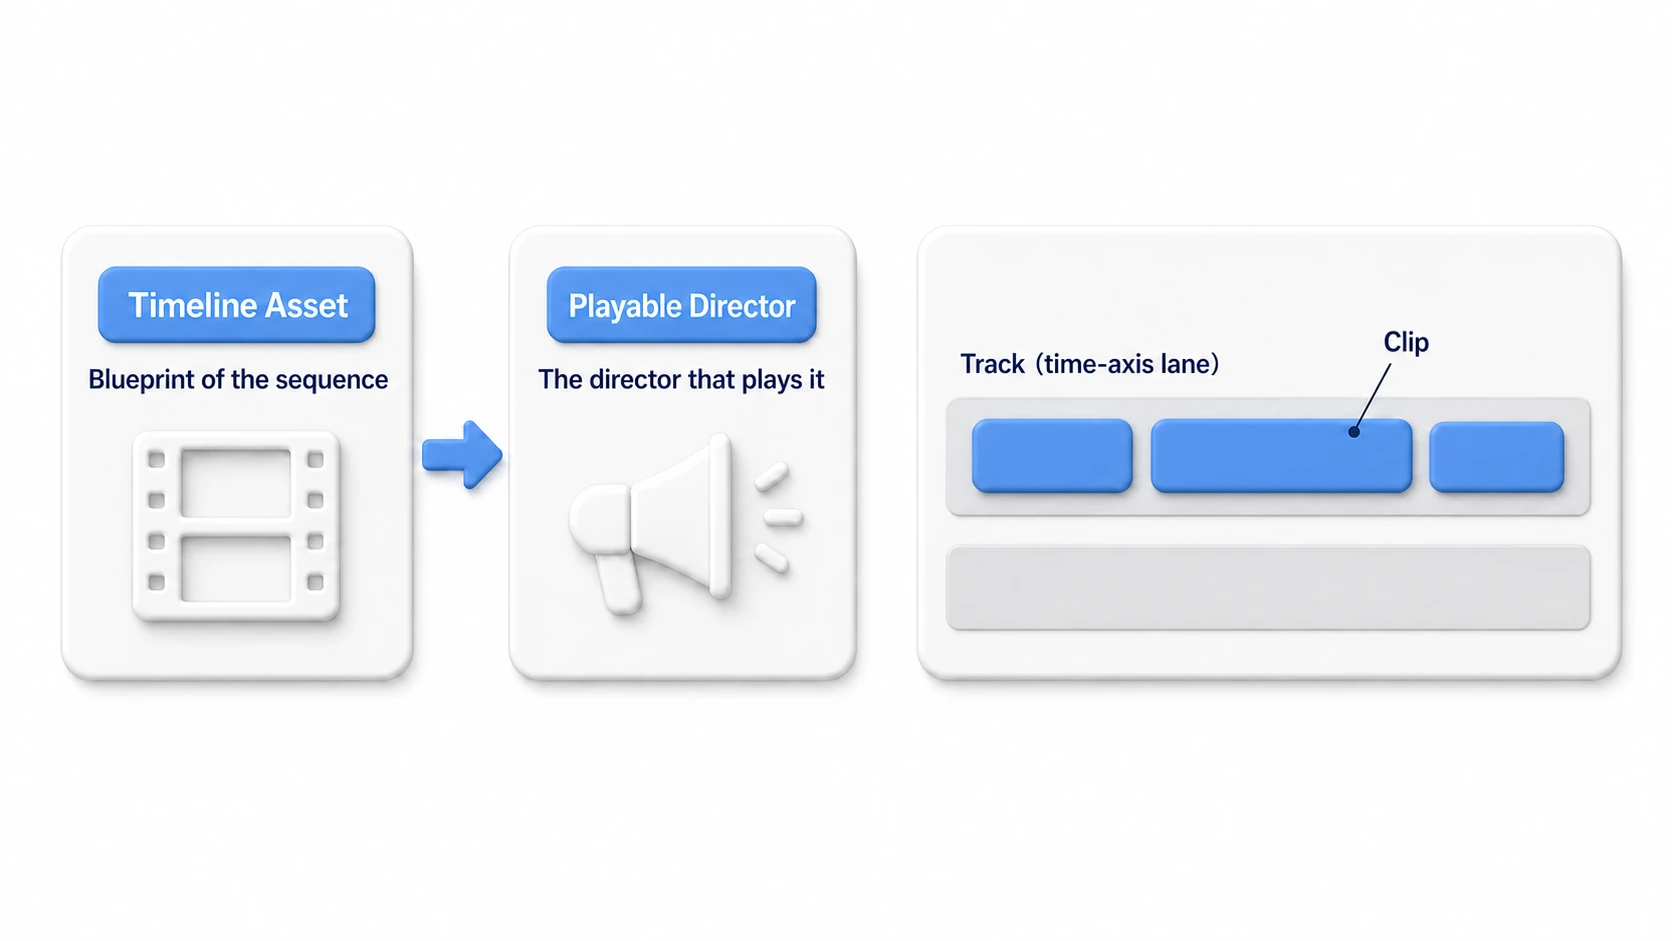
| Element | Description |
|---|---|
| Timeline Asset | The asset file that stores the timeline's settings |
| Playable Director | The component attached to a GameObject that plays the Timeline |
| Track | A time axis that controls a specific element (animation, audio, etc.) |
| Clip | An individual element placed on a track |
Main Track Types
Master the five you'll use most and you can build the majority of any sequence.
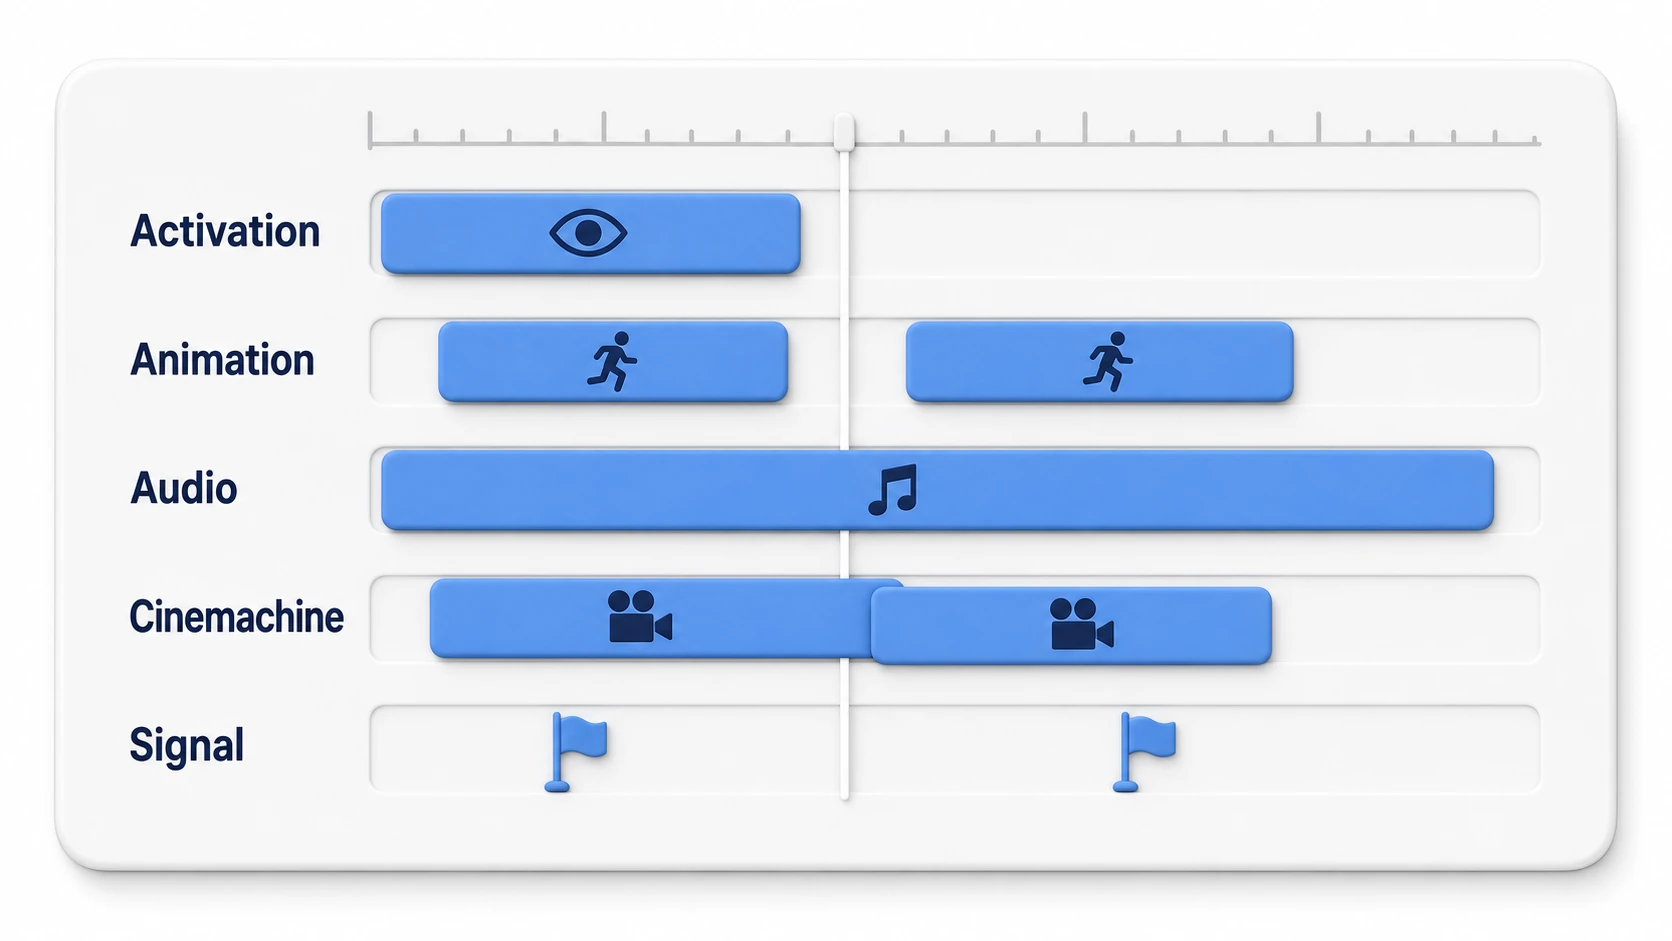
Activation Track
Controls a GameObject's active/inactive state along the timeline. Used for things like spawning enemies or toggling UI visibility.
Animation Track
Plays existing animation clips or records keyframe animation directly within the Timeline. Controls character movement, object translation and rotation, and more.
Audio Track
Places BGM and sound effects along the timeline. You can play multiple audio sources in sync and adjust volume and pitch.
Control Track
Controls Prefabs, nested timelines, and Particle Systems.
Common use cases:
- Nested Timelines: Play another Timeline (split complex sequences into manageable parts)
- Particle Systems: Control when effects play
- Prefab instantiation: Spawn and destroy Prefabs at specific times
Signal Track
Fires events at specific times. Combined with a Signal Receiver, it can communicate with external systems. Used for running custom logic, updating UI, changing game state, and more.
Cinemachine Track
Controls Cinemachine virtual cameras. Switch between multiple camera views to achieve cinematic camera work.
Key changes in Cinemachine 3.x:
CinemachineVirtualCamera→CinemachineCameraCinemachineBrainsettings merged into the camera componentCinemachineComposer→CinemachineRotationComposerCinemachineTransposer→CinemachineFollowCinemachineOrbitalTransposer→CinemachineOrbitalFollowCheck which Cinemachine version you're using and use the appropriate component names.
Basic Usage
Setup Steps
1. Create a Timeline asset
- Right-click in the Project window → Create → Timeline
- Or open the window via Window → Sequencing → Timeline and click the Create button
2. Set up the Playable Director
- Create an empty GameObject
- Drag and drop the Timeline asset onto the GameObject in the Hierarchy
- A Playable Director component is added automatically
3. Add tracks
- Click the "+" button in the Timeline window, or right-click
- Choose the type of track you want to add
- Or drag and drop a GameObject into the Timeline window
4. Place clips
- Drag animation clips or audio clips onto a track
- Or record keyframes directly in Recording mode
Recording Mode
- Click the red circle button on a track to start recording
- Move along the timeline while changing the object's Transform or properties
- Your changes are automatically recorded as keyframes
- When you exit recording mode, an animation clip is generated
Recorded Clip: The generated clip is embedded in the Timeline asset as a Recorded Clip. You can later replace it with a regular AnimationClip, or extract it to the Project window for reuse.
Cinemachine Integration
Cinemachine is Unity's advanced camera system that uses virtual cameras to achieve professional-quality camera work.
Integration Steps
1. Add a Cinemachine Track
Add a "Cinemachine Track" to the Timeline and bind the camera in your scene that has a Cinemachine Brain.
2. Place Virtual Cameras
Place multiple Cinemachine Virtual Cameras in the scene, each with a different angle and follow target.
3. Create camera shots
Drag and drop Virtual Cameras onto the Cinemachine Track. Adjust each clip's length to control how long each camera is shown, and line up clips to switch between cameras.
4. Adjust blends
Adjust the blend time between clips to set up smooth camera transitions or hard cuts.
Practical: Building a Boss Entrance with Timeline
A boss entrance in an action game, a key event in an RPG, the moment "the sealed door opens" in a horror game—a sequence that synchronizes multiple elements (camera, animation, sound, UI) to the second is Timeline's home turf. In the practical section of Getting Started with Cinemachine we built a boss entrance with Priority-switching code, but once you have more than three elements, switching to Timeline is the right call. Let's build a boss entrance end to end.
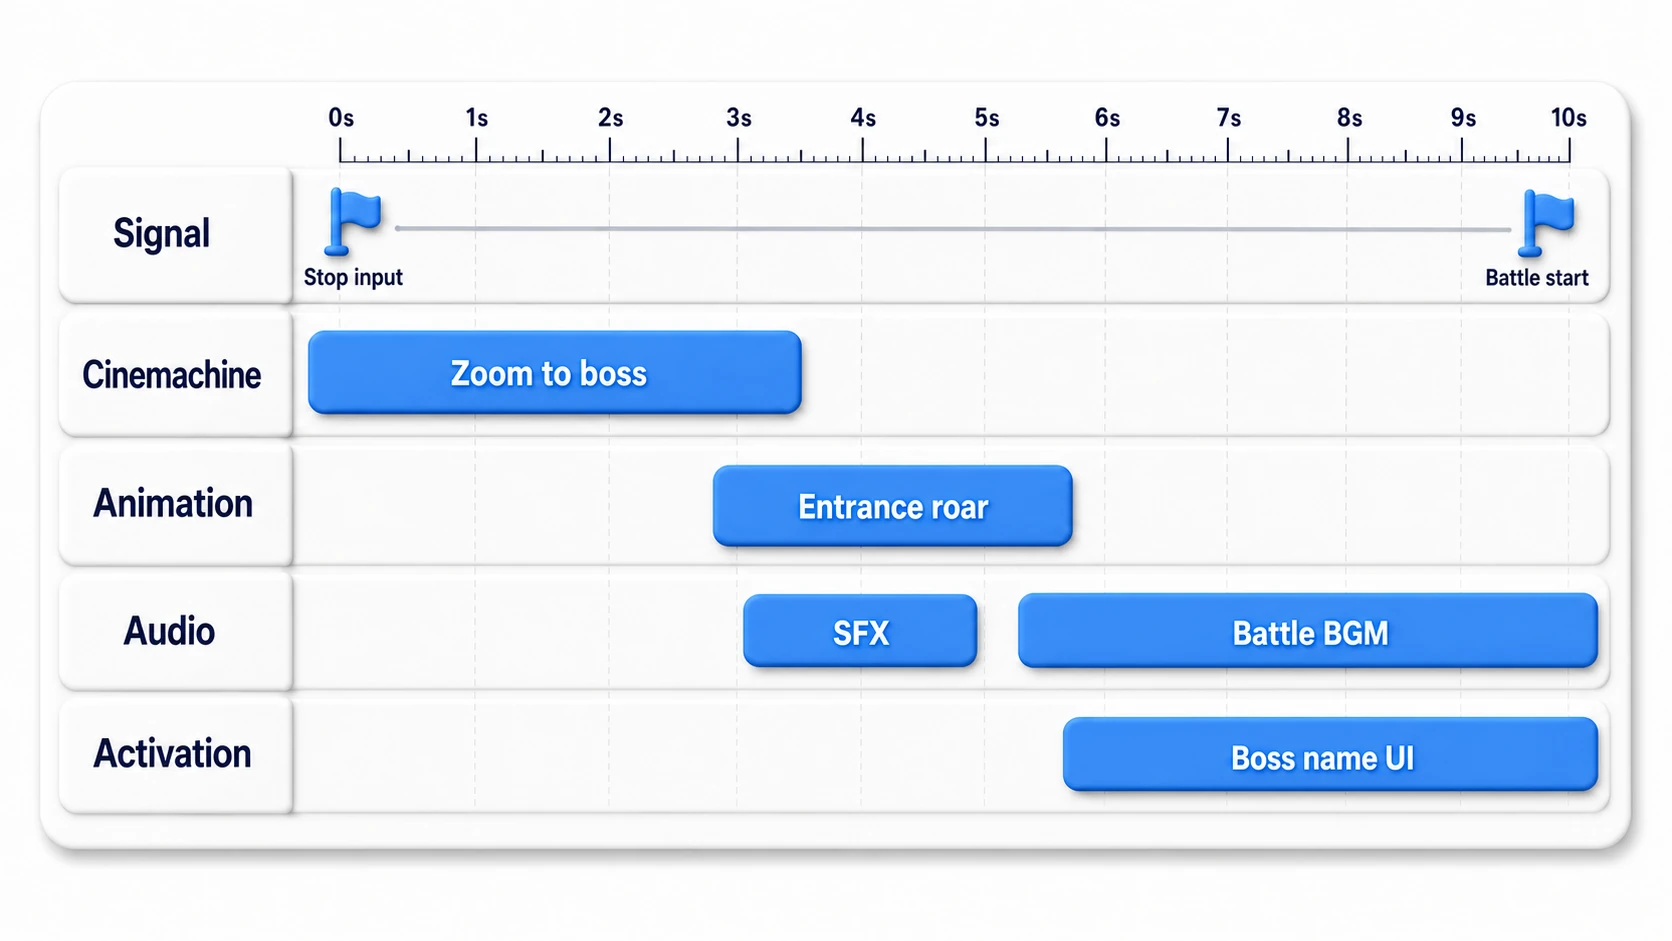
- Foundation: On an empty GameObject "BossIntroCutscene", create
Timeline_BossIntro. Set the Playable Director's Play On Awake to off (you'll play it from a script when the player enters the battle area). - Signal Track (start): Place a Signal Emitter at 0 seconds,
OnCutsceneStart—stop the player's input via a Signal Receiver. - Cinemachine Track: Place a clip for a camera that frames the boss head-on. Overlap it slightly with the clips before and after to create a blend that zooms in.
- Animation Track: Place the boss's entrance animation (rising up and roaring).
- Audio Track: Place the roar sound effect and the music transition to match the peak of the animation. Being able to line them up by dragging while watching the waveform is the joy of Timeline.
- Activation Track: Make the boss-name UI object active only for the stretch right after the roar.
- Signal Track (end): Place a Signal Emitter at the final point,
OnBattleStart, which hands input back to the player and starts the battle.
Move the playhead around and confirm that you can adjust the timing of every element just by dragging. "I want to delay the roar by 0.3 seconds" becomes a 3-second job with no code changes.
There are two key points. "Funnel the entry and exit points with game logic into Signals" (Timeline holds only the sequence, and shakes hands with the game side via start/end notifications, so the sequence and the logic don't get tangled) and "Set Wrap Mode to Hold" (with the default None, the boss snaps back to its pre-entrance position the instant playback ends—a classic cutscene trap).
Other Classic Use Cases
| Sequence | Tracks used |
|---|---|
| Game intro sequence | Activation (logo) + Cinemachine (zoom in) + Audio (BGM) + Signal (start notification) |
| Opening a treasure chest | Animation (lid) + Audio (fanfare) + Control (sparkle Particles) |
| Ending credits | Animation (scroll) + Audio (theme song) |
Controlling Timeline from Scripts
Timeline Playback Control
using UnityEngine;
using UnityEngine.Playables;

public class TimelineController : MonoBehaviour
{
    PlayableDirector director;

    void Start()
    {
        director = GetComponent<PlayableDirector>();
    }

    public void PlayTimeline()
    {
        director.Play();
    }

    public void PauseTimeline()
    {
        director.Pause();
    }

    public void StopTimeline()
    {
        director.Stop();
    }

    public void JumpToTime(double time)
    {
        director.time = time;
        director.Evaluate();  // Applies immediately even while paused
    }

    public void SetStartTime(double time)
    {
        director.initialTime = time;  // Sets the playback start position
    }

    // Scrubbing: for hooking up to a slider
    public void OnSliderChanged(float normalizedTime)
    {
        director.time = normalizedTime * director.duration;
        director.Evaluate();  // Also usable for preview purposes
    }

    void OnEnable()
    {
        director.played += OnTimelinePlayed;
        director.paused += OnTimelinePaused;
        director.stopped += OnTimelineFinished;
    }

    void OnDisable()
    {
        director.played -= OnTimelinePlayed;
        director.paused -= OnTimelinePaused;
        director.stopped -= OnTimelineFinished;
    }

    void OnTimelinePlayed(PlayableDirector pd)
    {
        Debug.Log("Timeline started!");
    }

    void OnTimelinePaused(PlayableDirector pd)
    {
        Debug.Log("Timeline paused!");
    }

    void OnTimelineFinished(PlayableDirector pd)
    {
        Debug.Log("Timeline finished!");
    }
}
Using Signal Receiver
- Create a Signal Asset (right-click in Project → Create → Signal)
- Add a Signal Track and set a GameObject with a Signal Receiver in the binding field on the left side of the Timeline window
- Place a Signal Emitter on the Signal Track
- Add a Signal Receiver component to the GameObject
- Register the methods that respond to the Signal
using UnityEngine;

public class CutsceneEventHandler : MonoBehaviour
{
    // Methods called from the Signal Receiver
    public void OnBossAppear()
    {
        Debug.Log("The boss has appeared!");
        // Stop player movement, show UI, etc.
    }

    public void OnBattleStart()
    {
        Debug.Log("Battle start!");
        // Switch the game state to battle mode
    }
}
Signal Receiver setup steps:
- Open the Signal Receiver component
- Click Add Reaction
- Select the Signal Asset to use
- Specify the target GameObject and method
Changing Bindings at Runtime
A pattern that comes up frequently in real projects: you can change a track's binding target at runtime.
// Example: swapping in a different character
foreach (var output in director.playableAsset.outputs)
{
    if (output.streamName == "PlayerAnimation")
    {
        director.SetGenericBinding(output.sourceObject, newCharacter);
    }
}
Next steps: If you want to create your own tracks, you can implement a Custom Track by inheriting from three classes:
TrackAsset(the track itself),PlayableAsset(the clip data), andPlayableBehaviour(the runtime behavior).
Common Issues and Solutions
Issue 1: Timeline doesn't play
- Check that Play On Awake is enabled on the Playable Director
- Check that the Timeline asset is set up correctly
- Check that the objects bound to the tracks exist
Issue 2: Animations don't take effect
- Check that the Animator component is correctly bound to the Animation Track
- Check for conflicts with the Animator's other layers or state machine
- Check that Recording mode has been exited
Resolving conflicts between the Animator and the Animation Track:
- Use an Avatar Mask to limit which body parts Timeline controls
- Adjust the Track weight to control how much influence Timeline has
- Disable the Animator's state machine while the Timeline is playing
Issue 3: Objects revert to their original state after playback ends
Check the Playable Director's Wrap Mode.
| Wrap Mode | Behavior |
|---|---|
| Hold | Keeps the state of the final frame |
| Loop | Plays repeatedly |
| None | Reverts to the original state after playback ends |
Common gotcha: With the default
None, character positions and properties revert to their pre-playback state. For cutscenes, you'll usually wantHold.
Issue 3.5: Choosing the Update Method
Choose the Playable Director's Update Method based on your use case.
| Update Method | Use case |
|---|---|
| Game Time | Normal gameplay (affected by Time.timeScale) |
| Unscaled Game Time | UI sequences during pause, etc. (unaffected by Time.timeScale) |
| DSP Clock | When audio sync is critical |
| Manual | When controlling playback entirely from script |
Issue 4: The camera doesn't switch
- Check that a Cinemachine Brain is attached to the main camera
- Check that the Virtual Cameras' priorities are set correctly
- Check that the Cinemachine Brain is bound to the Cinemachine Track
Issue 5: Signals don't fire
- Check that the Signal Receiver is attached to the correct GameObject
- Check that the Signal Asset is assigned to the Signal Emitter
- Check that a Reaction is registered in the Signal Receiver
Best Practices
Naming Conventions
- Timeline assets:
Timeline_CutsceneName - Tracks: names that describe their role (e.g.,
Track_PlayerAnimation) - Signal Assets:
Signal_EventName
Staying Organized
- Group related Timeline assets in a dedicated folder
- Group tracks by type
- Break up long Timelines with markers
Performance
- Delete unused tracks and clips
- Compress high-resolution animations
- Split complex Timelines for easier management
- Load/unload on demand with Addressables
Summary
Timeline is a powerful tool for creating cutscenes and cinematic sequences.
- Activation Track - Controls object visibility
- Animation Track - Manages animations chronologically
- Audio Track - Places BGM and sound effects
- Cinemachine Track - Achieves cinematic camera work
- Signal Track - Fires events to hook into game logic
- Once a sequence has more than three elements, reach for Timeline instead of a coroutine. Funnel the contact points with your logic into Signals.
You can build sequences visually without writing code, and Cinemachine integration brings professional-quality camera work within reach. That "money shot" in your game—are you still managing it with WaitForSeconds in a coroutine?