You build a cherry-blossom flurry with the Particle System (Shuriken), and the moment you crank up the count, the frame rate tanks. A starry sky, a blizzard over a snowfield—right when you want "one more order of magnitude of particles," the CPU cries uncle. When you hit that wall of sheer volume, that's VFX Graph's cue.
VFX Graph is Unity's official node-based visual effect authoring tool. Because it runs the particle calculations on the GPU, it can drive particles at a scale of hundreds of thousands to millions—far past the few thousand that were Shuriken's limit.

What You'll Learn
- How VFX Graph differs from the Particle System (Shuriken) and when to use each
- The basic structure of VFX Graph (Spawn / Initialize / Update / Output)
- Basic usage and controlling effects from scripts
- System requirements and caveats on mobile
- Practical: spawning tens of thousands of fireflies in a night forest
Differences from the Classic Particle System
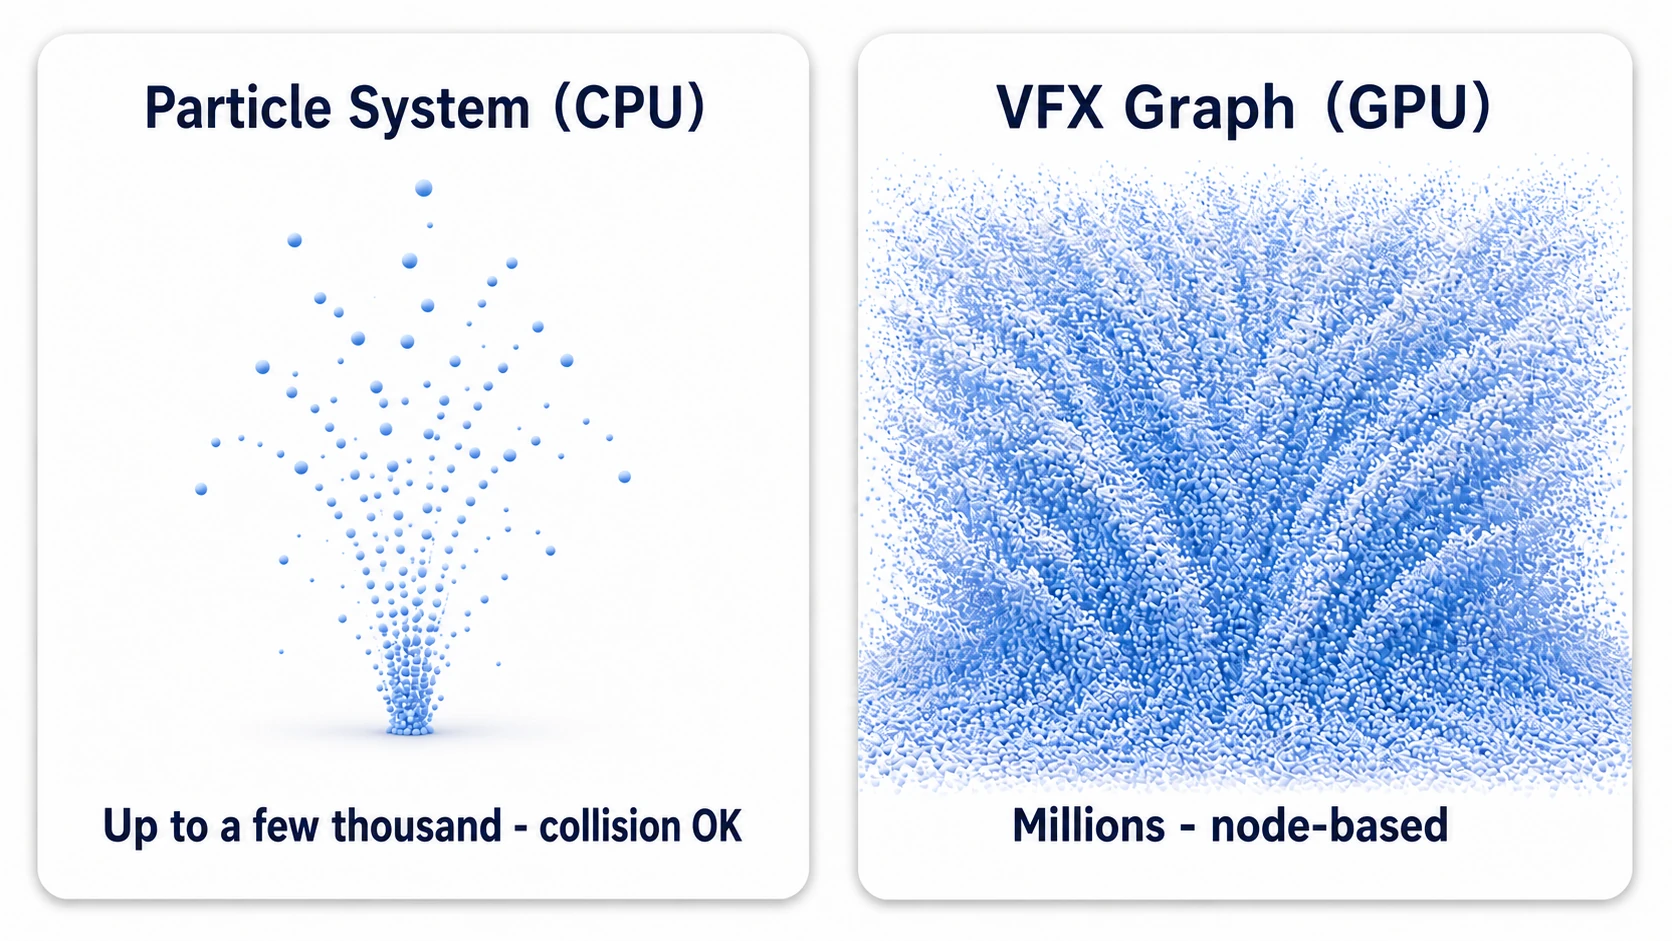
Particle System (Shuriken)
- CPU-based particle system
- Available since Unity's early days
- Configured in the Inspector
- Modular design
- Supports collision detection
- Easy to set up, lots of learning resources
- Tends to be CPU-heavy (a few thousand particles is the practical limit)
VFX Graph
- GPU-based particle system
- Configured through a node-based graph
- Can render massive numbers of particles (even millions)
- Collision detection is limited
- Steeper learning curve
- Integrates with Shader Graph
- Enables more advanced visuals
Performance Comparison
| Scenario | Recommended System |
|---|---|
| Huge numbers of particles in a single system | VFX Graph (dramatically cheaper) |
| Many different effects playing at once | Particle System (can be cheaper) |
| The same effect placed many times | VFX Graph (cheap thanks to instancing) |
When to Use Which
Use VFX Graph when:
- You want massive particle counts (explosions, fire, smoke, magic, etc.)
- You need advanced visuals
- You want to integrate with Shader Graph
- You place the same effect many times
Use the Particle System when:
- You need collision detection
- You want to set things up quickly
- Simple effects are enough
- You play many different effects at once
Basic Structure of VFX Graph
Two Components
A VFX Graph setup consists of two parts.
| Component | Description |
|---|---|
| Visual Effect component | Attached to a GameObject |
| Visual Effect Asset | Stores the effect's configuration |
The Four Context Nodes
Data in a VFX Graph flows from top to bottom through the nodes. It's the same idea as Shuriken's "life of a particle", turned directly into a vertical graph.
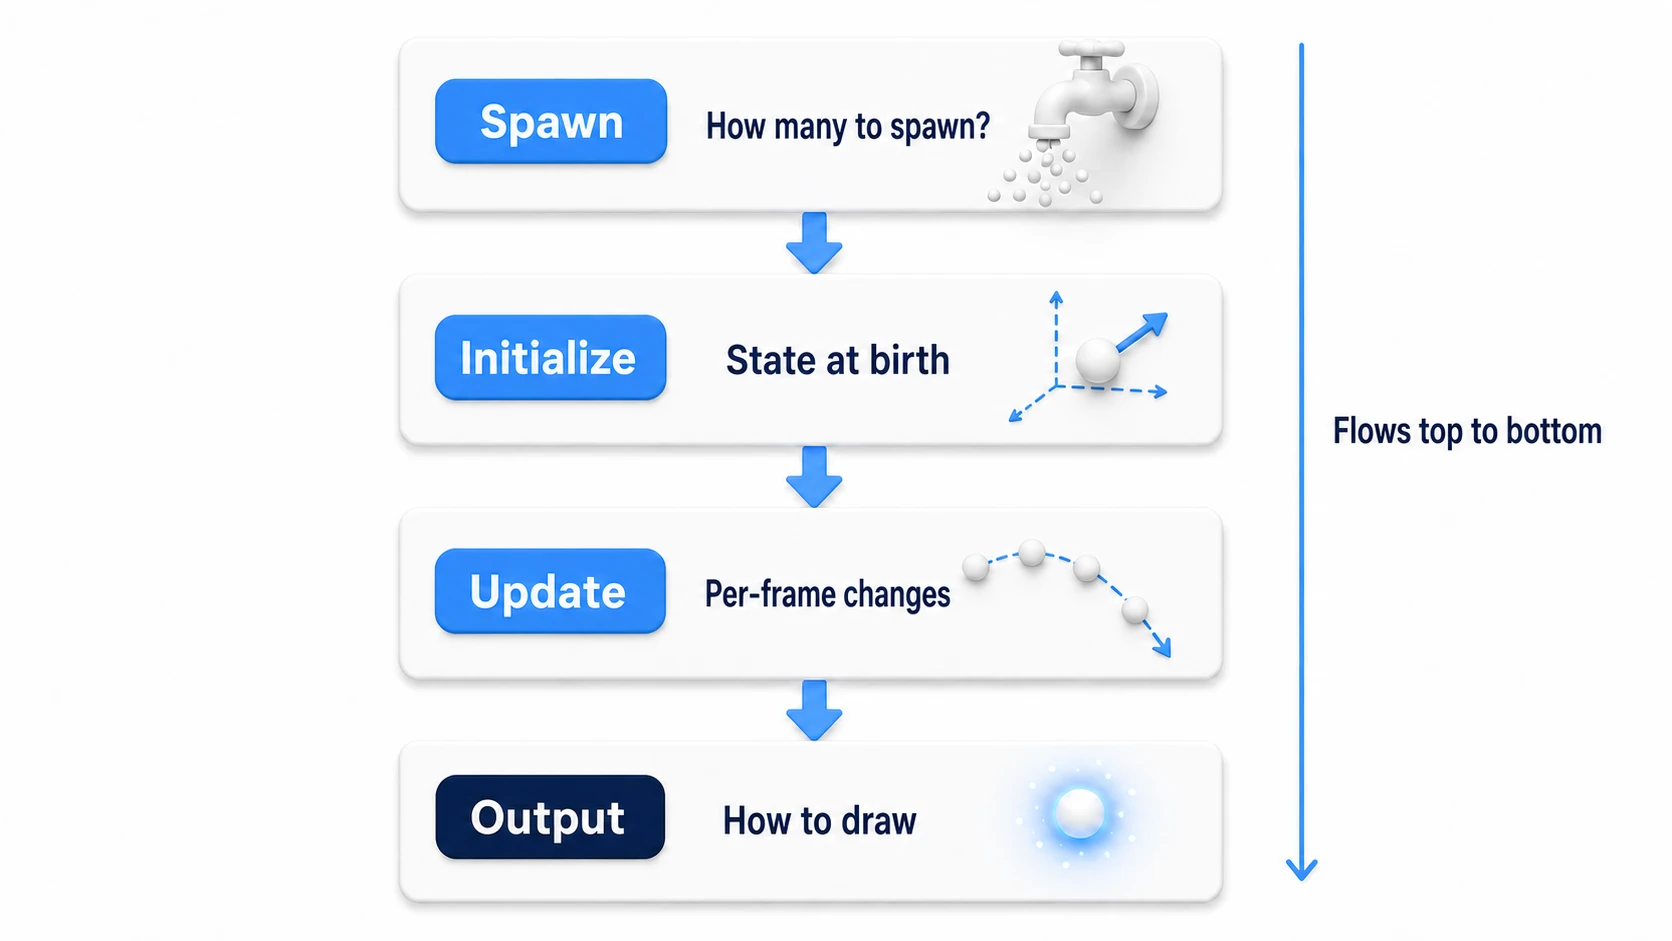
1. Spawn Context
Determines how many particles to spawn each frame and passes that to Initialize Particle.
- Constant Spawn Rate - Emits spawn events at a constant rate
- Burst - Spawns a large number of particles at once
Other Spawn blocks:
Periodic Burst(bursts at fixed intervals) andVariable Spawn Rate(a spawn rate that changes dynamically) are also available.
2. Initialize Particle Context
Initializes each particle.
- Capacity - The maximum number of particles alive at once (see the guidelines below)
Capacity guidelines by platform:
| Platform | Practical Capacity range | Notes |
|---|---|---|
| High-end PC | 1M-5M | Heavily dependent on GPU performance |
| Mid-range PC | 100K-500K | |
| Console | 100K-1M | Varies by platform |
| Mobile | 10K-50K | Watch out for heat and battery drain |
Estimating Capacity: Capacity is the maximum number of particles alive at the same time. Estimate the actual on-screen count as spawn rate x lifetime — setting Capacity too high wastes VRAM.
- Set LifeTime - Particle lifetime
- Set Position Shape - Initial particle position (spawned from a shape)
- Set Velocity - Initial particle velocity
3. Update Particle Context
Runs per-frame updates on each particle.
- Gravity - Applies gravity
- Linear Drag - Applies drag
- Force - Applies a force
- Collision - Collision detection (limited)
4. Output Particle Context
Configures how the particles are finally rendered.
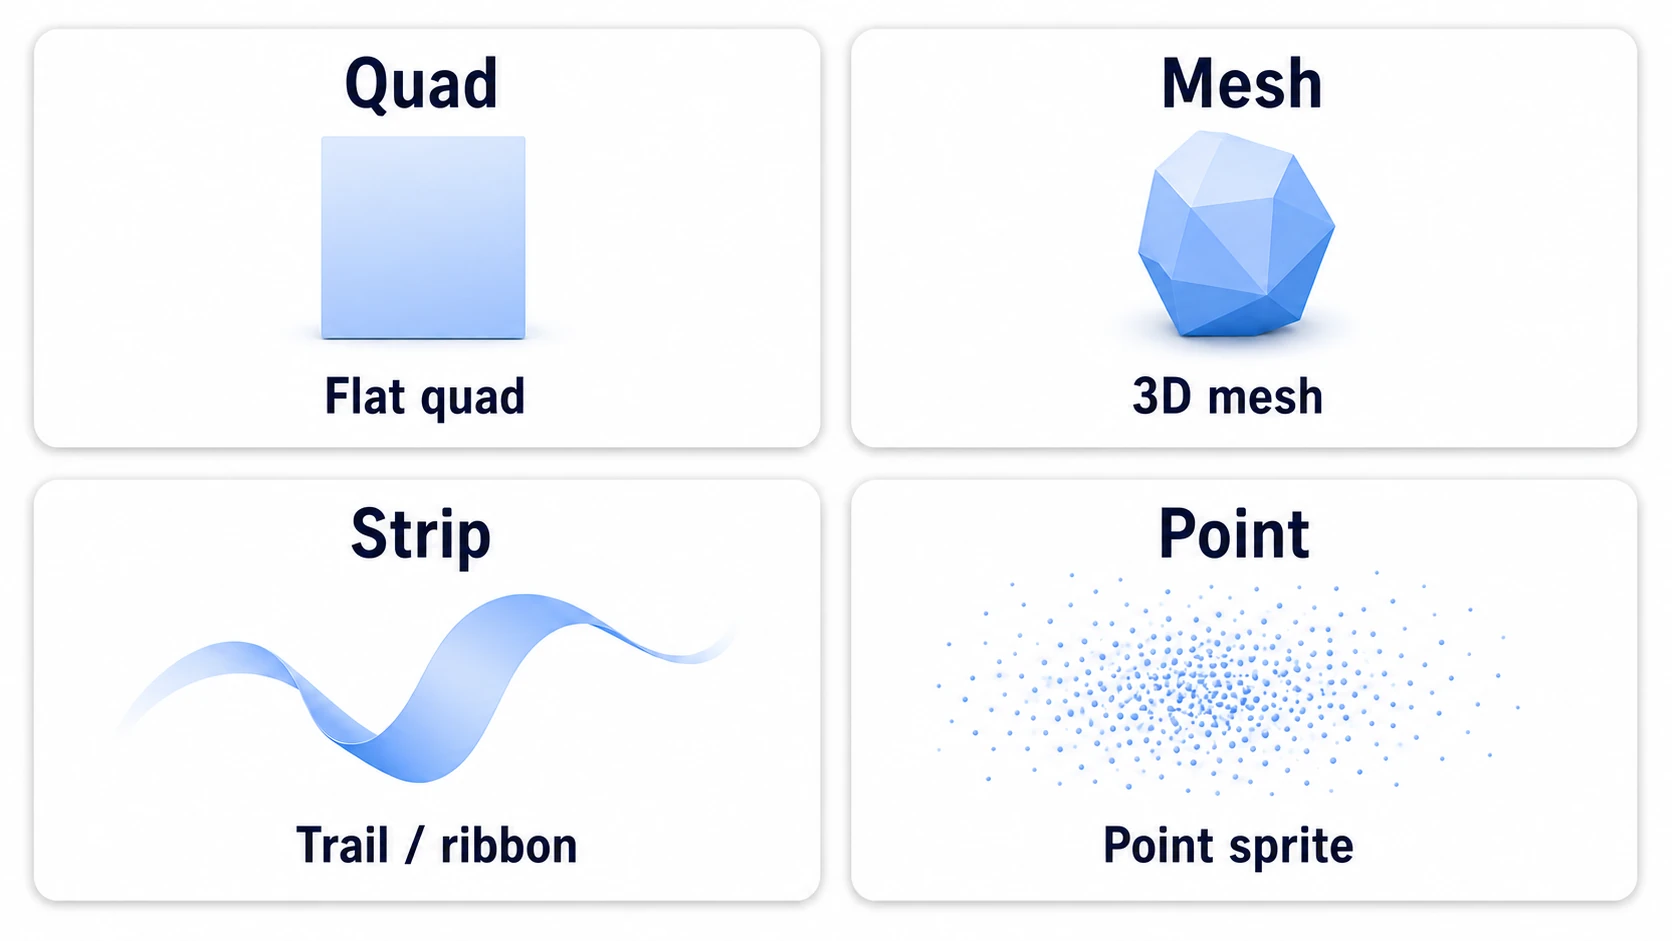
Output types:
| Output | Purpose |
|---|---|
| Output Particle Quad | Flat quads (the most common) |
| Output Particle Mesh | Uses a 3D mesh |
| Output Particle Strip | Trails and ribbons |
| Output Particle Point | Point sprites |
Key blocks:
- Orient - Particle orientation (billboarding, etc.)
- Set Size Over Life - Size change over the particle's lifetime
- Set Color Over Life - Color change over the particle's lifetime
- Main Texture - The texture to use
- Blend Mode - Alpha blending settings
Installation
- Open Window > Package Manager
- Select Unity Registry
- Select Visual Effect Graph
- Click the Install button
Additional Setup for URP Projects
Version note: With URP 14 and later (Unity 2023.1+), VFX Graph works without any special setup. The steps below apply to earlier versions.
In URP projects, you may need to configure the URP Asset.
- Select the URP Asset (Universal Render Pipeline Asset)
- Choose the Renderer you are using from the Renderer List
- Confirm that VFX Graph is enabled under Renderer Features
Basic Usage
Creating an Effect
- Select GameObject > Visual Effects > Visual Effect
- A GameObject with a Visual Effect component attached is created
- Click the "New" button on the Visual Effect component
- Choose a template (Simple Loop, Burst, Continuous, etc.)
- Name the file and save it
Editing the Graph
- Double-click the Visual Effect Asset in the Project window
- The VFX Graph window opens
- Add and edit nodes to customize the effect
Using the Learning Templates
You can learn from Unity's official learning templates.
- Select Assets > Create > Visual Effects > Visual Effect Graph
- In the Create New VFX Asset window, click "Install Learning Templates"
- A variety of templates are added
Controlling Effects from Scripts
Sending Events
using UnityEngine;
using UnityEngine.VFX;

public class VFXController : MonoBehaviour
{
    VisualEffect visualEffect;

    void Start()
    {
        visualEffect = GetComponent<VisualEffect>();
    }

    public void Play()
    {
        // Default events
        visualEffect.SendEvent(VisualEffectAsset.PlayEventName);  // OnPlay
    }

    public void Stop()
    {
        visualEffect.SendEvent(VisualEffectAsset.StopEventName);  // OnStop
    }

    public void SendCustomEvent()
    {
        // Custom event
        visualEffect.SendEvent("CustomEventName");
    }
}
The High-Performance Approach (Using IDs)
public static readonly int CustomEventID = Shader.PropertyToID("CustomEventName");

void SendEvent()
{
    visualEffect.SendEvent(CustomEventID);
}
Setting Properties
You can set properties defined in the VFX Graph's Blackboard from a script.
// Setting various properties
visualEffect.SetFloat("SpawnRate", 100f);
visualEffect.SetVector3("EmitterPosition", transform.position);
visualEffect.SetTexture("MainTexture", myTexture);
visualEffect.SetGradient("ColorGradient", myGradient);

// Getting a property
float rate = visualEffect.GetFloat("SpawnRate");

// Debugging: check the current particle count
// aliveParticleCount is retrieved via GPU readback,
// so it lags by one or two frames.
// If particles have no Lifetime set,
// every particle stays alive forever.
int aliveCount = visualEffect.aliveParticleCount;
Exposed properties: When you create a property in the Blackboard, it is not accessible from scripts unless you check Exposed.
Performance: If you call these frequently, cache the ID up front with
Shader.PropertyToID()and useSetFloat(int id, float value).
Sending Events with Parameters
Using VFXEventAttribute, you can pass parameters such as position and color dynamically.
public void SpawnAtPosition(Vector3 position, Color color)
{
    VFXEventAttribute eventAttribute = visualEffect.CreateVFXEventAttribute();
    eventAttribute.SetVector3("position", position);
    eventAttribute.SetVector4("color", new Vector4(color.r, color.g, color.b, color.a));
    visualEffect.SendEvent("OnSpawn", eventAttribute);
}
On the VFX Graph side: Add
Get Source Attributeblocks (position, color, etc.) in the Initialize Particle context to receive the parameters passed from the event.
Keeping the Effect Stopped Initially
Use one of the following approaches:
- Set Initial Event Name to empty - Disables auto-play
- Set Initial Event Name to a custom event name - The effect will not start until you send the event manually
Common Use Cases
Large-Scale Particle Effects
- Explosions, fire, smoke
- Magic effects
- Rain, snow
- Starry skies, fireworks
Environment Effects
- Fog
- Leaves blowing in the wind
- Dust
- Fireflies
UI Effects
- Button particles
- Transitions
- Background effects
System Requirements
Supported Render Pipelines
| Pipeline | Support |
|---|---|
| Universal Render Pipeline (URP) | Yes |
| High Definition Render Pipeline (HDRP) | Yes |
| Built-in Render Pipeline | × (not supported) |
Built-in RP is not supported: VFX Graph is URP/HDRP-only (the same conclusion as the feature table in the render pipeline article). If a Built-in project needs massive particle counts, consider migrating to URP. This article was verified on Unity 6 (6000.0) with Visual Effect Graph 17.x.
Supported Platforms
- PC (Windows, Mac, Linux)
- Consoles (PlayStation, Xbox)
- Mobile (iOS, Android) - some limitations
- WebGL - some limitations
GPU Requirements
- A GPU that supports Compute Shaders
- DirectX 11 or later, OpenGL ES 3.1 or later, Vulkan, Metal
Caveats on Mobile
| Item | Recommendation |
|---|---|
| Minimum requirements | OpenGL ES 3.1 or later (Android) / Metal (iOS) |
| Particle count | 10K-50K is the practical ceiling |
| Capacity setting | Keep it as low as possible |
Mobile optimization: On mobile, set Capacity low and avoid complex node graphs. Older devices may not support Compute Shaders at all.
The "hundreds of thousands to millions" particle counts are rough figures that depend heavily on GPU performance. Don't take the numbers at face value—increase Capacity step by step on your target device, measure the frame rate, and find your own game's real limit. Watching the Profiler as you go from 100k → 300k → 1M is itself one of VFX Graph's most fun experiments.
Main limitations on mobile:
- Output Particle Strip may not be supported
- Does not run on older devices without Compute Shader support
- The Sample Gradient node may have reduced precision
- Device heat makes GPU throttling more likely
Shader Graph Integration
VFX Graph integrates with Shader Graph, letting you render particles with custom shaders.
Integration Steps
- Create a Shader Graph: Create a Shader Graph for VFX Graph
- URP:
Create > Shader Graph > URP > VFX Shader Graph - HDRP:
Create > Shader Graph > HDRP > VFX Shader Graph
- URP:
- Configure the Output: Select the
Shader Graphoption in the Output Particle context - Assign the shader: Drag and drop the VFX Shader Graph you created
Use cases: Distortion, custom lighting, special warp effects — anything the standard blend modes cannot achieve.
Working with SDFs (Signed Distance Fields)
A distinctive VFX Graph feature: SDFs let you spawn particles along a mesh's shape and use it for collision detection.
You can generate an SDF texture from a mesh via Window > Visual Effects > Utilities > SDF Bake Tool.
Output Event
You can send an event to the C# side when a particle dies. This is useful for triggering things like damage numbers or sound playback.
Caveats
Limited Collision Detection
Collision detection in VFX Graph is limited. If you need complex collisions, use the Particle System instead.
Learning Curve
Because it is node-based, the initial learning curve is steep. If you are used to the Particle System, it may feel disorienting at first. We recommend learning with the Learning Templates.
Render Pipeline
Use it with URP or HDRP (the Built-in Render Pipeline is not supported).
Practical: Spawning Fireflies in a Night Forest
Fireflies drifting through the night forest of an open world, a cherry-blossom flurry in a Japanese-style game, dust dancing through a dungeon—"unassuming but present in huge numbers" environment effects are where VFX Graph is at its tastiest. Here we'll build fireflies from a template as quickly as possible.

- Start from a template: Create an object via "GameObject > Visual Effects > Visual Effect" and pick a Simple Loop-style template from "New".
- Spawn: set
Constant Spawn Rateto around 200. Fireflies aren't born all at once—they keep welling up continuously—so use Rate, not Burst. - Initialize: set Capacity to 10,000 (estimated from spawn rate x lifetime). Set
Set Position Shapeto a Box scaled to cover the whole forest, andSet Lifetimeto a random 20-40 seconds. - Update: add a
Turbulenceblock so they drift softly and irregularly. If they fly in straight lines, they look like bullets, not bugs. - Output: keep the size small (0.02-0.05), make the color a faint HDR yellow-green, and let Bloom make it glow. Adding a flicker (on and off) with
Set Color Over Lifeinstantly makes it feel like fireflies.
To finish, create a SpawnRate (Float, Exposed) on the Blackboard and wire it to Constant Spawn Rate. Then, with the visualEffect.SetFloat("SpawnRate", ...) from earlier, you can tie it to the time of day—0 by day, 200 by night.
There are two key points: the "environment effects = Spawn Rate + wide Shape + long lifetime" design (the exact opposite of a hit effect—keep them quiet, wide, and long-lived), and "connect to the game through Exposed properties" (rather than rewriting the graph internals, leave a knob you can turn from outside, and you can react to day/night, weather, and events freely). When you want to craft the look of the particles further, move on to Shader Graph integration.
Summary
VFX Graph is a high-performance, GPU-based particle system.
- GPU-based - Renders massive numbers of particles with high performance (even millions)
- Node-based - Build effects with visual logic
- Shader Graph integration - Works with custom shaders
- Four contexts - Composed of Spawn, Initialize, Update, and Output
- Connect to the game with Exposed properties + SetFloat, "turning a knob from outside"
| Use Case | Recommended System |
|---|---|
| Massive particle counts, advanced visuals | VFX Graph |
| Collision detection, simple effects | Particle System |
Choose the particle system that fits your project's requirements. Your game's atmosphere—what would change if you could add one more order of magnitude of particles?