Cameras in film and anime chase, push in, cut, and shake. Try to write the same thing in Unity by poking at Camera.main.transform, and the blending on cuts, the way around obstacles, the compositing of shake—before you know it, you've grown a giant camera-only script.
The package that takes all of that off your hands is Cinemachine, Unity's official camera control package. With almost zero scripting, you can build "cinematic camera work"—following, switching, shake, and obstacle avoidance.

What You'll Learn
- Cinemachine's core concepts — Cinemachine Camera and Brain
- Choosing the right Body type (Follow, Position Composer, Third Person Follow, and more)
- Practical examples — following, switching, camera shake, and obstacle avoidance
- Integration with the Input System and Timeline
- Practical: building a boss-entrance showcase camera
If you want to fine-tune how a follow camera tracks its target, see the companion article Follow Cameras in Practice (tuning Dead Zone, Damping, and Confiner 2D).
Tested with: Unity 2022.3 LTS / Unity 6, Cinemachine 3.x
Version note: This article targets Cinemachine 3.x. Cinemachine 2.x uses different component names and APIs (e.g.,
CinemachineVirtualCamera→CinemachineCamera). Check which version your project uses.
Installation
You can install Cinemachine from the Package Manager.
- In the Unity editor, select "Window" → "Package Manager"
- From the dropdown in the top left, select "Unity Registry"
- Find "Cinemachine" in the list and click it
- Click the "Install" button in the bottom right
Cinemachine Core Concepts
Virtual Camera
A Virtual Camera is a virtual camera you place in the scene. It doesn't render anything itself; instead, it sends position and orientation data to the Cinemachine Brain on the Main Camera.
A Virtual Camera is made up of three main elements.
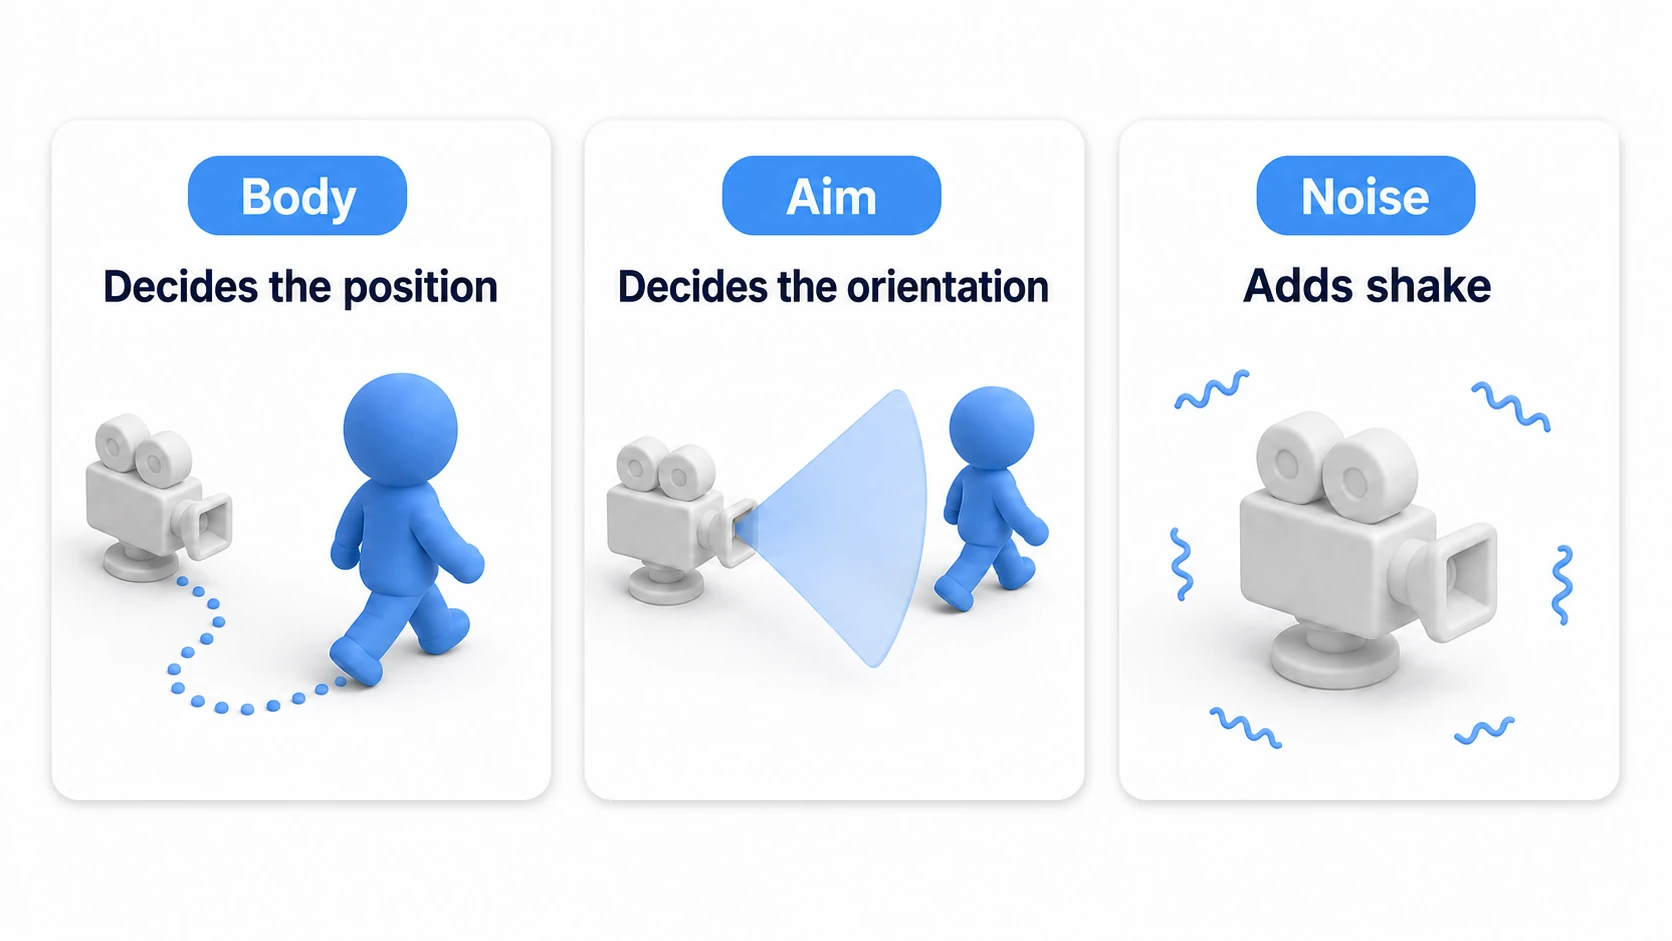
| Element | Description |
|---|---|
| Body | Controls the camera's position (tracking, path movement, etc.) |
| Aim | Controls the camera's orientation (look-at behavior, screen composition, etc.) |
| Noise | Adds camera shake and handheld jitter |
Cinemachine Brain
The Cinemachine Brain is a component attached to the Main Camera. It manages all Virtual Cameras in the scene and decides which Virtual Camera is active.
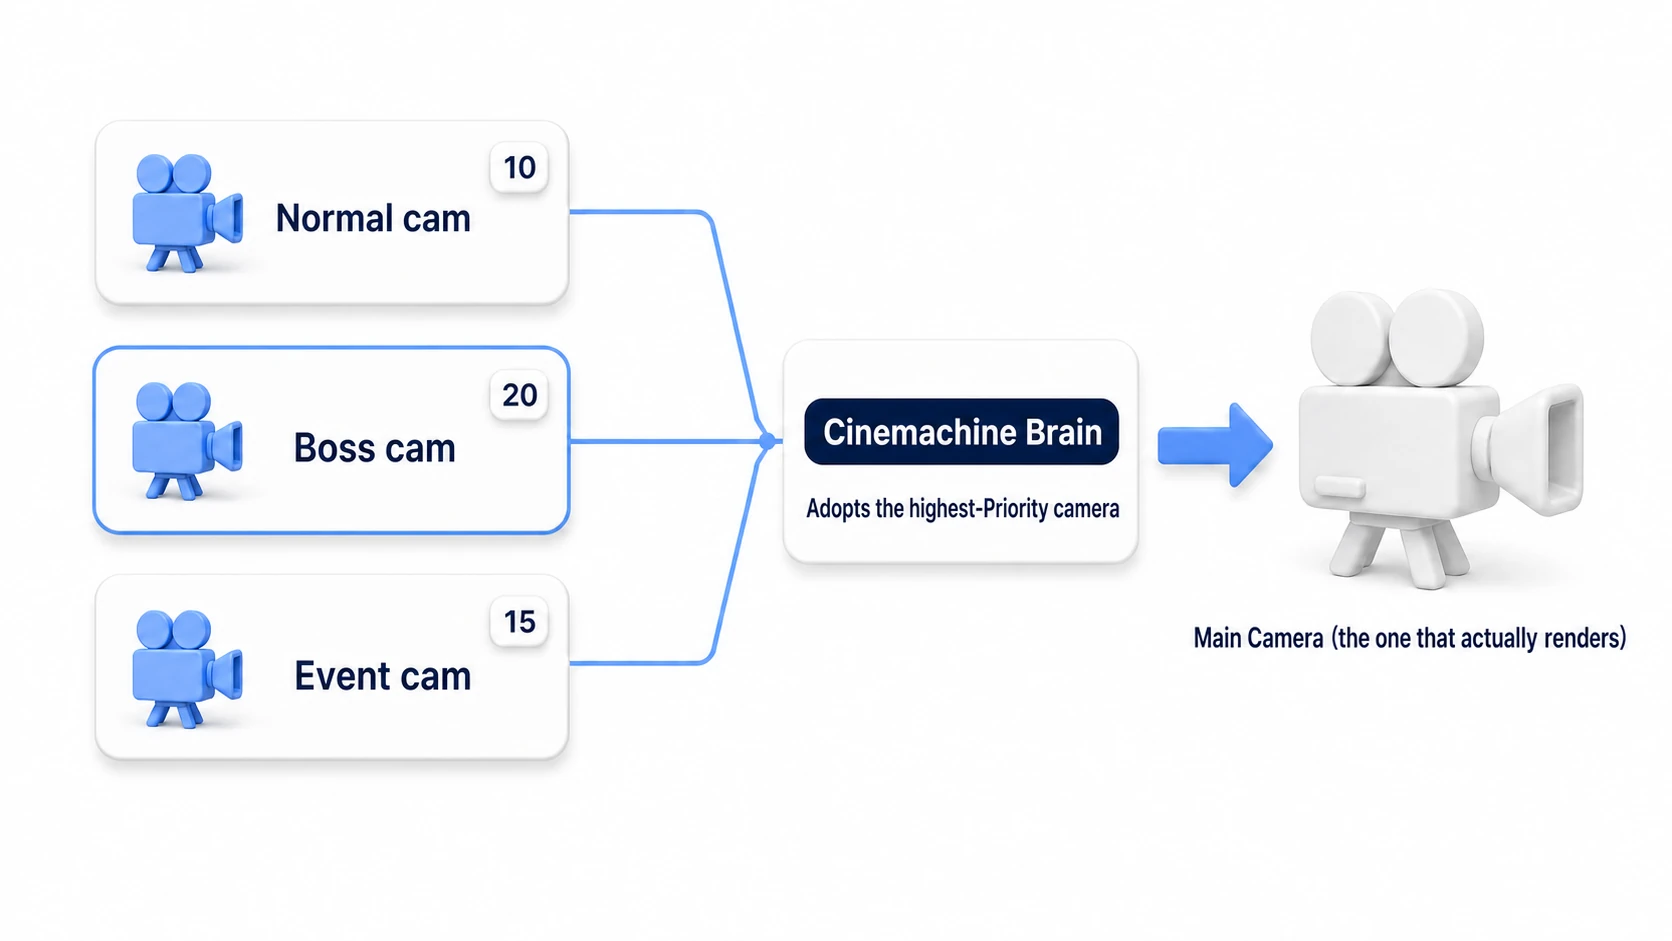
Virtual Camera Basics
Creating a Virtual Camera
- Right-click in the Hierarchy window
- Select "Cinemachine" → "Cinemachine Camera"
Setting Targets
| Target | Description |
|---|---|
| Tracking Target | The target the camera tracks (affects the Body settings) |
| Look At Target | The target the camera looks at (affects the Aim settings) |
Main Body Types
| Type | Use Case |
|---|---|
| Do Nothing | Keeps the position fixed |
| Follow | Tracks a target (for 3D games) |
| Position Composer | Keeps the target at a specific screen position (for 2D games) |
| Orbital Follow | Orbits around a target |
| Third Person Follow | Over-the-shoulder camera for TPS games |
| Spline Dolly | Moves along a path |
Third Person Follow (TPS Camera)
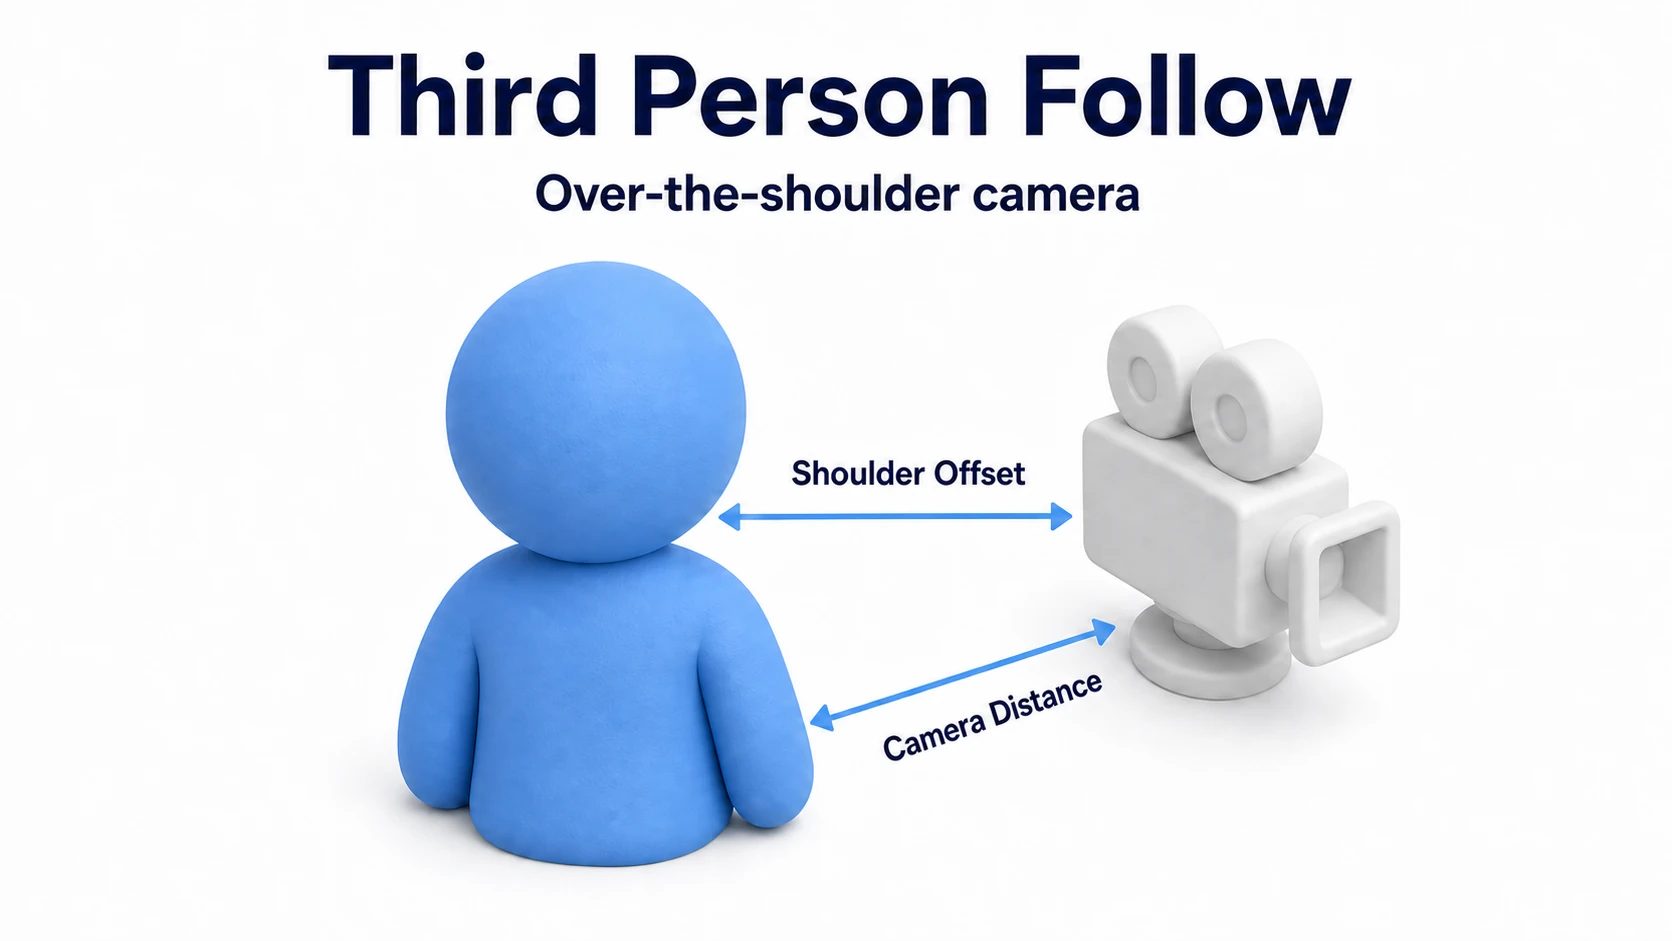
This is the most commonly used camera type in third-person shooters. It places the camera over the player's shoulder and supports aiming controls.
- Create a Cinemachine Camera
- Set Body to "Third Person Follow"
- Adjust the parameters:
- Shoulder Offset: Offset from the shoulder (e.g., 0.5, 0, 0 for over the right shoulder)
- Camera Distance: Distance from the player
- Damping: Smoothness of the follow behavior
Changes from Cinemachine 2.x: Components named
Framing TransposerandTransposerin 2.x have been renamed toPosition ComposerandFollowin 3.x.
Practical Examples
Example 1: A Camera That Follows Your Character
- Create a Cinemachine Camera
- Configure the following:
- Tracking Target: The character's Transform
- Look At Target: The character's Transform
- Body: Follow
- Follow Offset: (0, 2, -5)
- Aim: Composer
Example 2: Switching Smoothly Between Multiple Cameras
using UnityEngine;
using Unity.Cinemachine;

public class CameraSwitcher : MonoBehaviour
{
    [SerializeField] private CinemachineCamera camera1;
    [SerializeField] private CinemachineCamera camera2;

    void Update()
    {
        if (Input.GetKeyDown(KeyCode.Alpha1))
        {
            camera1.Priority.Value = 15;
            camera2.Priority.Value = 5;
        }
        else if (Input.GetKeyDown(KeyCode.Alpha2))
        {
            camera1.Priority.Value = 5;
            camera2.Priority.Value = 15;
        }
    }
}
Example 3: Implementing Camera Shake
- Select the Virtual Camera
- Choose "Add Extension" → "Cinemachine Basic Multi Channel Perlin"
- Set the Noise Profile (important):
- Click the circle button to the right of the "Noise Profile" field
- Select a preset such as "6D Shake" (the shake won't work if no Noise Profile is set)
- Configure the parameters:
- Amplitude Gain: 1.0 (amplitude)
- Frequency Gain: 1.0 (frequency)
Important: Without a Noise Profile assigned, changing Amplitude or Frequency has no effect—no shake will occur. Use one of Unity's built-in presets such as "6D Shake" or "Handheld_normal_mild", or create your own NoiseSettings asset.
using UnityEngine;
using Unity.Cinemachine;

public class CameraShake : MonoBehaviour
{
    [SerializeField] private CinemachineCamera virtualCamera;
    private CinemachineBasicMultiChannelPerlin noise;

    void Awake()
    {
        // Get the noise component from the extension
        noise = virtualCamera.GetComponent<CinemachineBasicMultiChannelPerlin>();
    }

    public void Shake(float amplitude, float frequency, float duration)
    {
        if (noise == null) return;

        noise.AmplitudeGain = amplitude;
        noise.FrequencyGain = frequency;
        Invoke(nameof(StopShake), duration);
    }

    void StopShake()
    {
        noise.AmplitudeGain = 0f;
        noise.FrequencyGain = 0f;
    }
}
Example 4: A Camera That Avoids Obstacles
- Select the Virtual Camera
- Choose "Add Extension" → "Cinemachine Deoccluder"
- Set the obstacle layers in "Collide Against"
Working with the Input System
To implement player-controlled camera rotation with Orbital Follow or Third Person Follow, use the CinemachineInputAxisController.
Setup Steps
- On the Virtual Camera, choose "Add Component" → "Cinemachine Input Axis Controller"
- Create an Input Actions asset and set up a Look (Vector2) action
- Assign it to the "Input Action" field of the CinemachineInputAxisController
Code Example (Controlling from a Script)
using UnityEngine;
using UnityEngine.InputSystem;
using Unity.Cinemachine;

public class CameraLookController : MonoBehaviour
{
    [SerializeField] private CinemachineCamera virtualCamera;
    [SerializeField] private InputActionReference lookAction;

    private CinemachineOrbitalFollow orbitalFollow;

    void Awake()
    {
        orbitalFollow = virtualCamera.GetComponent<CinemachineOrbitalFollow>();
    }

    void OnEnable() => lookAction.action.Enable();
    void OnDisable() => lookAction.action.Disable();

    void Update()
    {
        Vector2 lookInput = lookAction.action.ReadValue<Vector2>();
        // Update the horizontal rotation of Orbital Follow
        orbitalFollow.HorizontalAxis.Value += lookInput.x * Time.deltaTime * 100f;
    }
}
Note: When using the New Input System, make sure the Input System Package is enabled in Project Settings.
Extensions
| Extension | Use Case |
|---|---|
| Cinemachine Deoccluder | Moves the camera to avoid obstacles |
| Cinemachine Basic Multi Channel Perlin | Continuous camera shake (handheld jitter, vibration) |
| Cinemachine Impulse Source | Momentary camera shake (explosions, hits) |
| Cinemachine Follow Zoom | Adjusts FOV based on distance |
| Cinemachine Confiner 2D/3D | Confines the camera to an area |
Impulse Source (Momentary Shake)
For momentary camera shake on explosions or when taking damage, the Impulse System is the right tool.
using UnityEngine;
using Unity.Cinemachine;

public class ExplosionShake : MonoBehaviour
{
    [SerializeField] private CinemachineImpulseSource impulseSource;

    public void Explode()
    {
        // Generate an impulse from the explosion position
        impulseSource.GenerateImpulse();
    }
}
- Add "Cinemachine Impulse Source" to an empty GameObject
- Add "Cinemachine Impulse Listener" to the Virtual Camera
- Call
GenerateImpulse()from your script
Timeline Integration
Combining Cinemachine with Timeline makes it easy to create cutscenes and scripted events.
- Open the Timeline window (Window → Sequencing → Timeline)
- Add a Cinemachine Track to the Timeline
- Drag and drop multiple Virtual Cameras onto the Cinemachine Track
- Adjust the placement and duration of each Virtual Camera
Best Practices
- Use a consistent naming convention for Virtual Cameras - e.g., "VCam_Follow", "VCam_Boss"
- Set Priorities thoughtfully - Spacing them in increments of 10 makes it easy to insert new cameras later
- Adjust Damping to control smoothness - Lower values for action games, higher for adventure games
- Tune the Blend Time - Around 1–2 seconds usually feels natural
- Take advantage of Extensions - Obstacle avoidance, camera shake, area confinement, and more
Practical: Building a Boss-Entrance Camera
A boss entrance in an action game, an event scene in an RPG, a goal celebration in a racing game—a showcase moment where you "hand the camera the spotlight for just an instant" can be built purely by combining the parts you learned in this article (Priority switching + Impulse shake). Let's build a boss entrance as an example.
Scene prep (the no-code part):
- Leave the normal follow camera
VCam_Follow(Priority 10) as is - Place
VCam_BossIntro(Priority 5) framing the boss head-on—normally its low Priority means it isn't used - Add a
Cinemachine Impulse Sourceto the boss and anImpulse Listenerto the Cinemachine Camera on the Main Camera side
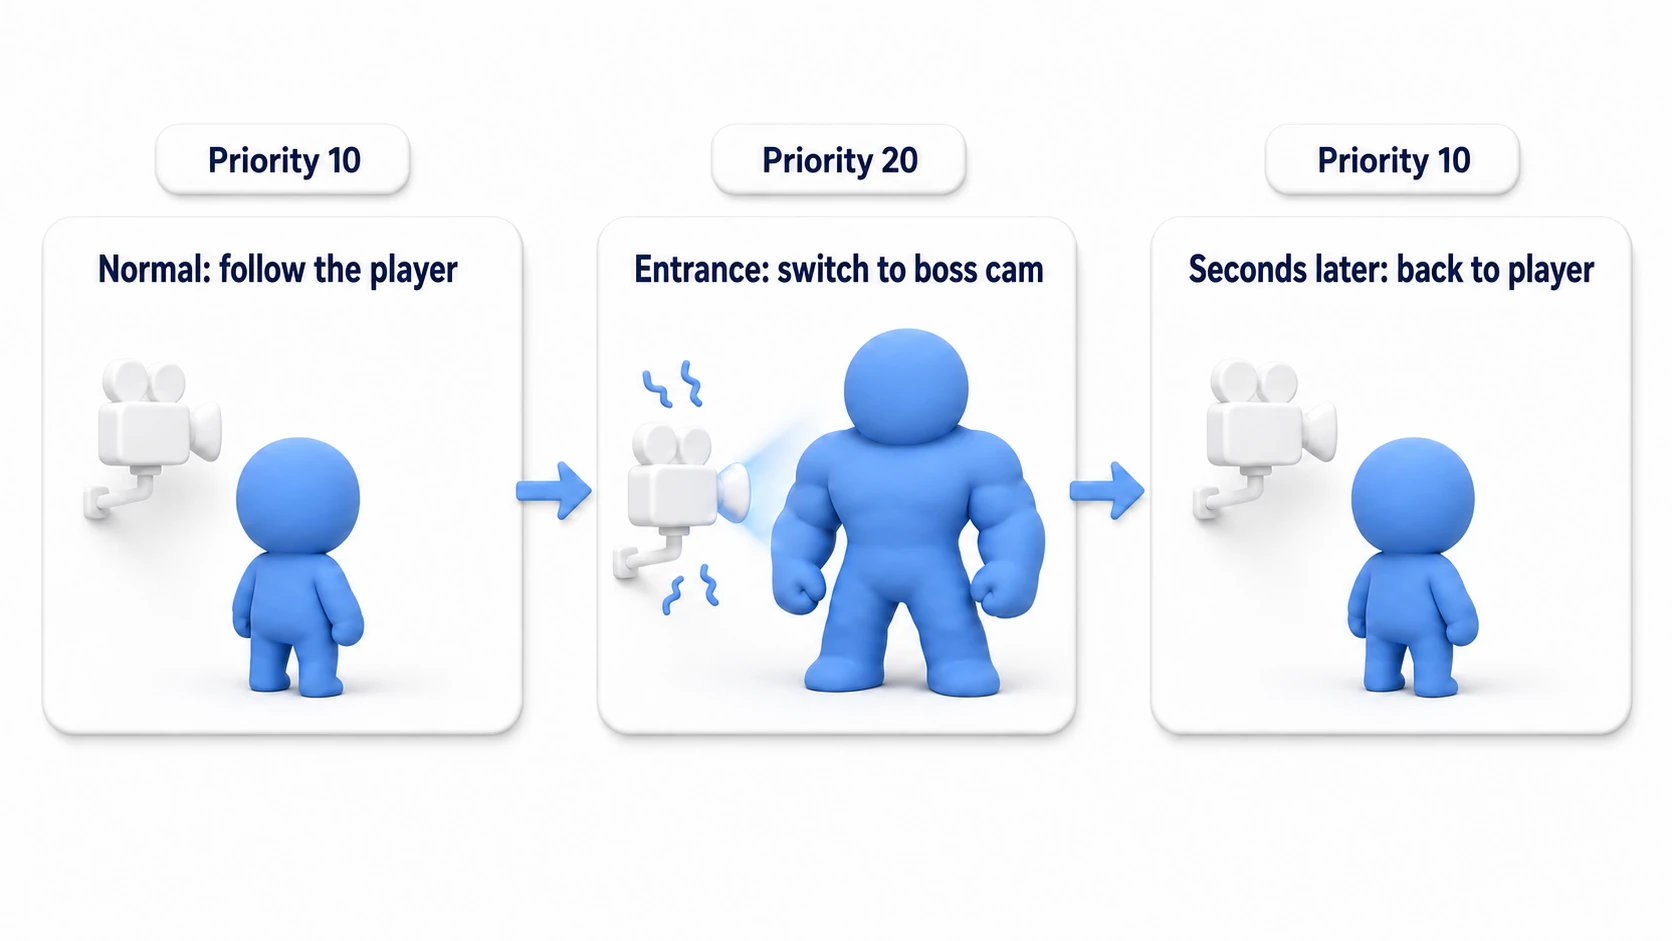
After that, the entrance event just needs to temporarily flip the Priorities.
using System.Collections;
using UnityEngine;
using Unity.Cinemachine;

public class BossIntroDirector : MonoBehaviour
{
    [SerializeField] private CinemachineCamera bossIntroCam; // Priority 5
    [SerializeField] private CinemachineImpulseSource landingImpulse;
    [SerializeField] private float introDuration = 3f;

    // Call from the boss-entrance event
    public void PlayBossIntro()
    {
        StartCoroutine(IntroRoutine());
    }

    private IEnumerator IntroRoutine()
    {
        bossIntroCam.Priority.Value = 20;      // Higher than Follow (10) → auto-blends
        yield return new WaitForSeconds(1f);   // Wait for the camera to push all the way in

        landingImpulse.GenerateImpulse();      // Shake on the boss's landing impact

        yield return new WaitForSeconds(introDuration);
        bossIntroCam.Priority.Value = 5;       // Lower it and it auto-blends back to the player
    }
}
The blending on the cut and the blend back on the return are all handled automatically by the Brain, so all the code does is "raise and lower Priority" and "fire the shake." There isn't a single line that moves the camera in code.
There are two key points: "leave the showcase camera in place and call it by Priority" (rather than spawning cameras dynamically, the Cinemachine way is to keep them waiting in the scene), and "tune how satisfying the cut feels with the Brain's Blend Time" (default 2 seconds; for a snappy entrance, tighten it down to around 0.5 seconds). When your cuts get more complex, the right move is to graduate from code and step up to Timeline integration.
Summary
Cinemachine is a powerful tool for controlling Unity cameras.
- Implement camera work without scripts - Just configure it in the Inspector
- Adapts automatically to animation and terrain changes - No manual adjustments needed
- Achieve high-quality camera work quickly - Following, switching, shake, and obstacle avoidance
- For showcase moments, "call a waiting camera by Priority" - no code that moves the camera
- Create cinematic sequences with Timeline integration - Cutscenes and scripted events
Give Cinemachine a try and bring cinematic camera work to your game. That boss-entrance scene in your game—what kind of camera is showing it off right now?