"I'd love to release this game internationally someday..." When that thought crosses your mind, the first hurdle you face is localization. Have you ever pictured a future where you scatter if (language == "en") branches across every screen—and quietly closed that thought away?
The Unity Localization package is Unity's official solution for multilingual support. It manages text, images, audio, fonts, and more per language, and lets you switch between them at runtime. It also integrates with CSV files and Google Spreadsheets, making collaboration with translators seamless.
This article targets Unity Localization 1.0 or later (Unity 2022.3 LTS recommended).

What You'll Learn
- The core concepts of the Localization package (Locale, String Table, Asset Table)
- Language selection at startup (Locale Selector priority, saving with PlayerPrefs)
- How to localize text, images, and fonts
- Smart Strings (variable insertion and plurals)
- Translation workflows with CSV / Google Spreadsheets integration
Core Concepts
| Concept | Description |
|---|---|
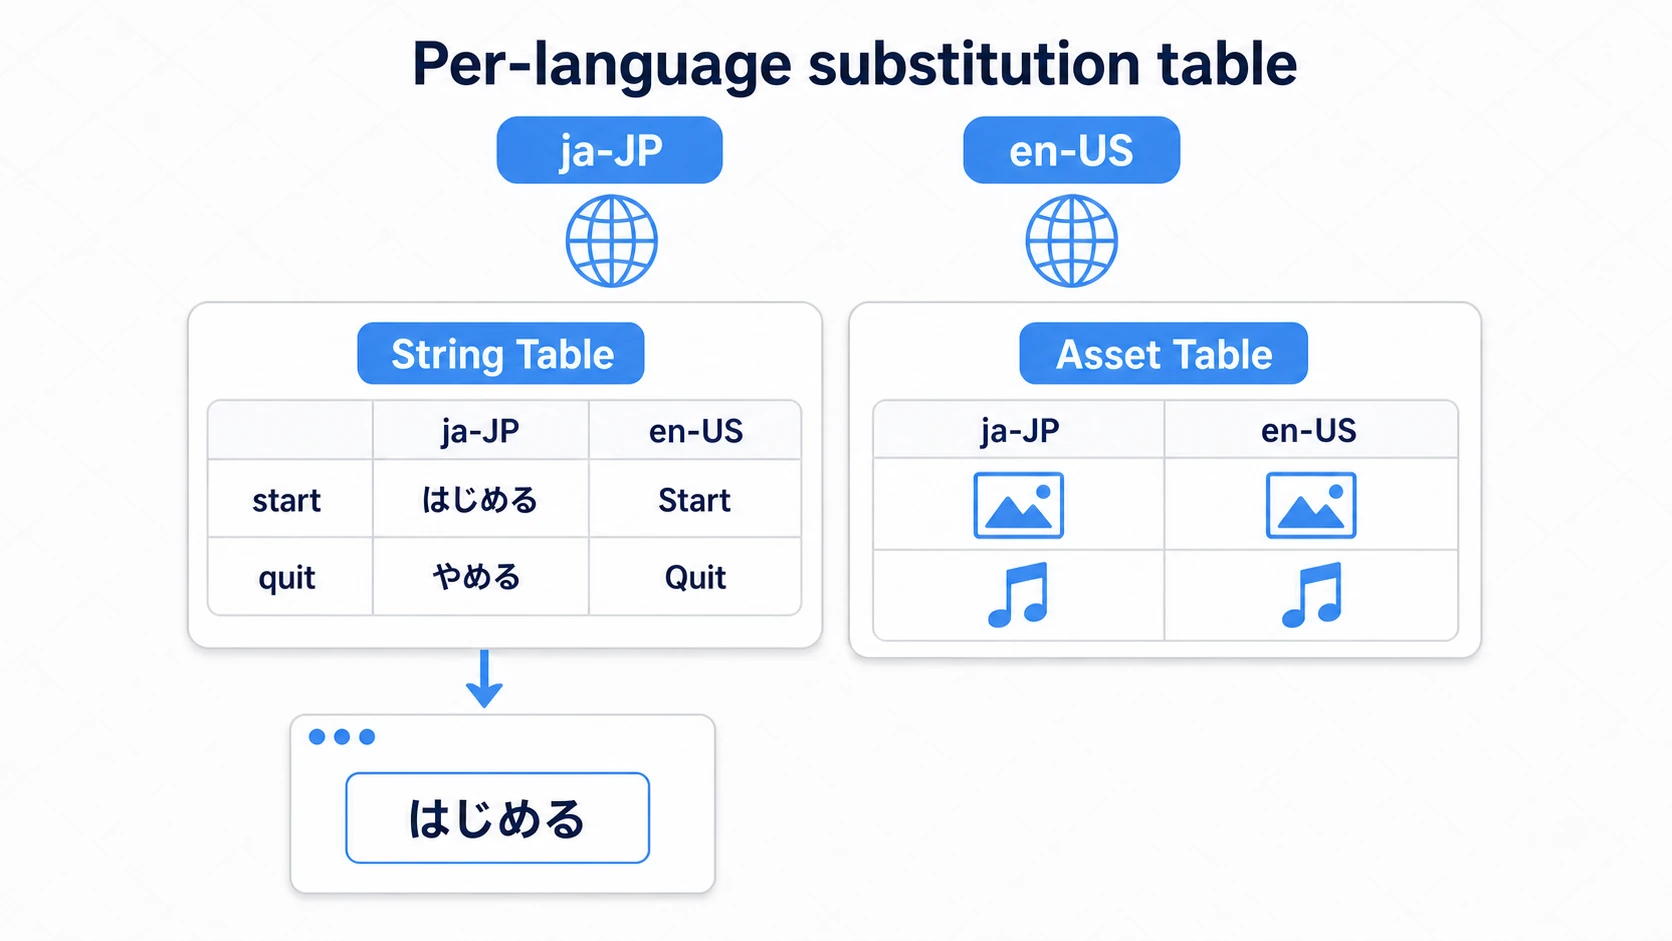
| Locale | A combination of language and region (e.g., en-US, ja-JP) |
| String Table | A container that manages text per language |
| Asset Table | A container that manages images, audio, and other assets per language |
| Locale Selector | The mechanism that decides which Locale to use |
| Smart Strings | A feature for localizing dynamically changing strings |
The key idea is a "per-language substitution table". Text goes into a String Table, and images and audio go into an Asset Table; your UI only ever references the keys in those tables.
Installation
Install the package from the Package Manager.
- Select
Window > Package Manager - Choose
Unity Registryfrom the dropdown in the top left - Find and select
Localizationin the list - Click the
Installbutton in the bottom right
Setup
Creating the Localization Settings
- Select
Edit > Project Settings > Localization - Click the
Createbutton - Choose where to save the asset
Creating Locales
- Click the
Locale Generatorbutton in the Localization Settings window - Check the languages you want to support (e.g., English, Japanese)
- Click the
Generate Localesbutton
Locale Selector: Choosing a Language at Startup
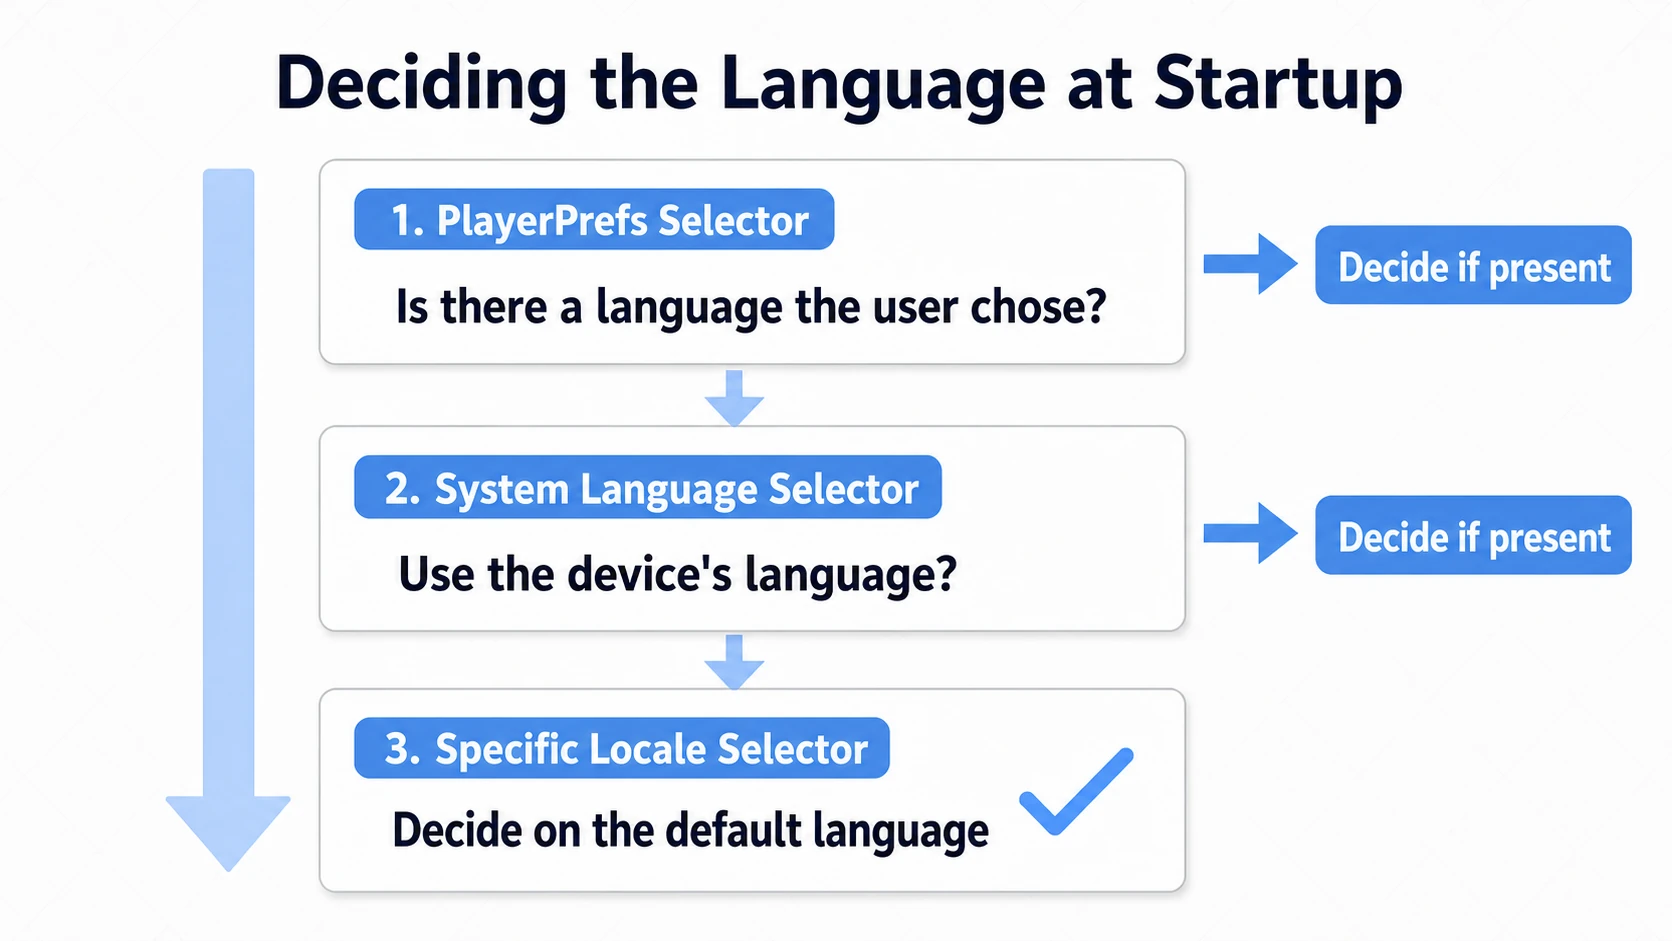
The Locale Selector is the mechanism that decides which language to use when the app starts.
Configuring the System Language Selector
This selector automatically picks a language based on the device's language settings.
- Open
Edit > Project Settings > Localization - Select the Localization Settings
- Click
+in theLocale Selectorssection - Add a
System Language Selector - Adjust the priority (selectors are evaluated from top to bottom)
Startup Selector Priority
| Selector | Description |
|---|---|
| Command Line Selector | Specifies the language via command-line arguments (for debugging) |
| System Language Selector | Uses the device's language settings |
| Specific Locale Selector | Forces a specific language |
| PlayerPrefs Selector | Saves and restores the language chosen by the user |
Recommended setup: Put the
PlayerPrefs Selectorfirst, followed by theSystem Language Selector, and finally aSpecific Locale Selector(as a fallback). The language is then resolved in this order: user choice → system language → default language.
Saving the Language with the PlayerPrefs Selector
With a PlayerPrefs Selector in place, all your code needs to do is change SelectedLocale. The Selector saves the choice automatically the moment it changes, and restores it on the next launch.
using UnityEngine;
using UnityEngine.Localization.Settings;

public class LanguageSettings : MonoBehaviour
{
    // Change the language (with a PlayerPrefs Selector, saving and restoring are automatic)
    public void SetLanguage(string localeCode)
    {
        var locale = LocalizationSettings.AvailableLocales.GetLocale(localeCode);
        if (locale != null)
        {
            LocalizationSettings.SelectedLocale = locale;
        }
    }
}
Warning (use one saving mechanism): the
PlayerPrefs Selectorsaves the language under its own key. If you add your own separate save likePlayerPrefs.SetString("selected_language", ...), the two stored values can disagree, and a different language gets picked after a restart. Consolidate saving into the Selector; treat hand-rolled saving as the fallback for projects that don't use one.
Localizing Text
Creating a String Table
- Open
Window > Asset Management > Localization Tables - Select the
New Table Collectiontab - Set
TypetoString Table Collection - Enter a table name in
Name(e.g.,UI Texts) - Click the
Createbutton
Localizing UI Text
- Select a GameObject with a TextMeshPro component
- Use
Add Componentto add aLocalize String Event - Choose the table and entry in
String Reference
Localizing from a Script
using UnityEngine;
using UnityEngine.Localization.Settings;

public class LocalizedTextExample : MonoBehaviour
{
    async void Start()
    {
        try
        {
            var localizedString = await LocalizationSettings.StringDatabase
                .GetLocalizedStringAsync("UI Texts", "menu_start");
            Debug.Log(localizedString);
        }
        catch (System.Exception e)
        {
            Debug.LogError($"Localization failed: {e.Message}");
        }
    }
}
A word of caution about async void: Exceptions thrown in
async voidmethods do not propagate to the caller, so always handle errors withtry-catch. For production projects, consider aUniTask- orCoroutine-based implementation instead.
Localizing Assets
Creating an Asset Table
- Open
Window > Asset Management > Localization Tables - Set
TypetoAsset Table Collection - Enter a table name in
Name(e.g.,Game Assets) - Click the
Createbutton
Using Localization Scene Controls
- Open
Window > Asset Management > Localization Scene Controls - Set the Asset Table Collection you created in
Asset Table - Turn on
Track Changes - Assign the assets in your scene for each language
Switching Fonts
When you need different fonts per language—for example, switching between Japanese and English—use an Asset Table.
Managing Fonts with an Asset Table
- Create an Asset Table Collection (e.g.,
Fonts) - Register a font asset for each language
- Use TextMeshPro's
Localize Font Eventcomponent
using UnityEngine;
using UnityEngine.Localization.Components;
using TMPro;

public class LocalizedFontExample : MonoBehaviour
{
    [SerializeField] private TMP_Text textComponent;
    [SerializeField] private LocalizeAssetEvent fontEvent;

    void Start()
    {
        fontEvent.OnUpdateAsset.AddListener(asset =>
        {
            if (asset is TMP_FontAsset font)
            {
                textComponent.font = font;
            }
        });
    }
}
TextMeshPro Fallback Fonts
For CJK (Chinese, Japanese, Korean) support, configuring fallback fonts is essential.
- Select your main font asset
- Open
Fallback Font Assetsin the Inspector - Add a Japanese (or other CJK) font asset
Font Asset Creator: To use Japanese fonts with TextMeshPro, you need to create a Font Asset containing Japanese characters via
Window > TextMeshPro > Font Asset Creator. Use a preset such as "Japanese Hiragana + Katakana + CJK".
Smart Strings
Smart Strings localize text that changes dynamically. They are based on the SmartFormat library.
Inserting Variables
Here is a Japanese entry that means "Hello, {player_name}!":
こんにちは、{player_name}さん!
Handling Plurals
Japanese has no grammatical plural, so the Japanese entry simply inserts the variable.
Japanese entry (meaning "{count} items"):
{count}個のアイテム
English:
{count} {count:plural:item|items}
Smart Strings syntax follows the SmartFormat library. Because plural rules differ between languages, each language needs its own configuration.
Setting Variables from a Script
using UnityEngine;
using UnityEngine.Localization.Components;

public class SmartStringExample : MonoBehaviour
{
    [SerializeField] private LocalizeStringEvent localizeStringEvent;

    void Start()
    {
        // Set variables via Arguments (recommended)
        localizeStringEvent.StringReference.Arguments = new object[] { 5 };
        localizeStringEvent.RefreshString();
    }
}
Smart Strings variables: Use placeholders like
{0}and{1}; values are assigned in the order of theArgumentsarray. For named variables, add a Variable withLocalizedString.Add().
Practical: Building a Language Dropdown
An RPG's options screen, a puzzle game's settings, a visual novel's title—every multilingual game has a "language" dropdown somewhere. Let's assemble the parts we've covered so far (Locale, PlayerPrefs Selector) into this classic piece of UI.
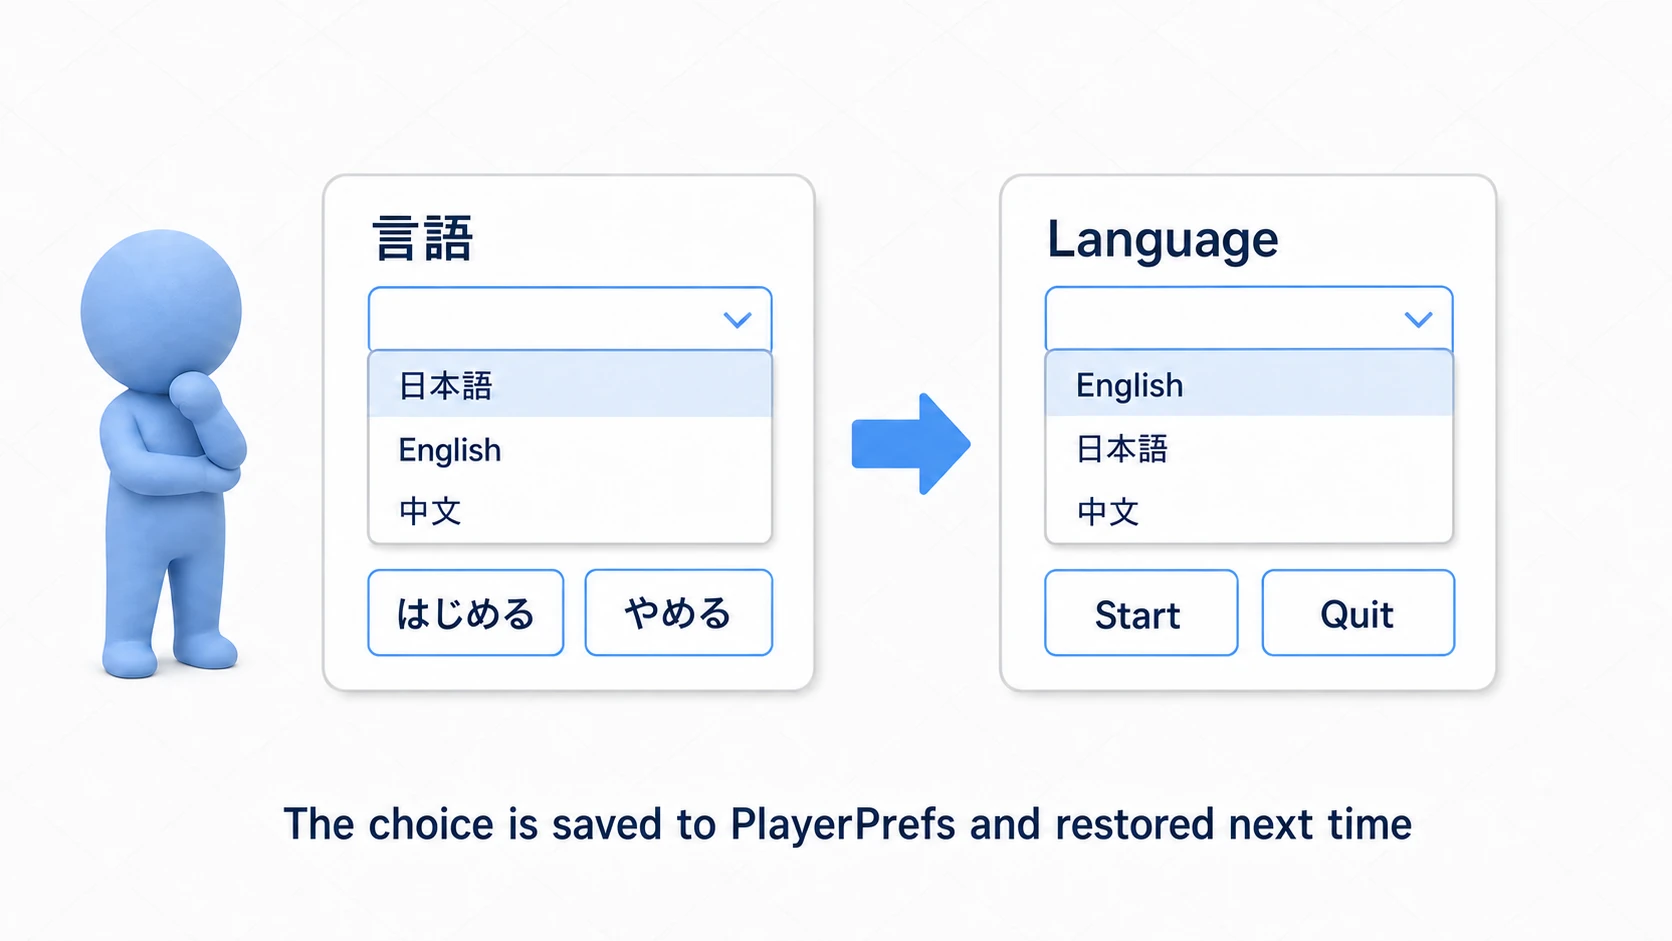
Line up the available Locales in a TMP_Dropdown and switch on selection.
using System.Collections;
using UnityEngine;
using UnityEngine.Localization.Settings;
using TMPro;

public class LanguageDropdown : MonoBehaviour
{
    [SerializeField] private TMP_Dropdown dropdown;

    IEnumerator Start()
    {
        // Wait until initialization finishes (it can be uninitialized right after launch)
        yield return LocalizationSettings.InitializationOperation;

        // Populate the dropdown with the available Locales
        dropdown.ClearOptions();
        var locales = LocalizationSettings.AvailableLocales.Locales;
        foreach (var locale in locales)
        {
            dropdown.options.Add(new TMP_Dropdown.OptionData(locale.LocaleName));
        }

        // Select the current language and sync the displayed value
        dropdown.value = locales.IndexOf(LocalizationSettings.SelectedLocale);
        dropdown.RefreshShownValue();

        // Switch the language when the selection changes
        dropdown.onValueChanged.AddListener(index =>
        {
            LocalizationSettings.SelectedLocale = locales[index];
            // With a PlayerPrefs Selector configured, the choice is saved and restored automatically
        });
    }
}
There are two key points.
- Switching is a single assignment to
SelectedLocale: every text driven by aLocalize String Eventis replaced across the whole screen at that instant. You don't need to write per-UI update code. - Leave saving to the PlayerPrefs Selector: if you set the
PlayerPrefs Selectorto top priority back in the Locale Selector section, both saving the choice and restoring it on the next launch happen automatically. Writing your ownPlayerPrefs.SetStringis the fallback for when you don't use a Selector.
Testing
Switching Languages in the Game View
- A
Localedropdown appears in the toolbar at the top of the Game View - Click it to switch languages
- Changes are reflected in real time, even in Play Mode
The Preview Window
- Open
Window > Asset Management > Localization Tables - Select a table
- Click an entry to display the Preview
- Check how it renders in each language
Testing from a Script
#if UNITY_EDITOR
[UnityEditor.MenuItem("Debug/Switch to Japanese")]
static void SwitchToJapanese()
{
    var locale = LocalizationSettings.AvailableLocales.GetLocale("ja");
    LocalizationSettings.SelectedLocale = locale;
}

[UnityEditor.MenuItem("Debug/Switch to English")]
static void SwitchToEnglish()
{
    var locale = LocalizationSettings.AvailableLocales.GetLocale("en");
    LocalizationSettings.SelectedLocale = locale;
}
#endif
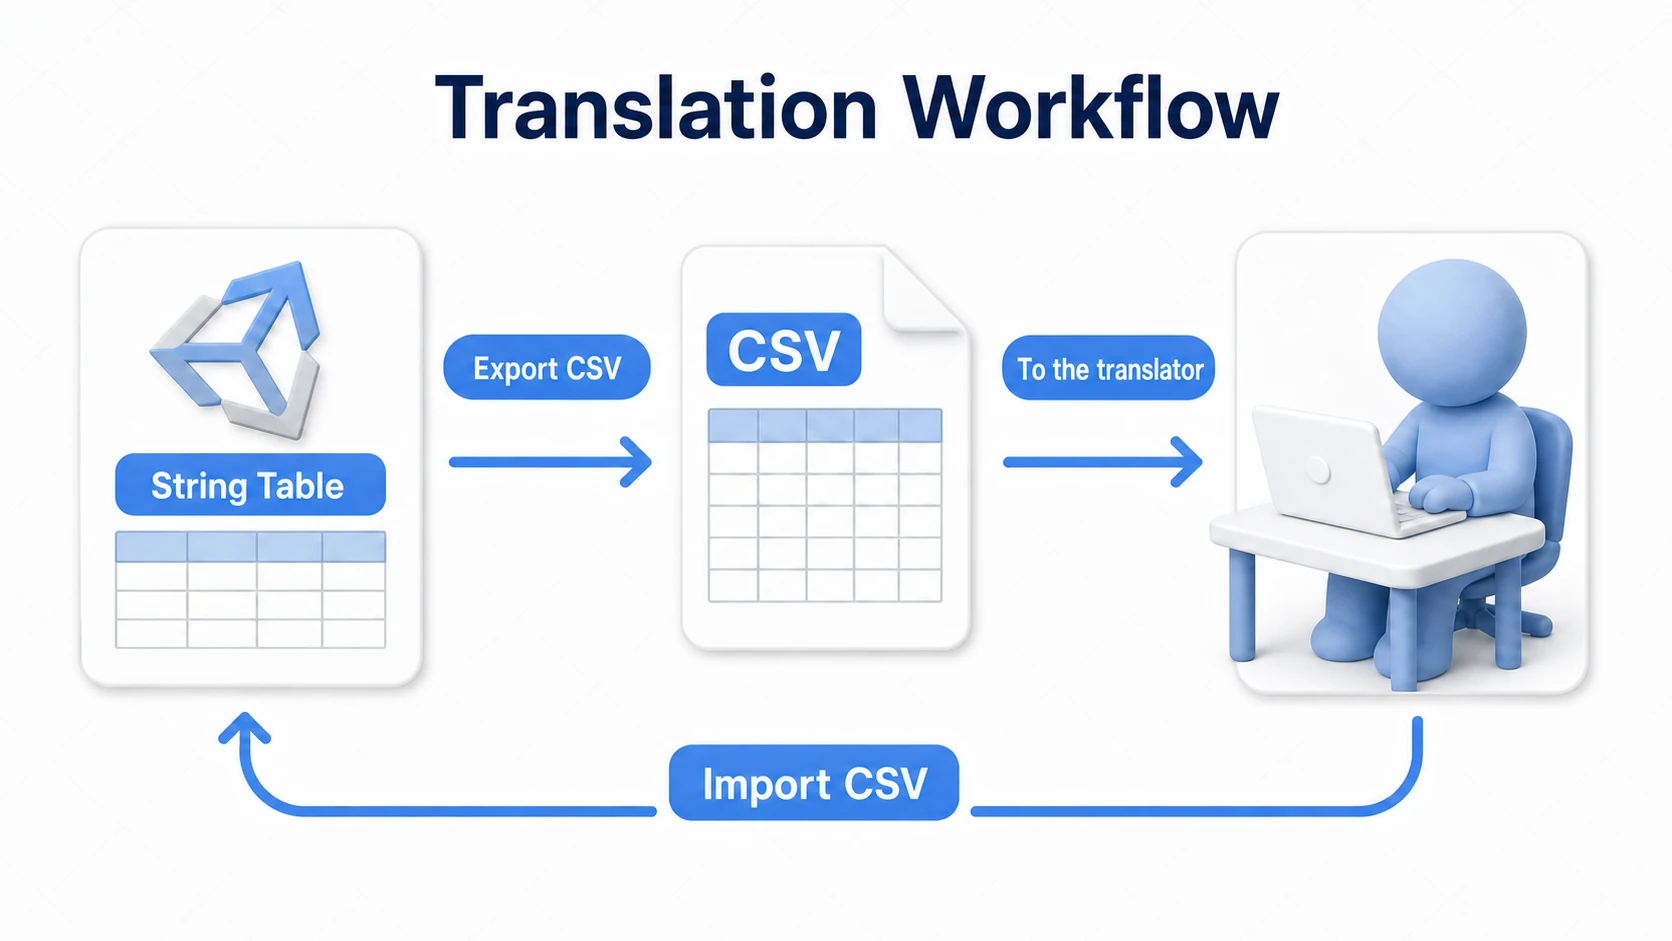
Managing Tables with CSV
Exporting to CSV
- Select a table in the Localization Tables window
- Choose
Export > CSV...from the menu in the top right
Importing from CSV
- Select a table in the Localization Tables window
- Choose
Import > CSV...from the menu in the top right
Google Spreadsheets Integration
The Google Spreadsheets Service makes collaboration with translators even smoother.
Setup Steps
- Install
Google Sheets for Unityfrom the Package Manager (found under Samples) - Create a service account in the Google Cloud Console
- Download the JSON key and place it in your project
- Add a
Google Sheets Servicein the Localization Settings - Configure the credentials
Important (handling the credentials): the service account's JSON key is a secret. Never commit it to a Git repository (add it to
.gitignore; this matters doubly for public repos). If it leaks, third parties can operate your Google account's resources.
More details: For the full Google Spreadsheets integration procedure, refer to the official Unity documentation.
Addressables Integration
Impact on Build Size
When you add multilingual support, the text and assets for every language are included in the build, which can significantly increase build size. This is especially noticeable when:
- You support a large number of languages
- You use a different font for each language
- You localize large assets such as audio or textures
Integrating with Addressables solves this problem. For large projects, Addressables integration lets players download only the languages they need. The mechanics of Addressables itself are covered in Getting Started with Addressables.
How to Set It Up
- Install the Addressables package
- Open the Localization Settings
- Change
Asset DatabasetoAddressables - Place each Locale in its own Addressable group
Benefits
- Smaller downloads: Load only the languages you need
- On-demand loading: Fetch only the required assets when switching languages
- Remote delivery: Supports distributing language packs from a CDN
Summary
The Unity Localization package is a powerful tool for making your Unity project multilingual.
- Localize text, images, and audio - Managed with String Tables and Asset Tables
- Smart Strings - Localize dynamic strings naturally, following each language's grammar
- CSV / Google Spreadsheets integration - Smooth collaboration with translators
- Addressables integration - Load only the languages you need and cut download size
If you are aiming for the global market, the Unity Localization package is well worth adopting. Which language region will your game reach next?