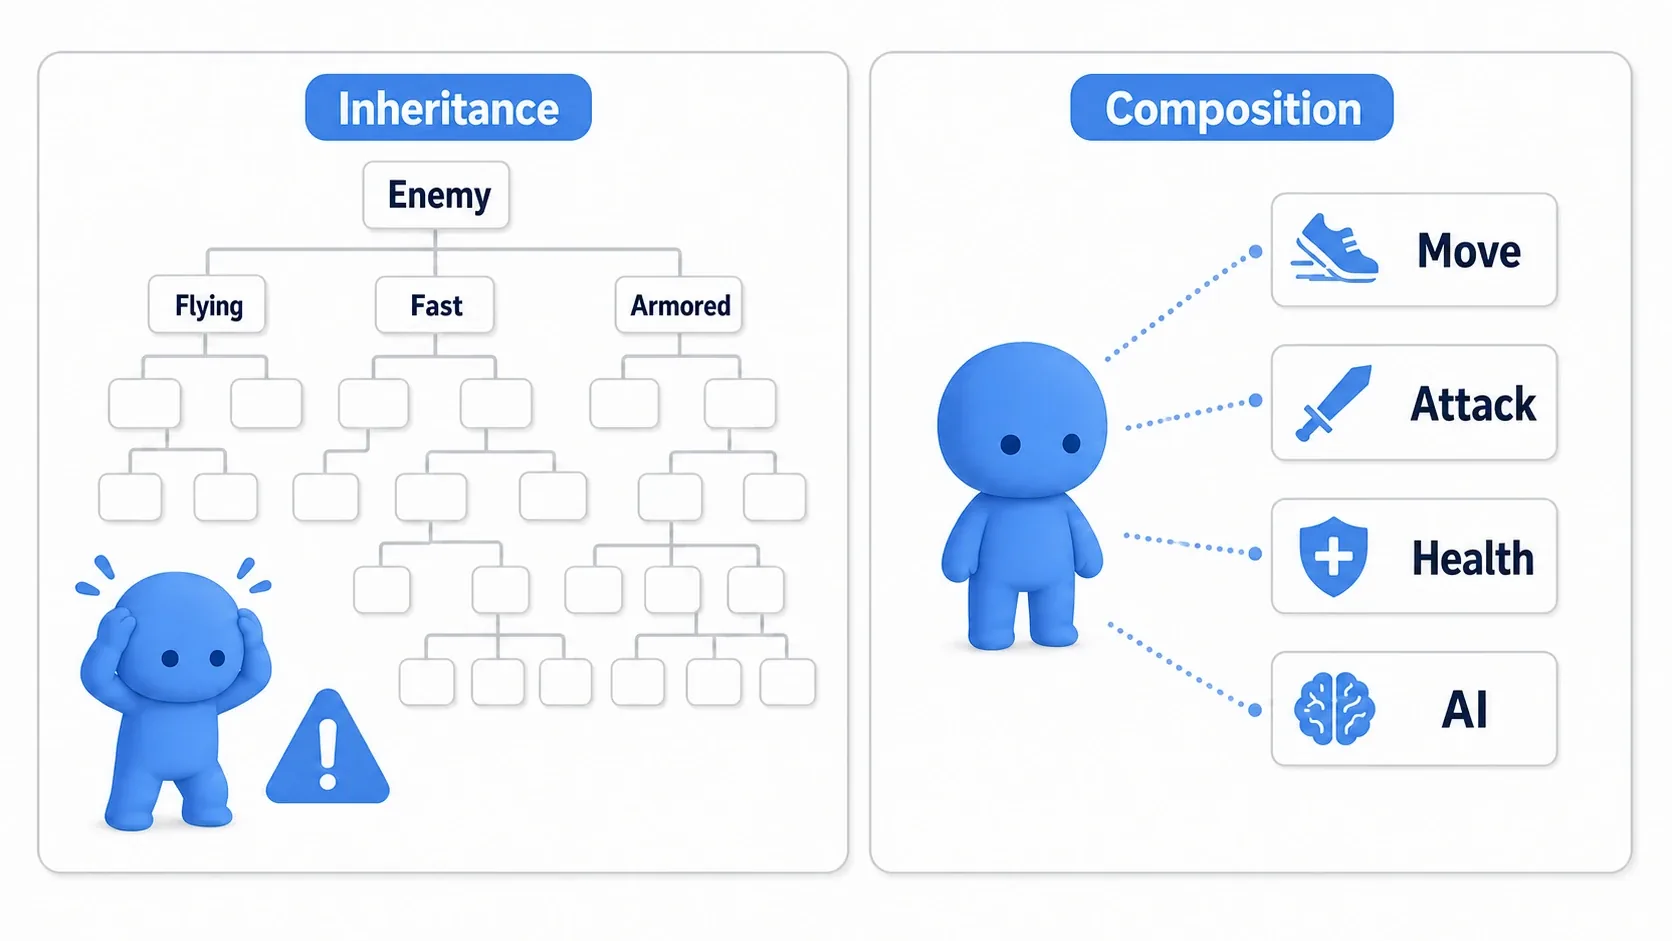
Every new enemy adds another class like FlyingEnemy, FastEnemy, ArmoredEnemy, FlyingFastEnemy. Every new piece of equipment or buff makes it harder to find where attack power is actually calculated. Enemy spawn code ends up scattered across stages, waves, and event dialogue.
These problems aren't about how you write GDScript; they're about how you divide up your design. Design patterns have intimidating names, but in game development they're easier to grasp as "techniques for staying unbreakable as things grow."
What You'll Learn
- Where inheritance-only design starts to hurt
- The composition approach that fits Godot naturally
- The decorator approach for stacking equipment and buffs
- How to build a factory that centralizes enemy and item creation
- How to connect all three patterns to actual game features
- Design Patterns Are Tools for When Things Grow
- Start by Separating Inheritance from Composition
- Composition: Give Objects Features as Parts
- Decorator: Stack Equipment and Buffs Onto a Value
- Factory: Gather Creation Rules in One Place
- What It Looks Like When You Combine All Three
- Common Pitfalls
- Bonus: Good to Know Beforehand
- Summary
- Further Reading
Design Patterns Are Tools for When Things Grow
The first thing to get right is not memorizing design patterns as fancy names. As you build a game, code that worked fine at first starts to strain in these ways.
| Problem | Example | Why it hurts |
|---|---|---|
| Too many classes | Flying enemies, fast enemies, armored enemies, and their combinations | You write near-identical code over and over |
| Calculations scattered | Equipment, buffs, skills, difficulty modifiers | You can't trace why the final attack power is what it is |
| Spawn code scattered | Enemies created at stage start, in events, and in wave management | Adding a new enemy means editing many places |
The three patterns in this article each address one of those pains.
| Pattern | In one line | Where it fits in a game |
|---|---|---|
| Composition | Combine features as parts | Reuse movement, health, and attack logic across player and enemies |
| Decorator | Layer effects onto a base value or behavior | Change stats with equipment, buffs, and debuffs |
| Factory | Gather creation logic into a dedicated class | Create enemies, bullets, items, and NPCs by fixed rules |
For a small prototype, you don't need to force these in. Applying a pattern to logic that fits in one file just means more files to read. A good signal is when you catch yourself writing the same kind of code a third time, or editing several files for every change.
Start by Separating Inheritance from Composition
Inheritance comes up constantly in object-oriented programming. In Godot, you write extends CharacterBody2D or extends Node at the top of a script. That sets the foundation: "this script behaves as a CharacterBody2D."
# player.gd
extends CharacterBody2D
That kind of inheritance is natural. The player should move as a 2D physics character, so it extends CharacterBody2D.
The problem is trying to express every game-specific difference through inheritance too.
Enemy
├─ FlyingEnemy
├─ FastEnemy
├─ ArmoredEnemy
├─ FlyingFastEnemy
├─ FlyingArmoredEnemy
└─ FastArmoredEnemy
If the only enemy traits are "flies", "fast", and "armored", this is still readable. Add "poison attack", "ranged attack", "stronger at night", and "splits in two", and the combination classes explode.
That's where composition comes in. You give objects the parts that tend to vary: "the enemy has movement", "the enemy has an attack", "the enemy has health".
| Approach | When to use it | Example |
|---|---|---|
| Inheritance | Deciding the kind of foundation | Player extends CharacterBody2D |
| Composition | Combining features | Player has a MovementComponent |
The trick is asking "is this a kind of thing, or a part?" A Player is a kind of CharacterBody2D. Movement and attack logic aren't kinds of player; they're features the player has.
Composition: Give Objects Features as Parts
Godot's scene tree is built for composition from the start. Putting Sprite2D, CollisionShape2D, and AnimationPlayer under a Player scene is exactly that: building one character out of several parts.
Scripts work the same way. Here we'll use a top-down action game and turn movement into a part.
Example: Reusing Movement Between Player and Enemies
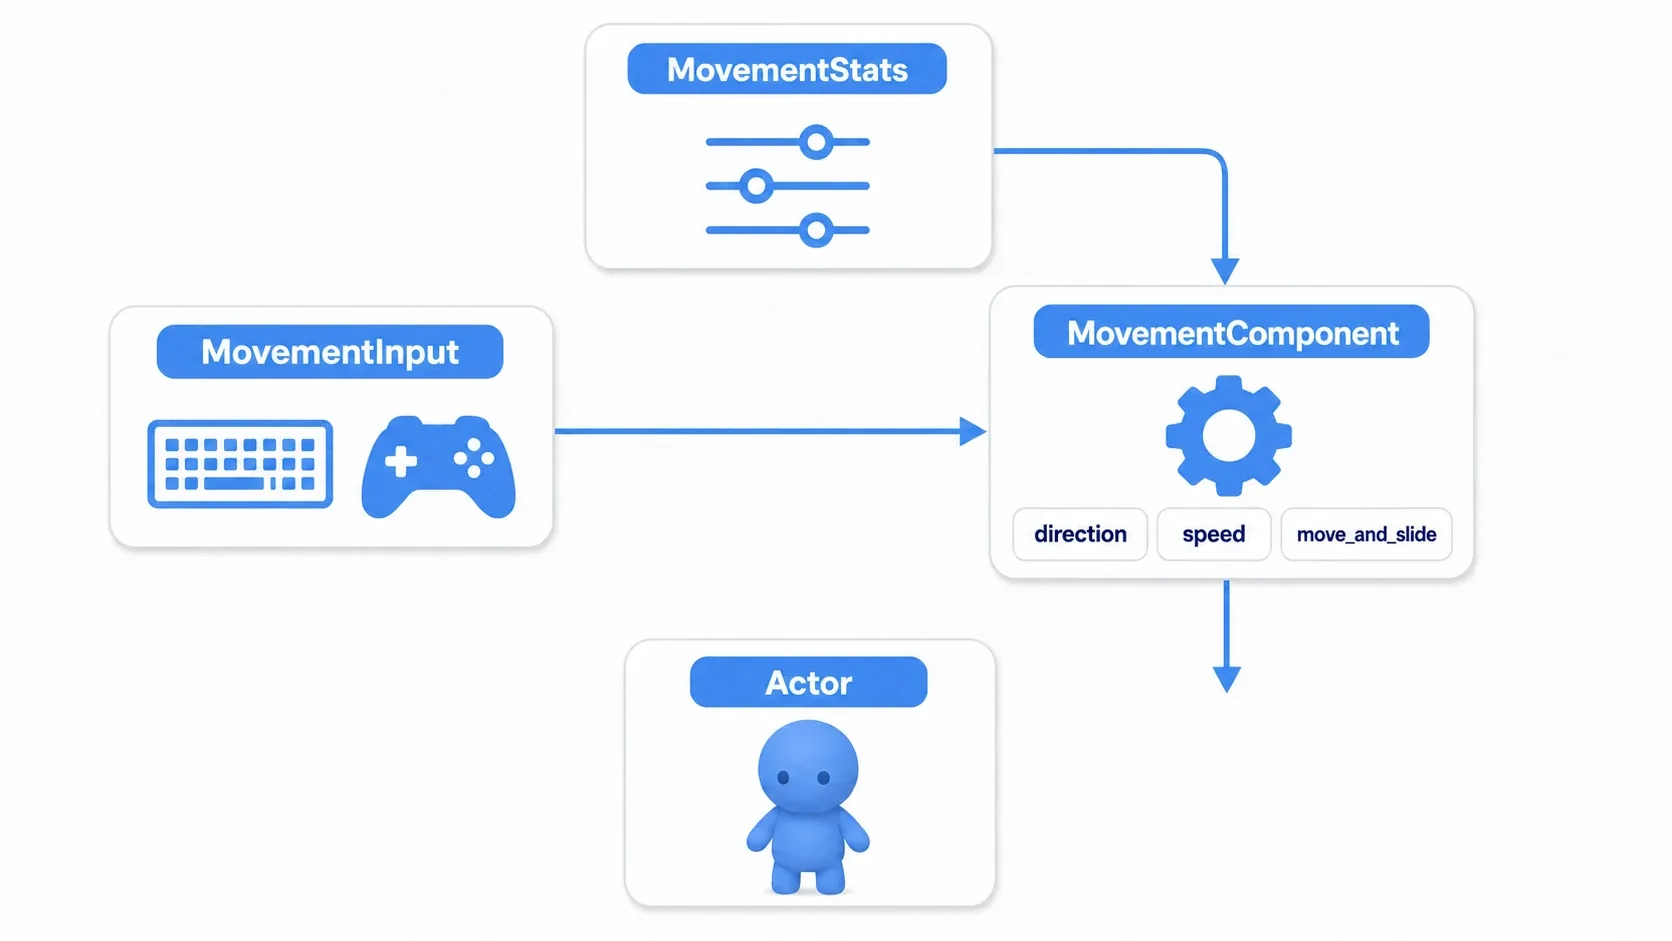
The player and enemies both move, but they get their direction differently.
- Player: read direction from keyboard or gamepad
- Enemy: decide direction from AI or a target position
Speed calculation and the move_and_slide() call can be shared. The only difference is deciding "which way do I want to go?"
First, make the movement parameters a Resource. As a Resource, you can easily author data sets in the editor for "fast enemies" or "heavy enemies".
# movement_stats.gd
class_name MovementStats
extends Resource

@export var max_speed: float = 200.0
@export var acceleration: float = 800.0
@export var friction: float = 600.0
Next, create a base class that returns an input direction. Whether it's player input or enemy AI, as long as it returns a Vector2 direction, the movement component can treat them identically.
# movement_input.gd
class_name MovementInput
extends Node

func get_input_direction() -> Vector2:
    return Vector2.ZERO
# player_input.gd
class_name PlayerInput
extends MovementInput

func get_input_direction() -> Vector2:
    # The input part only answers "which way do I want to go?"
    return Input.get_vector("ui_left", "ui_right", "ui_up", "ui_down")
The movement component takes the input direction and the movement data, and actually moves the CharacterBody2D.
# movement_component.gd
class_name MovementComponent
extends Node

@export var stats: MovementStats
@export var input_path: NodePath

@onready var input: MovementInput = get_node(input_path) as MovementInput

func update_movement(actor: CharacterBody2D, delta: float) -> void:
    if stats == null or input == null:
        return

    # Receive only a direction, without knowing what kind of input it came from
    var direction := input.get_input_direction()

    if direction != Vector2.ZERO:
        actor.velocity = actor.velocity.move_toward(
            direction * stats.max_speed,
            stats.acceleration * delta
        )
    else:
        actor.velocity = actor.velocity.move_toward(
            Vector2.ZERO,
            stats.friction * delta
        )

    # Keep the responsibility of actually moving inside MovementComponent
    actor.move_and_slide()
Finally, the player itself calls the movement component.
# player.gd
extends CharacterBody2D

@onready var movement: MovementComponent = $MovementComponent

func _physics_process(delta: float) -> void:
    # The player itself only "uses the movement part"
    movement.update_movement(self, delta)
The scene setup looks like this.
Player (CharacterBody2D)
├─ CollisionShape2D
├─ Sprite2D
├─ PlayerInput
└─ MovementComponent
Set MovementComponent's input_path to ../PlayerInput and the movement component uses player input. Build an EnemyInput and swap it in, and the same MovementComponent works for enemies.
Implementation Recipe: Player and Enemies in an Action Game
When you want "the player and enemies to share the same sense of acceleration" in an action game, building it in this order keeps things tidy.
- Turn speed, acceleration, and friction into data with
MovementStats - Use
MovementInputas a base and split it intoPlayerInputandEnemyChaseInput - Have
MovementComponenttake the input direction and handle only speed calculation - Put the same
MovementComponentin both the player and enemy scenes - Express per-character differences by swapping
MovementStatsandMovementInput
With this shape, tweaks like "make only the enemies slippery" or "raise only the player's top speed" become data swaps instead of rewrites of movement logic. When a bug appears, it's also easier to tell whether it's a speed calculation problem or an input direction problem.
Decorator: Stack Equipment and Buffs Onto a Value
Next is the decorator. A decorator wraps an existing value or behavior so you can add effects on top later.
An RPG makes it easy to picture.
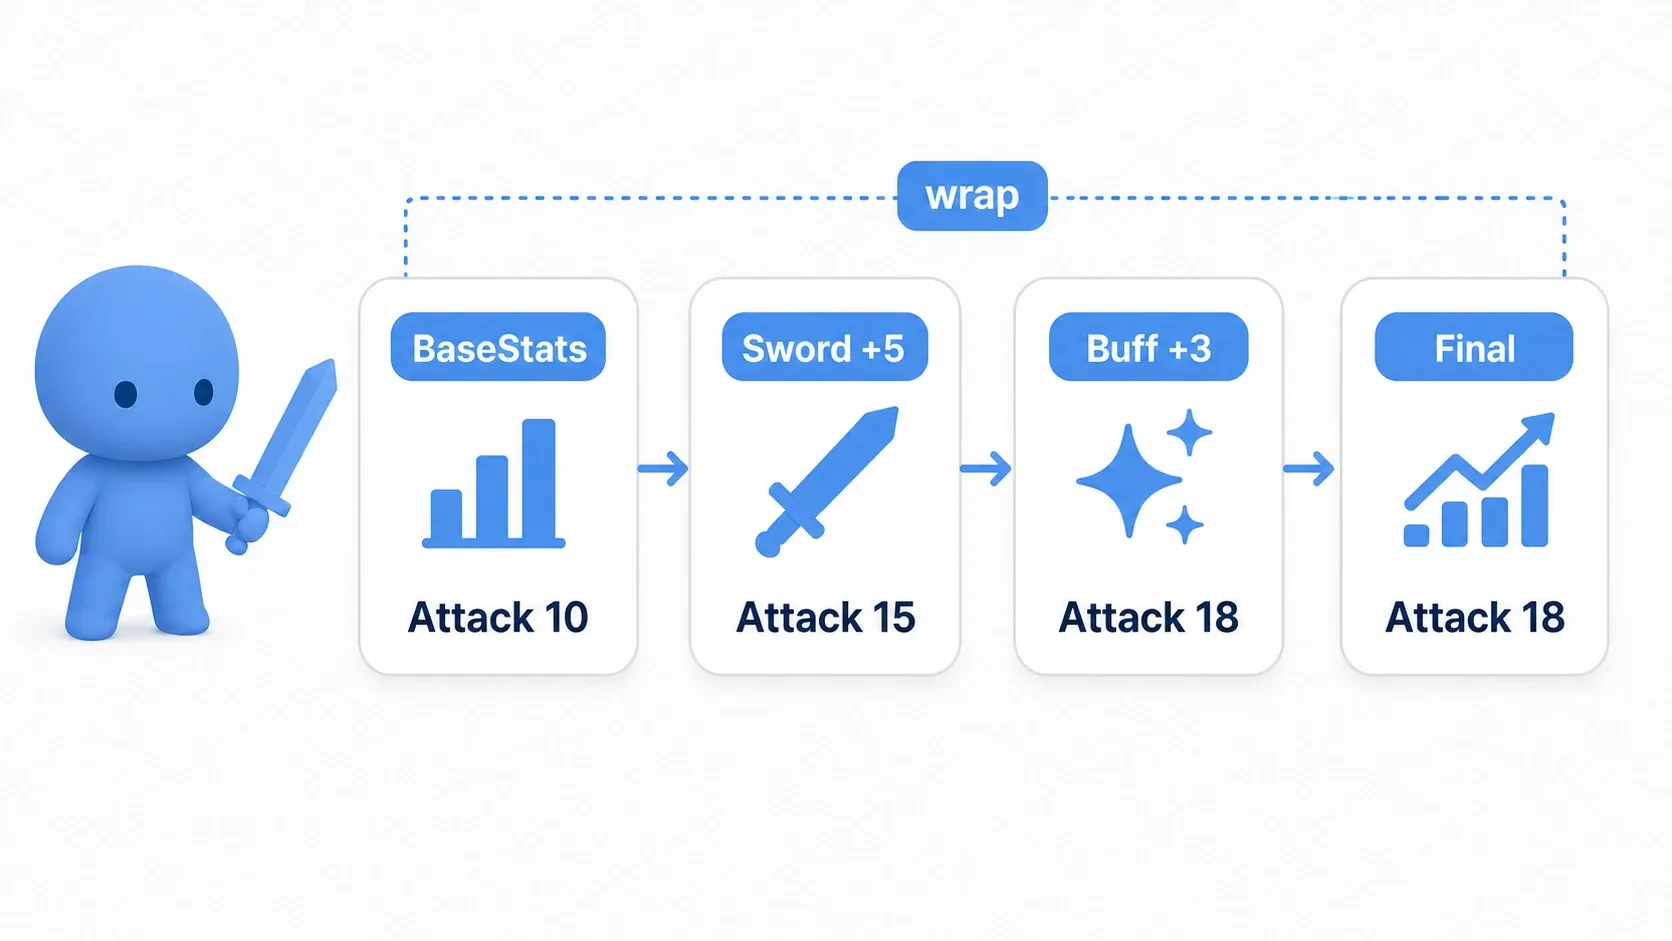
- Base attack: 10
- Sword equipped: +5
- Attack-up buff: +3
- Final attack: 18
Making classes like "player with a sword" and "player with a sword and a buff" falls apart immediately, because every new piece of equipment, buff, debuff, cooking effect, and difficulty modifier multiplies the combinations.
Example: Stacking Stat Calculations
First, define a shared type for reading stats. Here we use RefCounted as a lightweight calculation object rather than a Node placed in the scene.
# player_stats.gd
class_name PlayerStats
extends RefCounted

func get_attack() -> int:
    return 0

func get_defense() -> int:
    return 0
A class that returns the base stats.
# base_player_stats.gd
class_name BasePlayerStats
extends PlayerStats

var base_attack: int = 10
var base_defense: int = 5

func get_attack() -> int:
    return base_attack

func get_defense() -> int:
    return base_defense
Next, a base decorator that wraps another PlayerStats.
# stats_decorator.gd
class_name StatsDecorator
extends PlayerStats

var wrapped_stats: PlayerStats

func _init(stats: PlayerStats) -> void:
    # Hold the original stat calculation inside
    wrapped_stats = stats

func get_attack() -> int:
    return wrapped_stats.get_attack()

func get_defense() -> int:
    return wrapped_stats.get_defense()
And a decorator that raises attack.
# attack_boost_stats.gd
class_name AttackBoostStats
extends StatsDecorator

var bonus_attack: int

func _init(stats: PlayerStats, bonus: int) -> void:
    super(stats)
    bonus_attack = bonus

func get_attack() -> int:
    # Add this bonus on top of the inner result
    return wrapped_stats.get_attack() + bonus_attack
On the calling side, you stack effects onto the base stats.
var stats: PlayerStats = BasePlayerStats.new()
print(stats.get_attack()) # 10

# Equip a sword for +5
stats = AttackBoostStats.new(stats, 5)
print(stats.get_attack()) # 15

# An attack-up buff for another +3
stats = AttackBoostStats.new(stats, 3)
print(stats.get_attack()) # 18
The key point is that the player itself never needs to know how attack power is calculated in detail. The player just calls stats.get_attack() and gets the final value with equipment and buffs already applied.
Implementation Recipe: RPG Equipment and Temporary Buffs
For equipment and buffs in an RPG, think of it this way.
- Put the player's base values in
BasePlayerStats - Treat swords, rings, cooking effects, and skill effects as "effects that change stats"
- When attacking or updating UI, read
stats.get_attack()with the currently active effects applied - When a buff expires, remove that effect and recalculate
That said, decorators are simple when you only ever remove the most recently added effect. Removing an effect from the middle, or refreshing a buff of the same type, gets awkward.
In those cases, don't cling to a strict decorator. Holding an array of StatModifier entries and summing them is often easier to implement.
# For games with many equipment items and buffs, an array is sometimes easier
var attack_modifiers: Array[int] = [5, 3, -2]

func get_total_attack(base_attack: int) -> int:
    var total := base_attack

    for modifier in attack_modifiers:
        # Sum up the active modifiers in order
        total += modifier

    return total
What matters here isn't the strict shape of the decorator pattern; it's the idea of layering effects onto a base value to produce a final value. In a game that keeps adding equipment, buffs, difficulty modifiers, and stage effects, just holding that idea keeps your design far more organized.
Factory: Gather Creation Rules in One Place
Last is the factory. A factory collects the creation logic for things like enemies and items into a dedicated place.
Say you write code like this at stage start, when a chest opens, and at the start of a tower defense wave.
# Spawn code that easily ends up scattered everywhere
var enemy = preload("res://enemies/goblin.tscn").instantiate()
enemy.global_position = spawn_position
enemy.health = 50
enemy.speed = 100
add_child(enemy)
That's fine at first. But once you want to change goblin HP, add a new enemy, or set drop rates on spawn, the number of places to edit keeps growing.
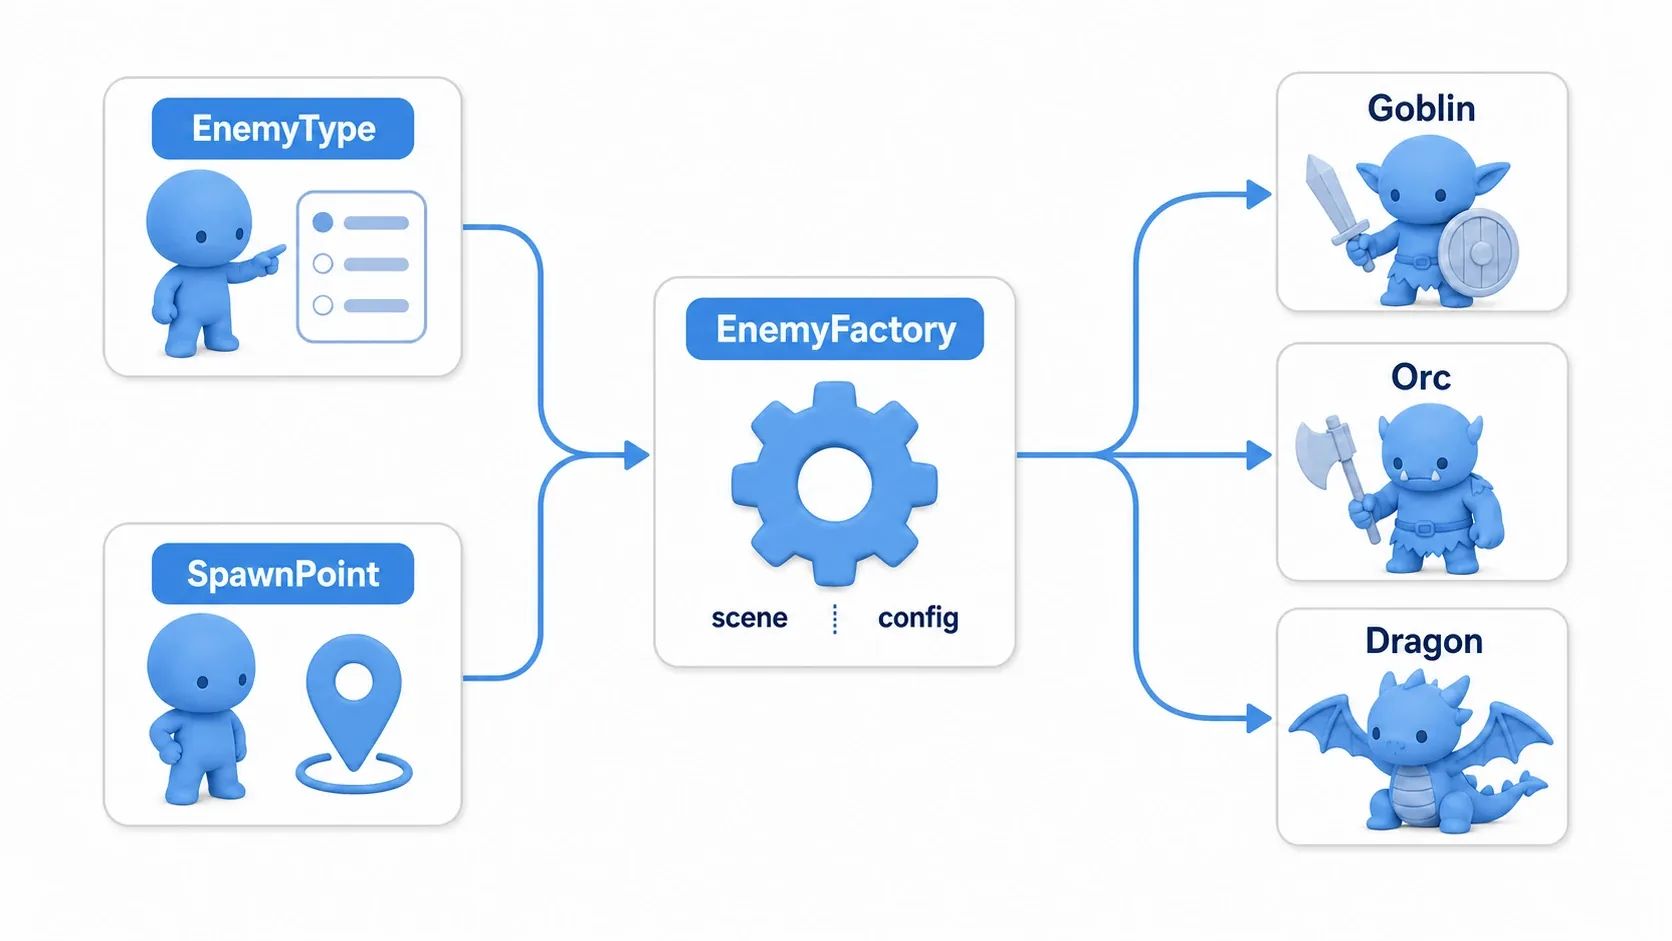
The caller should only say "spawn a goblin at this position" and leave the specific scene and initial values to the factory.
Example: Centralizing Enemy Creation in EnemyFactory
# enemy_factory.gd
class_name EnemyFactory
extends Node

enum EnemyType { GOBLIN, ORC, DRAGON }

const ENEMY_SCENES = {
    EnemyType.GOBLIN: preload("res://enemies/goblin.tscn"),
    EnemyType.ORC: preload("res://enemies/orc.tscn"),
    EnemyType.DRAGON: preload("res://enemies/dragon.tscn"),
}

const ENEMY_CONFIGS = {
    EnemyType.GOBLIN: { "health": 50, "speed": 100 },
    EnemyType.ORC: { "health": 120, "speed": 75 },
    EnemyType.DRAGON: { "health": 500, "speed": 45 },
}

func create_enemy(type: EnemyType, position: Vector2) -> Node2D:
    if not ENEMY_SCENES.has(type):
        push_error("Unknown enemy type: %s" % type)
        return null

    # The factory decides which scene to spawn and what the initial values are
    var enemy: Node2D = ENEMY_SCENES[type].instantiate()
    var config: Dictionary = ENEMY_CONFIGS[type]

    enemy.global_position = position
    enemy.health = config["health"]
    enemy.speed = config["speed"]

    return enemy
The calling side gets much shorter.
# wave_spawner.gd
extends Node2D

@onready var factory: EnemyFactory = $EnemyFactory

func spawn_wave() -> void:
    var spawn_points := [
        Vector2(100, 120),
        Vector2(180, 120),
        Vector2(260, 120),
    ]

    for point in spawn_points:
        # Only describe which enemy goes where
        var enemy := factory.create_enemy(EnemyFactory.EnemyType.GOBLIN, point)

        if enemy != null:
            add_child(enemy)
Implementation Recipe: Tower Defense Waves
In tower defense, spawn rules multiply quickly, because wave number, enemy type, spawn interval, spawn position, and difficulty modifiers all interact.
Splitting the roles like this keeps it readable.
| Role | What it owns |
|---|---|
WaveSpawner | When, how many, and in what order to spawn |
EnemyFactory | Which scene and initial values an enemy type maps to |
Enemy scene | Actual movement, attacking, and death logic |
If WaveSpawner knows everything, tweaking wave presentation means reading enemy stat code too. Keeping creation rules in EnemyFactory lets you reason about "spawn order" and "how an enemy is built" separately.
Factories also work for villager creation in RPGs, item generation in roguelikes, and bullet creation in shooters. That said, games that fire huge numbers of bullets often use an object pool to avoid creation cost. That's a separate topic, so here it's enough to take away the idea of gathering creation rules in one place.
What It Looks Like When You Combine All Three
In real games, these three patterns are usually combined by role rather than used alone.
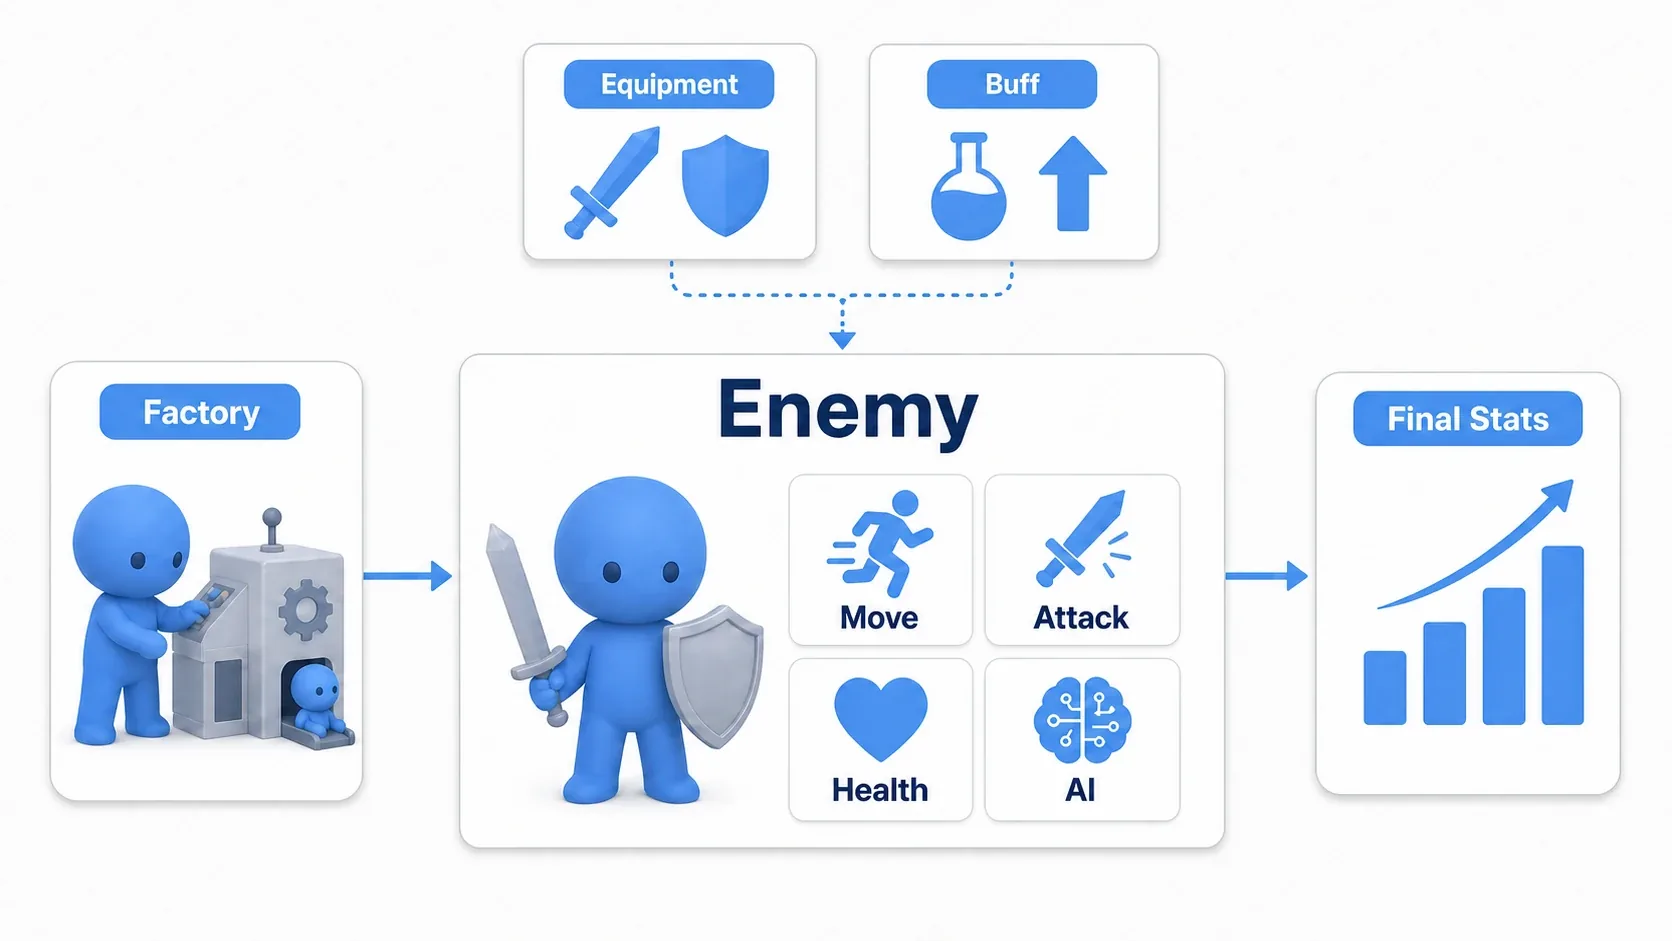
For an action RPG enemy, the split might look like this.
| Concern | Approach used | Concrete example |
|---|---|---|
| Spawning enemies | Factory | EnemyFactory.create_enemy(EnemyType.ORC, position) |
| Enemy features | Composition | MovementComponent, HealthComponent, AttackComponent |
| Temporary boosts | Decorator | +20% attack while enraged, lowered defense while poisoned |
The benefit of this split is that reasons to change are separated.
- Adding a new enemy type:
EnemyFactory - Changing how movement feels:
MovementComponentorMovementStats - Changing how equipment and buffs calculate: the stat calculation side
When files are separated by reason to change, "where do I edit this?" becomes easy to answer. It looks unglamorous while you're a beginner, but it pays off more and more as the game grows.
Common Pitfalls
Committing to Patterns Too Early
Trying to "design it perfectly from day one" produces classes you don't need yet. In a prototype, it's fine to build the straightforward thing and get it running.
These signs, though, mean it's time to reorganize.
- You've copied similar code into three or more places
if enemy_type == ...shows up in several files- Class names are all combinations of traits
- You can't trace where a final attack or HP value was decided
Coupling Components Too Tightly
Even with composition, if each component starts reaching for distant nodes with get_node("../../SomeNode"), things break just as easily.
Prefer passing the needed information down from the parent, wiring references with @export, or notifying via signals. The point of splitting into parts isn't to create more files; it's to make dependencies visible.
Decorator Removal Logic Gets Complicated
Decorators are clear for stacking effects, but removing an arbitrary effect from the middle tends to get complicated.
If you stack "sword + buff + poison" and then want to drop just the buff in the middle, peeling off the outermost layer won't do it. In games with many buffs and debuffs, managing StatModifier entries in an array with durations and priorities is a better fit.
The Factory Becomes a Catch-All
A factory handles creation, but it isn't the place for enemy AI decisions, wave progression, score updates, or playing effects.
Keeping the factory's job to "what to build, and what initial values to set" keeps it manageable. What happens after creation belongs to the enemy and its components; when to spawn belongs to the spawner.
Bonus: Good to Know Beforehand
Using Resources Well Makes Godot Designs Lighter
Composition sounds like it means adding Nodes, but not everything has to be a Node.
- Tunable data like speed, HP, and attack power:
Resource - Features that need per-frame processing:
Node - Characters that exist in the scene:
CharacterBody2DorNode2D
Splitting this way keeps the scene tree from getting needlessly deep. Enemy and item data in particular pairs well with the follow-up article on custom Resources.
You Don't Have to Avoid Inheritance Entirely
This article emphasized the pain of inheritance, but inheritance isn't bad.
Extending Godot foundations like CharacterBody2D, Control, Resource, and RefCounted is natural. Gathering the minimal logic common to all enemies into a BaseEnemy is often perfectly readable too.
What to avoid is trying to express combinations like "flies", "fast", "armored", and "poisonous" entirely through a class hierarchy.
When in Doubt, Split by Reason to Change
When a design decision is unclear, this question helps.
What has to change for this code to need editing?
New enemy types mean the factory; a different movement feel means the movement component; more equipment effects mean the stat calculation. The more you pack things with different reasons to change into one file, the harder it becomes to read later.
Summary
- Design patterns are organization techniques for staying unbreakable as things grow
- Use inheritance to set the foundation, and composition to turn variable features into parts
- Decorator is the idea of layering effects like equipment and buffs to produce a final value
- Factory is the idea of gathering enemy and item creation rules in one place
- Build straightforwardly while things are small, and adopt patterns once copy-paste, combination explosion, and scattered spawn code show up
The goal of learning design patterns isn't memorizing names. It's being able to ask "where should this logic live so it's easy to change later?"